
type
status
date
slug
summary
tags
category
icon
password
📚 ⚙️ Integrations
本页汇总了 ⚙️ Integrations 相关的常见问题(共 67 个)
▶ Adding your POD as a Production Partner on Etsy
Once you add a production partner for a specific POD, it will be automatically
assigned to all the products you publish from that POD with Customily. So it's
better if you add your POD as a Production Partner before publishing.
💡 Important:
If you've published products and you don't have the POD added as a Production
Partner, fulfillment of these products won't work. Make sure you add a production partner to them following these instructions.
To add a Production Partner
Sign in to your Etsy store, and go to your production partner manager:
- In Shop Manager , choose Settings.
- Select **Production partners**.
- Select Add a new production Partner and fill out the following information about your POD:
Production partner – Use the name of your POD (ie: Printify, Printful, Gelato, etc) (Check table below to make sure the name will be recognized. Link)
- Location – Use the POD location
- About production partner – "A production partner"
- About your partnership :
- Select – I don't have the technical ability to make it entirely by myself
- Select – I design everything myself
- Select – They do everything for me
The information not marked Private will be shared publicly in your shop.
- Once done, you can click Show Preview to see how it will appear in
your store.
- Click Save Partner and you are done!
If you have more questions, you can check Etsy's guide on Production Partners:
Note: Check the following table to make sure the Production Partner will
be recognized.
POD | Production Partner Name
---|---
Casestry | casestry
CustomCat | customcat
Gearment | gearment
Gelato | gelato
Printful | printful
Printify | printify
Shine On | shineon
TeeLaunch | teelaunch
The full color Co. | the-full-color-company
▶ Step 1: Creating Option Sets in BigCommerce
Option sets are a native functionality from BigCommerce.
To learn how to add options to your product you can follow this great tutorial
by BigCommerce
Options that are compatible with Customily, and that will work with the
preview are:
Text field
An option where customers can type their own text.
Multi-line text field
An option where customers can type their own text in multiple lines
Dropdown (Multiple Choice)
An option where customers can choose a value from an expandable list. It can
be used to select fonts, colors, styles, and almost anything!
Swatches
An option where customers can choose a value from a series of icons. It can be
used to select fonts, colors, styles, and almost anything!
Similar to the dropdown, but with much more visual feedback.
File upload field
An option where customers can click a button and upload their own image into
the product
Checkbox
An option for customers to check the selection. Very useful if you want
customers to state they have read and verified their personalization.
##
Adding Print file and Preview options
In order to receive the print file and preview thumbnail on your orders, you
will need to add these as options on your product. Don't worry this options
won't be visible to your customers, it's just so you'll get them with the
order info.
To do this, simply add 2 text filed options with the following names:
customily production file
view your personalization
The first option will add the print file to the order, if you are using one of
Customily's preview + production plans.
The second option will make sure you receive a copy of the preview customers
where seeing when buying with the order. It will also make the preview
available in the cart.
▶ Connecting your BigCommerce products with Customily
Connecting your BigCommerce products with your Customily preview requires you
to follow 2 easy steps.
1. Creating option sets
Create groups of options to use on your products. This is done entirely on the
BigCommerce side, so it's most likely you already know how to do this, and
that your products already have them!
But if they don't here's a summary of the different option types you can
create are:
- Text inputs
- Dropdowns
- Swatches
- Image (file) upload
- Checkbox
2. Assigning previews to your BigCommerce products
Connect your BigCommerce product listing and its options with the
personalization template created on Customily's design studio.
▶ Adding a production partner to your published Etsy products.
If you've published products and you don't have the POD added as a Production
Partner, fulfillment of these products won't work. Make sure you follow the
instructions below to avoid any disruptions with fulfillment.
- In Etsy, navigate to Shop Manage ”, followed by Listings. Click on
the individual product listing you've created with Customily to edit it.
- Scroll down to Production Partners and click **Add a new production
partner**.
- To create a new production partner, enter the following details:
- Production partner – Use the name of your POD (ie: Printify, Printful, Gelato, etc. without spaces)
- Location – Use the POD location
- About production partner – "A production partner"
- About your partnership :
- Select – I don't have the technical ability to make it entirely by myself
- Select – I design everything myself
- Select – They do everything for me
- Once done, you can click Show Preview to see how it will appear in
your store.
Make sure you show the production partner's real name for the fulfillment
process to be successful.

- Save the production partner and check the box to indicate that you're
using this partner.
Once added, this production partner will be available in your list of
production partners for every product, and you will only need to check the
box.

- Save the changes you've made to the product by clicking “Publish”.
If you have more questions, you can check Etsy's guide on Production Partners:
▶ Where do I get the personalization information on my BigCommerce orders?
All the personalization information from an order will appear in your
BigCommerce Order manager.
This information includes:
- All the personalization fields the customer entered. For example text inputs, color choices, etc.
- A link to the preview the customer was seeing when buying.
- A link to the production file (if you are using Customily's Preview + Production Plan).
- If your product lets customers upload their own picture, a link to the raw uploaded picture.
Important
To be able to see the preview and the print file on your order information,
this things need to be added as options on your product options. Learn how to
do that here.
To find your personalization information within the order
- Browse to BigCommerce Order manager.
- Find the customer order you want to get the information from and click to
expand it and view the details.
- In the right section of the order details, you will find the fields the
customer entered, the dropdowns and swatches he chose, a link to the
preview , and a link to the image uploaded by him (if your product has image upload), and the production file link(if you are using our preview + production plans).
Tip
To download the production file just copy the URL in a new tab of your
browser. The file will be downloaded on your browser's defined download
folder.
▶ Retrieving the personalization details via API
If you receive a lot of orders and you want to automate the personalization
details retrieval process, our API will come very handy. This example will
cover the basics of our Walmart API using postman
so you can then port it to any language.
These API features are part of our Preivew and Production plans.
First of all, you'll need to obtain an access token by calling at the
following endpoint
https://app.customily.com/api/token
as shown below (make sure you use the POST method)
You'll receive an access token (as the one shown below). You will use this
token to make authenticated requests to the
https://customily.walmart.com/api/item endpoint.
Call the https://customily.walmart.com/api/item endpoint, remember to
include the access token in the header request and the PONumber (order number)
as a query string parameter. Make sure to attach the string "Bearer" followed
by the accesstoken_ as shown in the screenshot below
It will return a JSON that has the following structure:
[ { "id": "9E633A40-FA2A-466D-970B-2EAE0303148C", "lineNumber": 1, "productName": "Men's Cuff Bangle Stainless Steel", "sku": "BA005886RE", "quantity": 1, "productId": "4e8e3225-4b8e-4a99-a31c-b22878880894", "previewUrl": "https://customily.walmart.com/assets/previews/1d4bd0c0-261f-437b-85a9-126e3482283a.jpeg", "productionUrl": "https://cdn.customily.com/ExportFile/anavia/8b3a96e0-1d8a-4dc8-9155-e5d0fae4581a.dxf", "optionsJson": "[{\"name\":\"Engraving\",\"value\":\"2020 BEST PAPA I LOVE YOU\",\"type\":\"Text Input\"},{\"name\":\"Font\",\"value\":\"Monotype Corsiva\",\"type\":\"Swatch\"}]", "createdDate": "2020-06-20T00:00:00.000Z", "poNumber": 2793546706844 }, { "id": "4ED9EA64-5766-430E-A104-2A140D71A9BC", "lineNumber": 2, "productName": "Men's Cuff Bangle Stainless Steel", "sku": "BA005886RE", "quantity": 1, "productId": "4e8e3225-4b8e-4a99-a31c-b22878880894", "previewUrl": "https://customily.walmart.com/assets/previews/e5854bff-5d15-41d0-95f6-ff8367bf99cb.jpeg", "productionUrl": "https://cdn.customily.com/ExportFile/anavia/63574dff-9e2c-414d-8adb-33f34cc9a73a.dxf", "optionsJson": "[{\"name\":\"Engraving\",\"value\":\"R • P • K\",\"type\":\"Text Input\"},{\"name\":\"Font\",\"value\":\"Monotype Corsiva\",\"type\":\"Swatch\"}]", "createdDate": "2020-06-20T00:00:00.000Z", "poNumber": 2793546706844 } ]
In this example, the client added 2 items to the cart. Each one having a
different personalization.
One of these items is shown below. This is the interface where the client
entered his personalization details.
The API response will contain all thepersonalization information the
client entered plus the Customily generated preview and **production files
**
id: Internal Customily Id unique to every line item
lineNumber: Line item number (order in which was added to the cart)
product Name: The name of the product on Walmart
sku: The product SKU from Walmart.
quantity: The quantity ordered for the product.
product id: The Customily template id for the ordered product.
previewUrl: link to the preview picture containing the client's
personalization.
productionUrl: link to the production file containing the client's
personalization.
optionsJson: the options the client selected (form the product's option set).
createdDate: the date when the product was added to the cart.
poNumber: Walmart's poNumber (order number)
You can download this postman example
Include Walmart order details
If you want to get both the Walmart order information + Customily's
personalization details in the same response, you'll have to include
orderDetails as a query string parameter:
i.e : https://customily.walmart.com/api/item?poNumber=2793546706844**&
orderDetails=true **
This pulls the Walmart order information from the following endpoint
<https://developer.walmart.com/#/apicenter/dsv#getAnOrder>
and combines it with the personalization details that are stored in Customily
This will return the complete Walmart order information and Customily's
personalziation details that will be stored on every "orderLine" object as a
"customily " field.
{
"purchaseOrderId": "2793546706844",
"customerOrderId": "4432087808878",
"customerEmailId": "B096B55FF345474AACCE014828A88CD5@relay.walmart.com",
"orderDate": 1592625015000,
"mart": "Walmart.com",
"shippingInfo": {
"phone": "4187347012",
"estimatedDeliveryDate": 1593543600000,
"estimatedShipDate": 1593050400000,
"methodCode": "Standard",
"postalAddress": {
"name": "PICKUP AT STORE",
"address1": "1265 Box Street",
"address2": "Sheri Schneider",
"city": "State College",
"state": "PA",
"postalCode": "16803",
"country": "USA",
"addressType": "OFFICE"
}
},
"orderLines": {
"orderLine": [ { "lineNumber": "1", "item": { "productName": "Men's Cuff Bangle Stainless Steel", "sku": "BA005886RE" }, "charges": { "charge": [ { "chargeType": "PRODUCT", "chargeName": "ItemPrice", "chargeAmount": { "currency": "USD", "amount": 17.99 }, "tax": { "taxName": "Tax1", "taxAmount": { "currency": "USD", "amount": 1.08 } } } ] }, "orderLineQuantity": { "unitOfMeasurement": "EACH", "amount": "1" }, "statusDate": 1592625798985, "orderLineStatuses": { "orderLineStatus": [ { "status": "Acknowledged", "statusQuantity": { "unitOfMeasurement": "EACH", "amount": "1" }, "cancellationReason": null, "trackingInfo": null, "returnCenterAddress": null } ] }, "refund": null, "originalCarrierMethod": "79", "fulfillment": { "fulfillmentOption": "S2S", "shipMethod": "STOREDELIVERY", "storeId": "1640", "pickUpDateTime": 1593543600000, "pickUpBy": "Sheri Schneider", "shippingProgramType": "THREETOFIVEDAY" }, "configId": "9e633a40-fa2a-466d-970b-2eae0303148c", "customily": { "guid": "9E633A40-FA2A-466D-970B-2EAE0303148C", "productId": "4e8e3225-4b8e-4a99-a31c-b22878880894", "previewUrl": "https://customily.walmart.com/assets/previews/1d4bd0c0-261f-437b-85a9-126e3482283a.jpeg", "productionUrl": "https://cdn.customily.com/ExportFile/anavia/8b3a96e0-1d8a-4dc8-9155-e5d0fae4581a.dxf", "optionsJson": "[{\"name\":\"Engraving\",\"value\":\"2020 BEST PAPA I LOVE YOU\",\"type\":\"Text Input\"},{\"name\":\"Font\",\"value\":\"Monotype Corsiva\",\"type\":\"Swatch\"}]", "createdDate": "2020-06-20T00:00:00.000Z" } }, { "lineNumber": "2", "item": { "productName": "Men's Cuff Bangle Stainless Steel", "sku": "BA005886RE" }, "charges": { "charge": [ { "chargeType": "PRODUCT", "chargeName": "ItemPrice", "chargeAmount": { "currency": "USD", "amount": 17.99 }, "tax": { "taxName": "Tax1", "taxAmount": { "currency": "USD", "amount": 1.08 } } } ] }, "orderLineQuantity": { "unitOfMeasurement": "EACH", "amount": "1" }, "statusDate": 1592625798985, "orderLineStatuses": { "orderLineStatus": [ { "status": "Acknowledged", "statusQuantity": { "unitOfMeasurement": "EACH", "amount": "1" }, "cancellationReason": null, "trackingInfo": null, "returnCenterAddress": null } ] }, "refund": null, "originalCarrierMethod": "79", "fulfillment": { "fulfillmentOption": "S2S", "shipMethod": "STOREDELIVERY", "storeId": "1640", "pickUpDateTime": 1593543600000, "pickUpBy": "Sheri Schneider", "shippingProgramType": "THREETOFIVEDAY" }, "configId": "4ed9ea64-5766-430e-a104-2a140d71a9bc", "customily": { "guid": "4ED9EA64-5766-430E-A104-2A140D71A9BC", "productId": "4e8e3225-4b8e-4a99-a31c-b22878880894", "previewUrl": "https://customily.walmart.com/assets/previews/e5854bff-5d15-41d0-95f6-ff8367bf99cb.jpeg", "productionUrl": "https://cdn.customily.com/ExportFile/anavia/63574dff-9e2c-414d-8adb-33f34cc9a73a.dxf", "optionsJson": "[{\"name\":\"Engraving\",\"value\":\"R • P • K\",\"type\":\"Text Input\"},{\"name\":\"Font\",\"value\":\"Monotype Corsiva\",\"type\":\"Swatch\"}]", "createdDate": "2020-06-20T00:00:00.000Z" } } ]
},
"paymentTypes": [ "PAYPAL" ],
"orderSummary": {
"totalAmount": {
"currencyAmount": 38.14,
"currencyUnit": "USD"
},
"orderSubTotals": [ { "subTotalType": "PRODUCT", "totalAmount": { "currencyAmount": 35.98, "currencyUnit": "USD" } }, { "subTotalType": "TAX", "totalAmount": { "currencyAmount": 2.16, "currencyUnit": "USD" } } ]
},
"pickupPersons": [ { "name": { "completeName": "Sheri Schneider", "firstName": "Sheri", "lastName": "Schneider" }, "phone": { "completeNumber": "4187347012" } } ]
}
If the order doesn't contain any Customily personalization details, the
"customily" field will show "This item wasn't personalized with Customily."
▶ How to load your personalization link into Walmart's Spreadsheet.
Loading the personalization from Customily into Walmart product requires you
to add the personalization link, into your product information through an Excel spreadsheet
you download from Walmart's supplier center.
To download your Walmart product Spreadsheet
- Go to the Add New Items section on your Walmart supplier center
- Click on **Bulk Item Setup
** 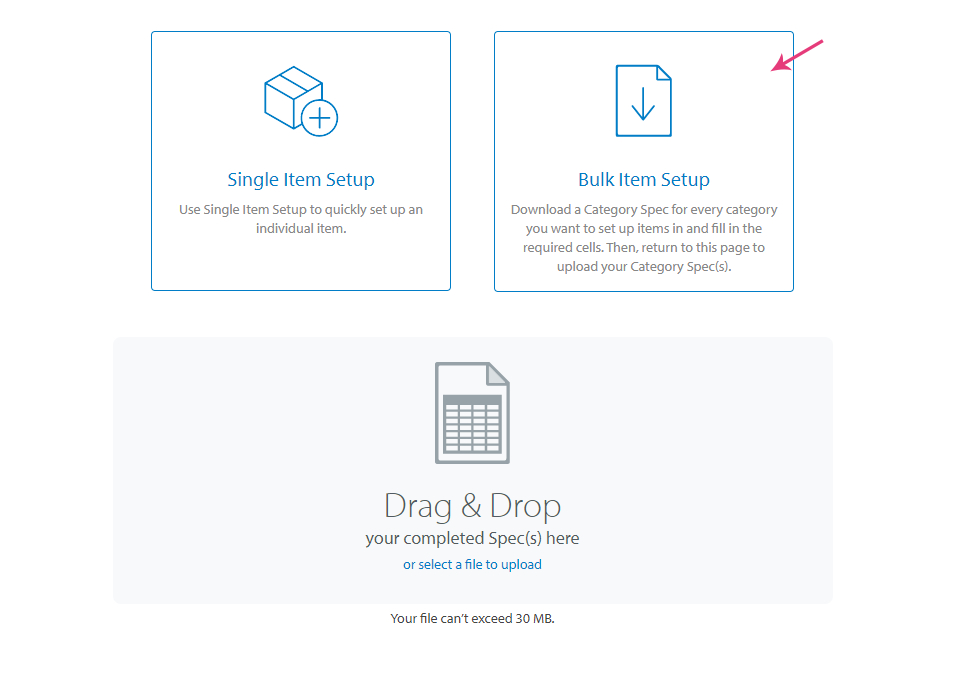
- You will be asked to select the category where you want to upload your product, select it and click the Download Spec button. This will download an Excel spreadsheet, where you'll be able to add the personalization link generated on Customily.
To add your personalization link into the spreadsheet
- Open the downloaded spreadsheet and make sure to enable macros by clicking
the Enable Content or Enable Macros button
- Select the sub-category where you want to upload your products
- Complete all the required fields for your product. You can add as many
products as you want here.
Note
Every time you save your spreadsheet it will check for errors or missing
fields, so make sure you have no errors before uploading the spreadsheet.
- Once you have all the fields completed with no errors you can add the
personalization fields. To do this go to the Walmart Toolbar on the
upper side and click on the Add Attribute button.
- Click on the Add Custom Attribute button to add custom attributes for
the personalization info.
- A dialog will appear for you to add the custom attributes. For
personalized products, Walmart needs 3 custom attributes
- personalizable ,
- personalization_type
- personalization_url
- After adding all the attributes you should have something like this. Click
on Finished to add the custom attributes to the spreadsheet
- The fields you just added will appear next to your already existing
fields. 
- Fill the new fields with the necessary values"
- in the personalizable field type "Yes"
- in the personalization_type field type URL
- in the personalization_url field paste the personalization URL you got from Customily
- Make sure you have no errors and save the spreadsheet.
To upload your updated spreadsheet into Walmart
- Access Walmart supplier center
- Drag and drop the updated spreadsheet into the upload section 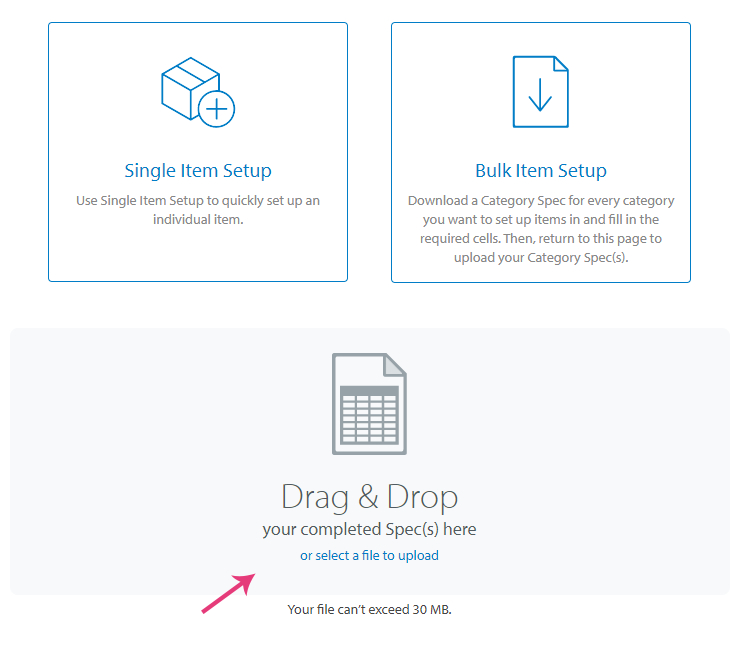
- Your products will now have a personalize button that will send customers to personalize the product while seeing Customily's live preview.
Tip
You can now check the status of the uploaded spreadsheet on your **Feed
Status** in the supplier center. You will be able to check the current status
and download an error report in case the spreadsheet has any errors
▶ How to create a user on your store for the Customily team.
During installation, our team will request you to create an account for us on
your store, so we can check that Customily is working perfectly with your
store's layout and design.
Follow these instructions to create the account for our team.
Creating an administrator account for Customily
- Log in to your Magento 2 store, and on the left menu, access **System >
All users**
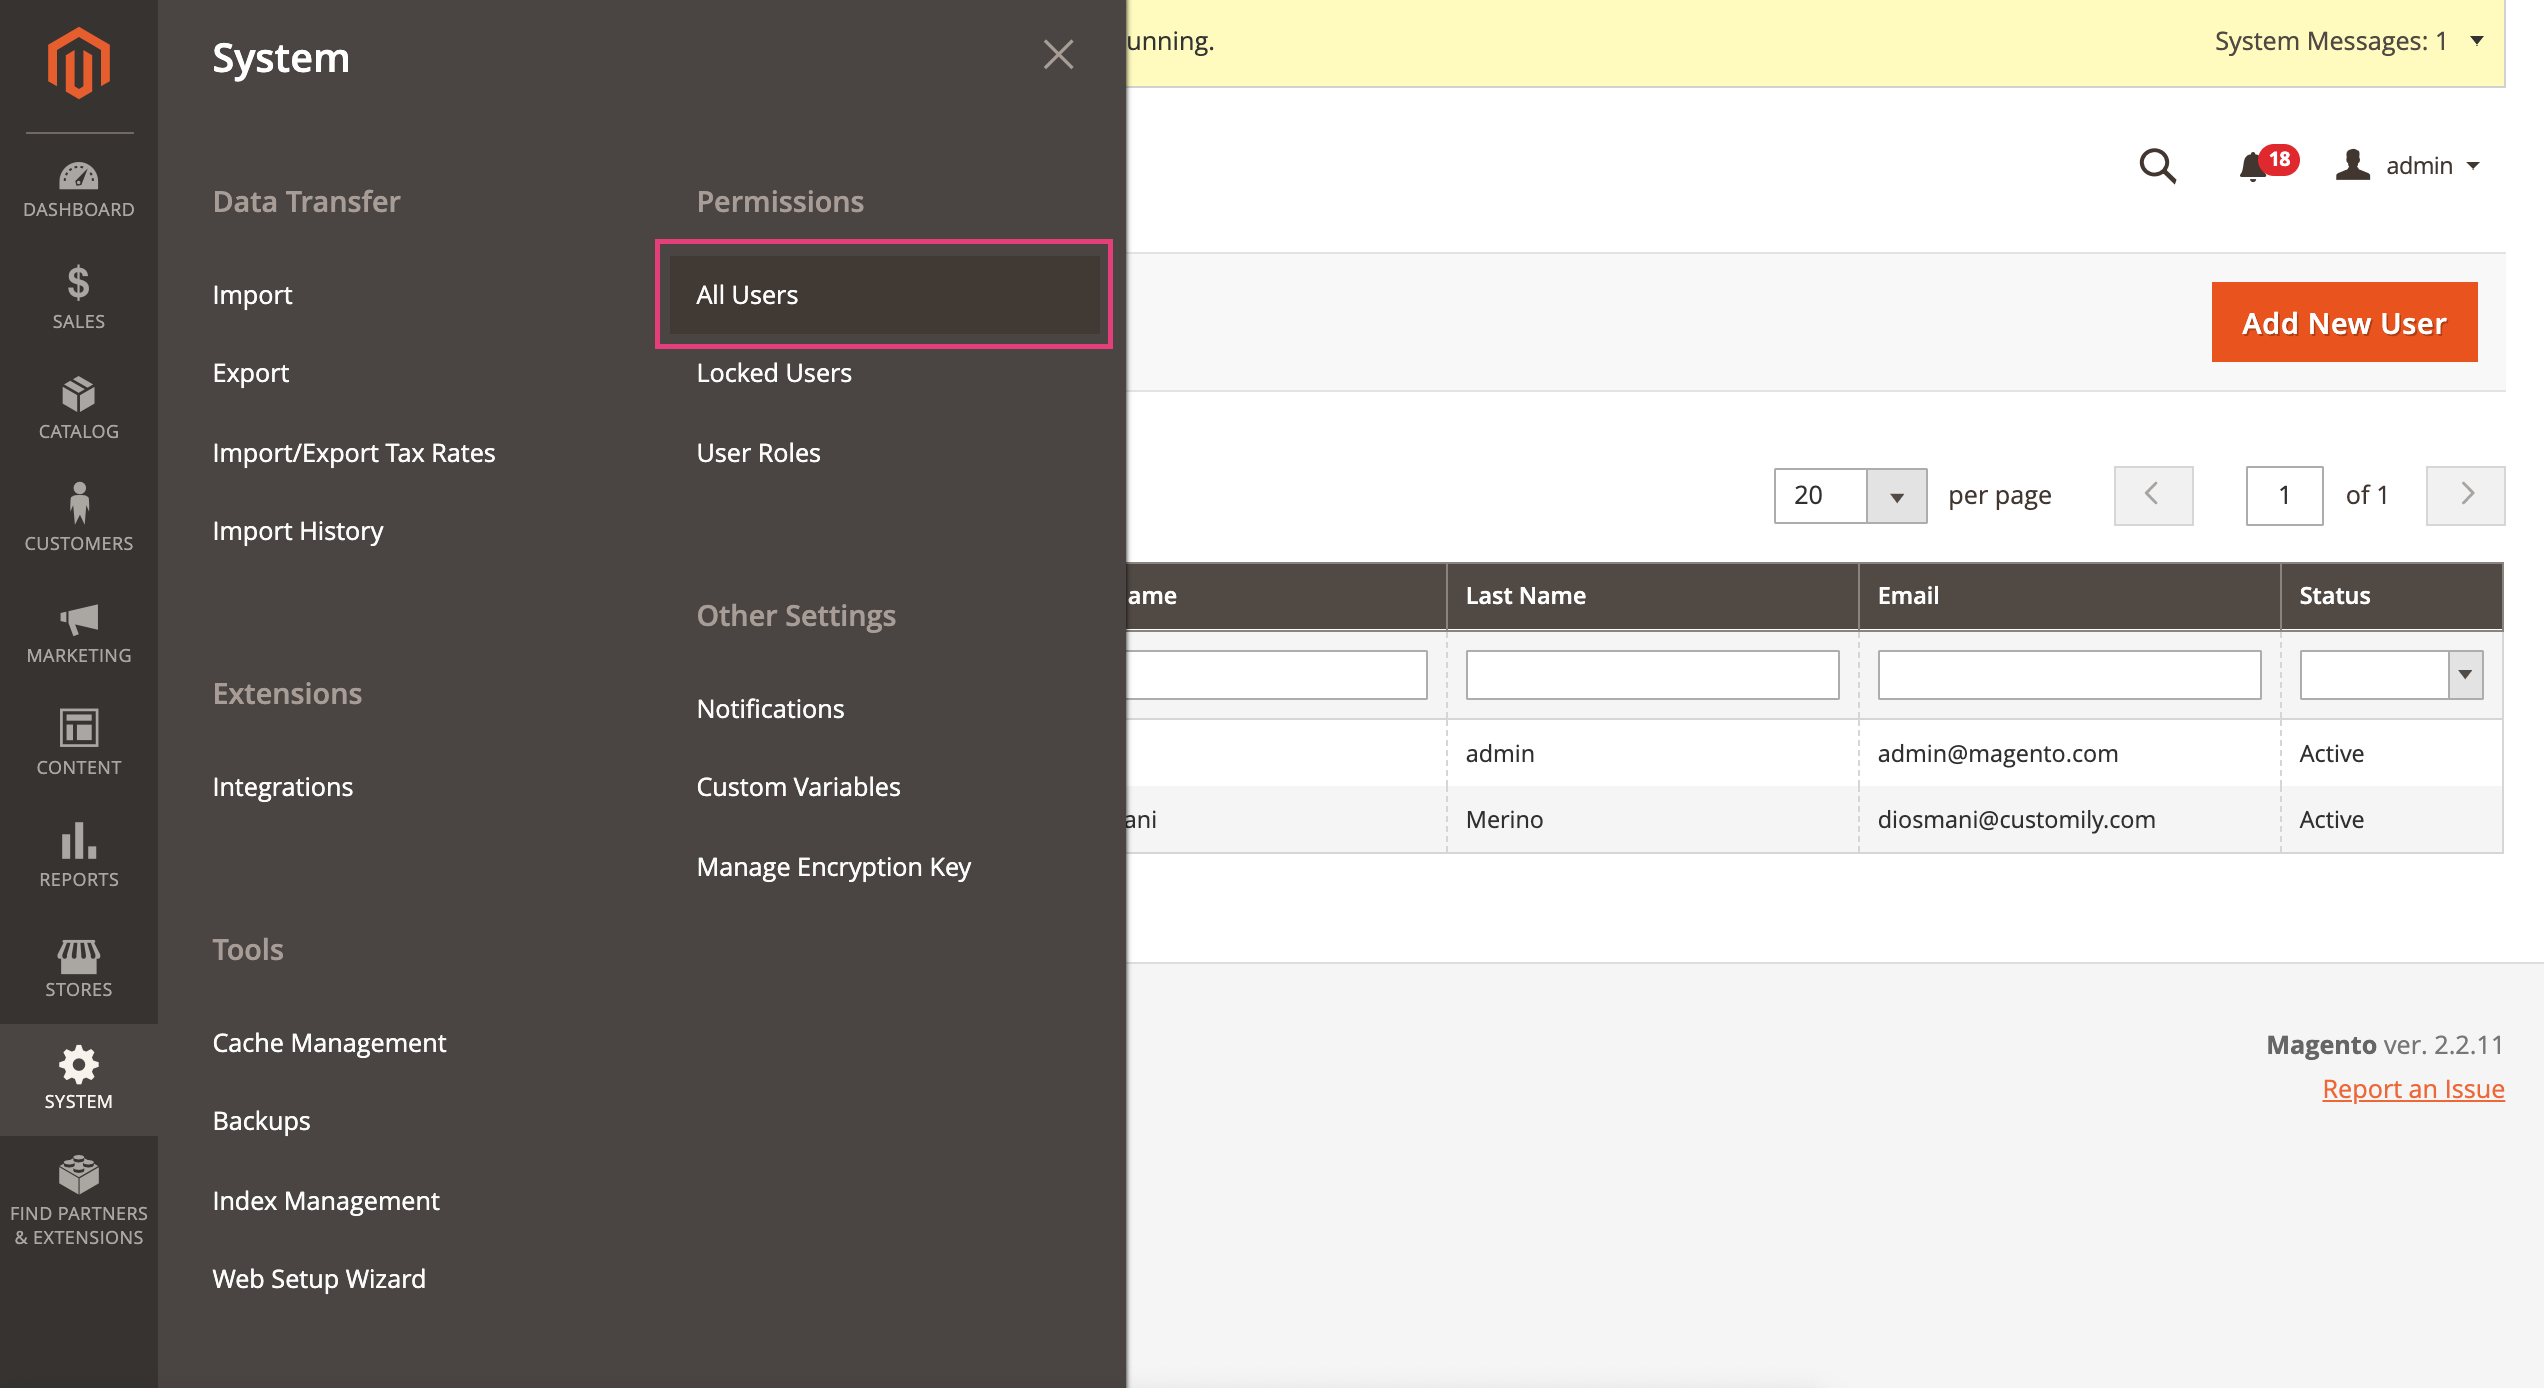
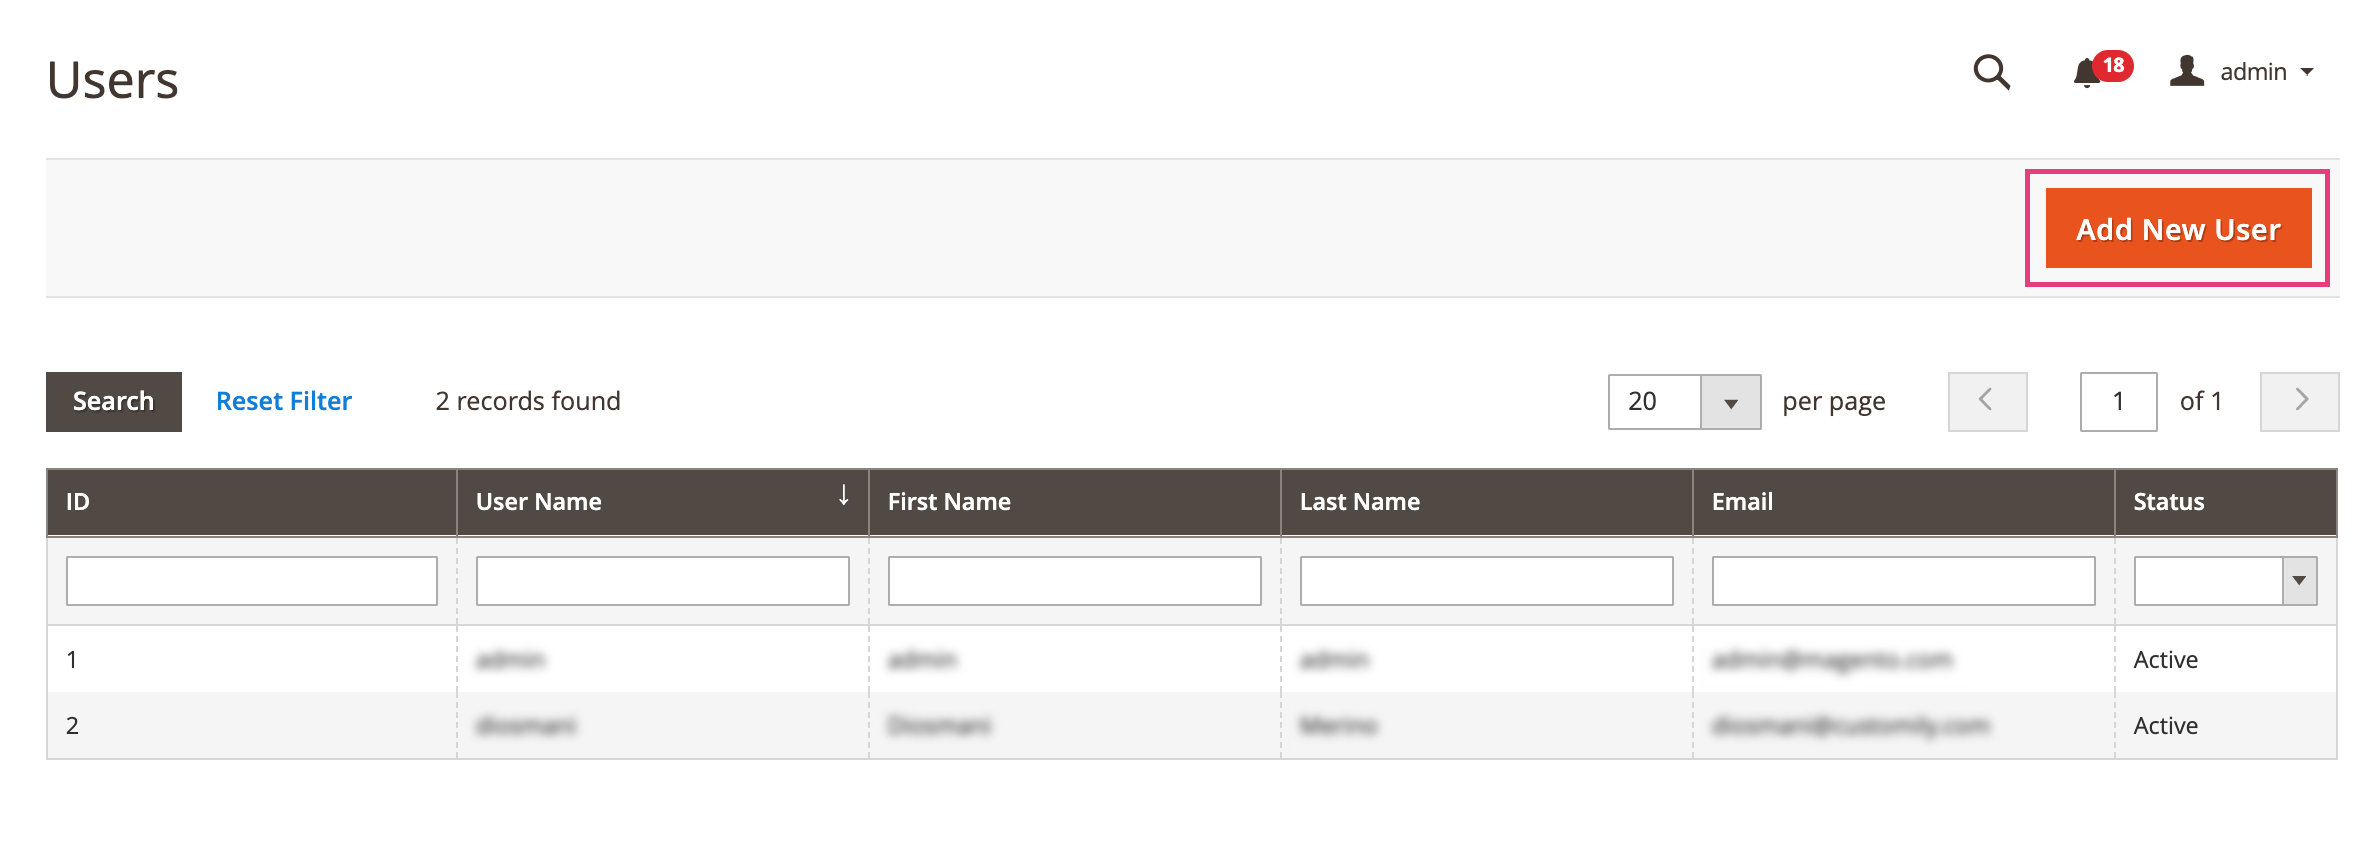
- Create a new user account, by clicking on Add new user.
- Fill the information for our user, and use the email
hello@customily.com to create the account
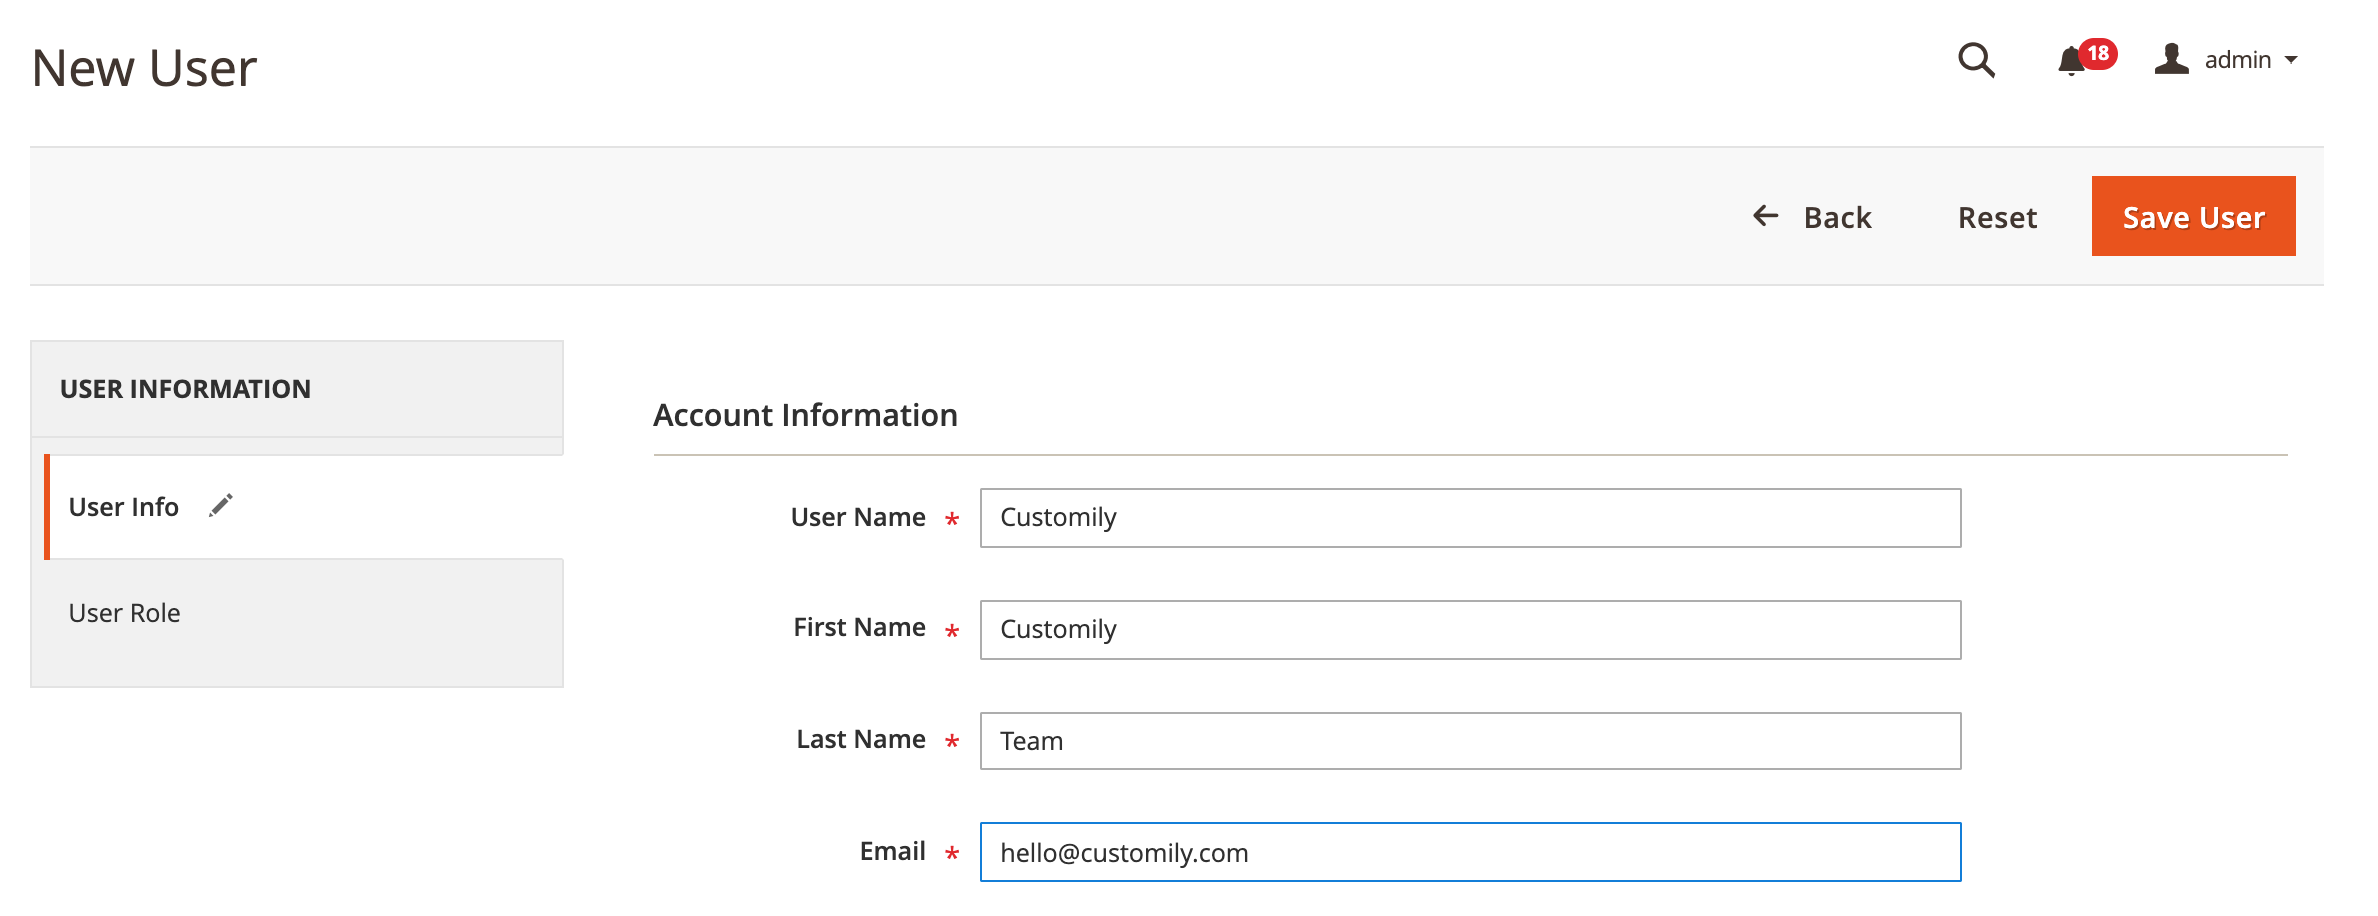
- Under User Role give the new account the role of Administrator.
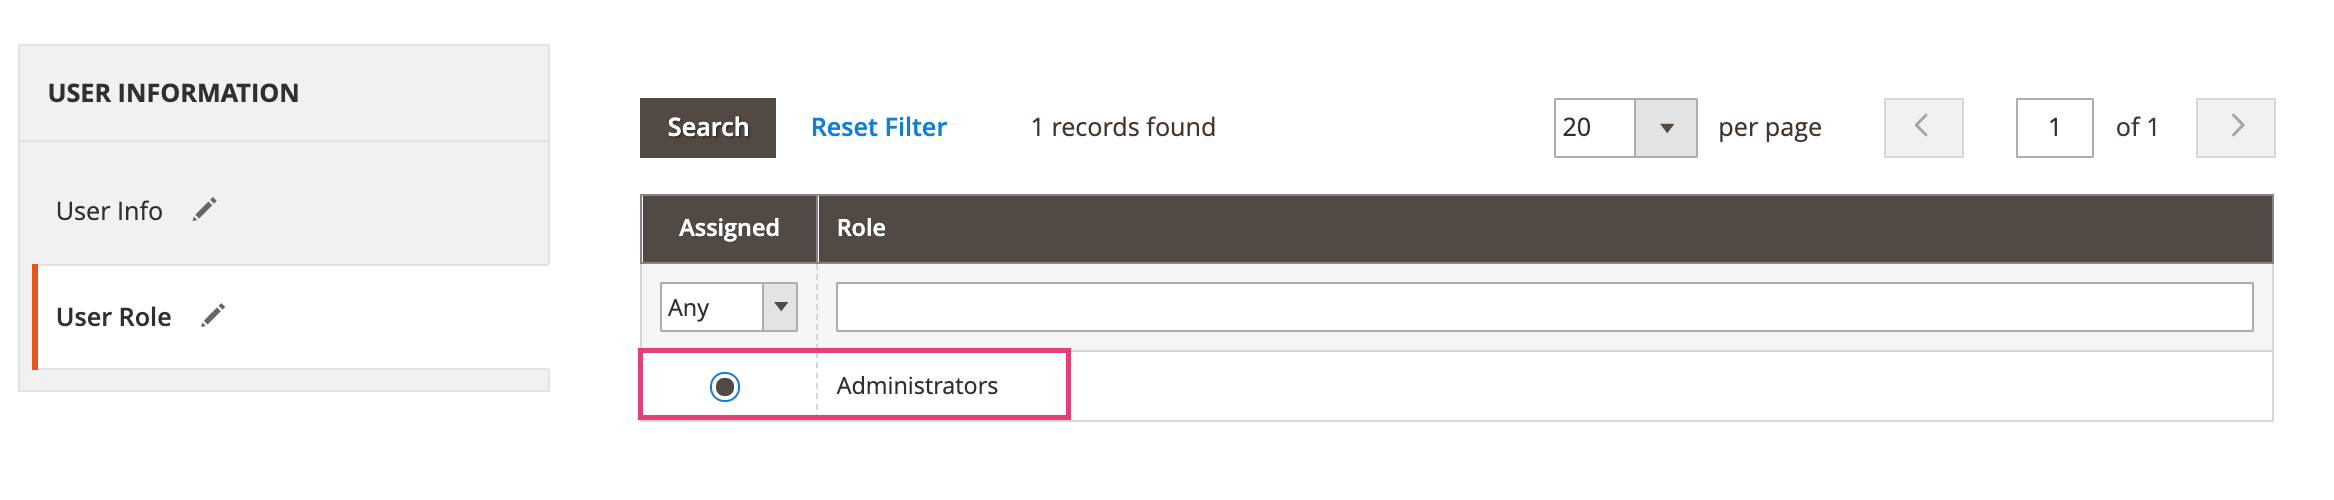
- Save user
Note
If you don't want to give the account Administrator role, you can always
assign another role you have created for your store. You only need to make
sure that with this role we have access to:
\- Catalog (to see the products)
\- Sales (to see the orders)
\- Store Configuration
\- System Configuration
▶ Step 2: Assigning options and previews to your Walmart products
Follow these steps to connect an option set and a preview template with your Walmart products.
How to connect previews with Walmart products
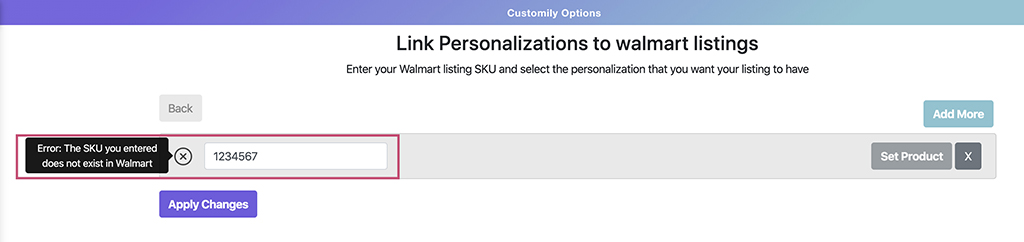
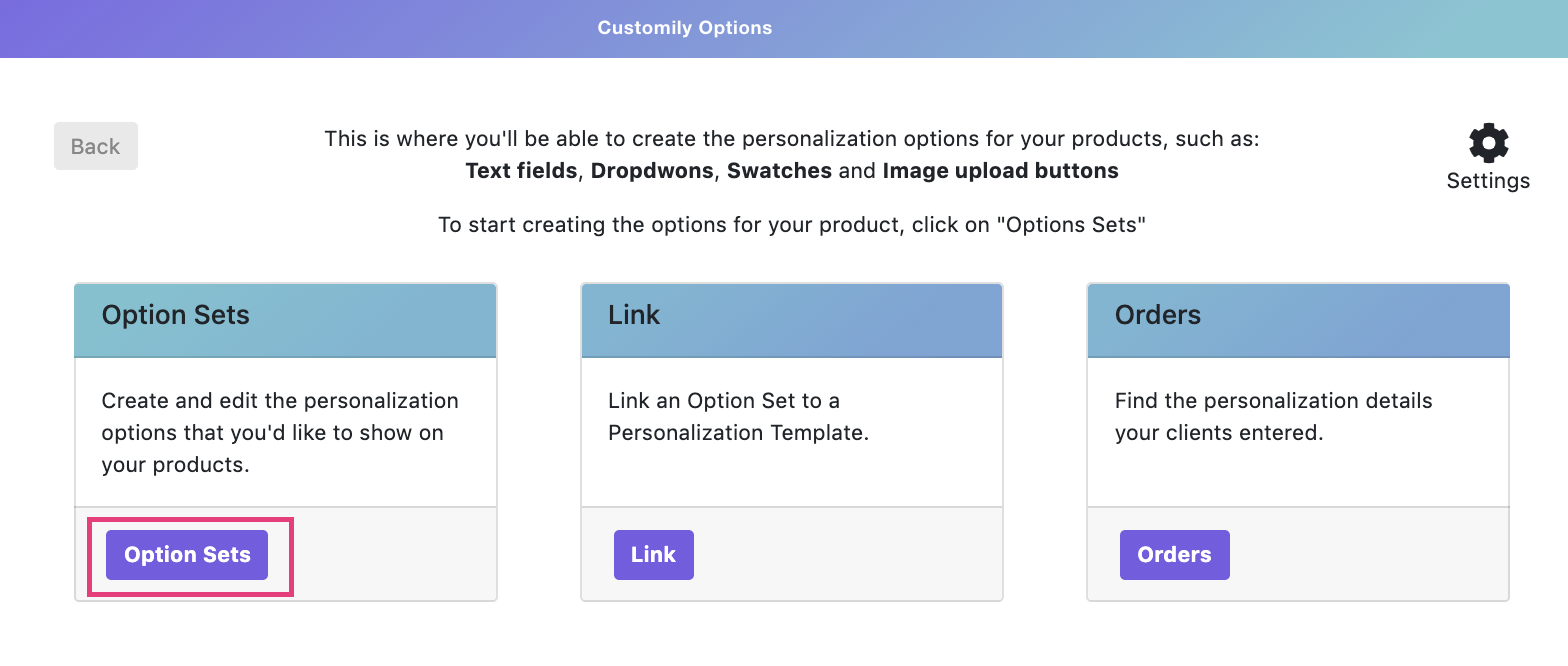
- Open Customily Options App and select Link.
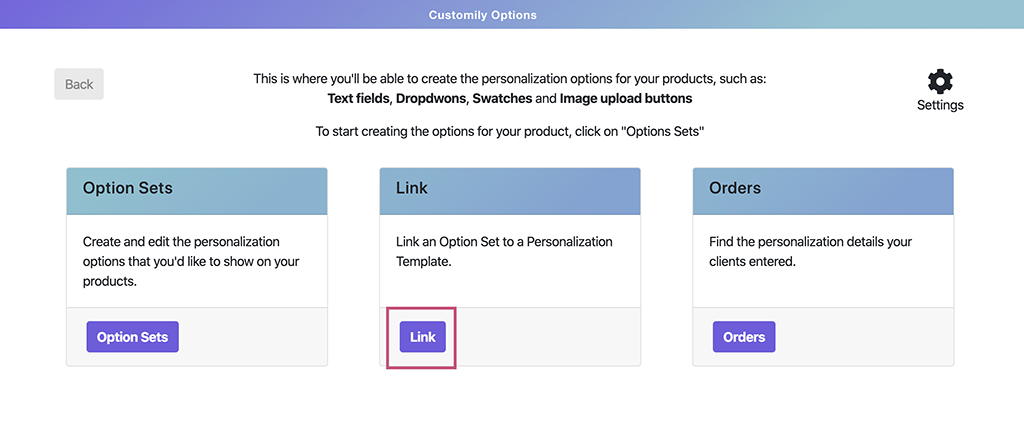
- Enter the SKU number of the Walmart product you wish to connect the
preview with. (If you are not sure what your products SKU is, scroll down to learn how to find the SKU).
- If the number is correct you will see a check symbol on the left of the number.
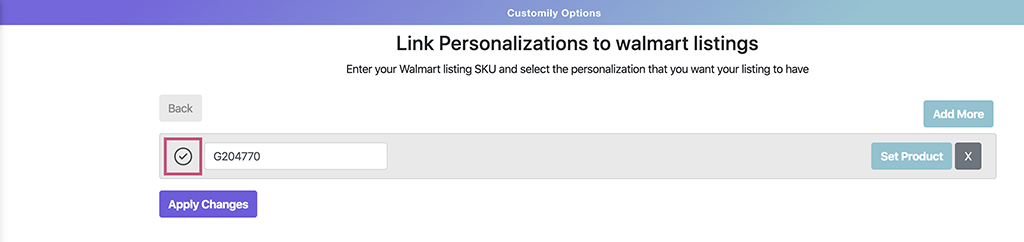
- If the number is incorrect, an error message will appear. Please check if you entered the SKU number correctly.
- Choose the template you want to use for your Walmart product from the
template list by clicking on it.
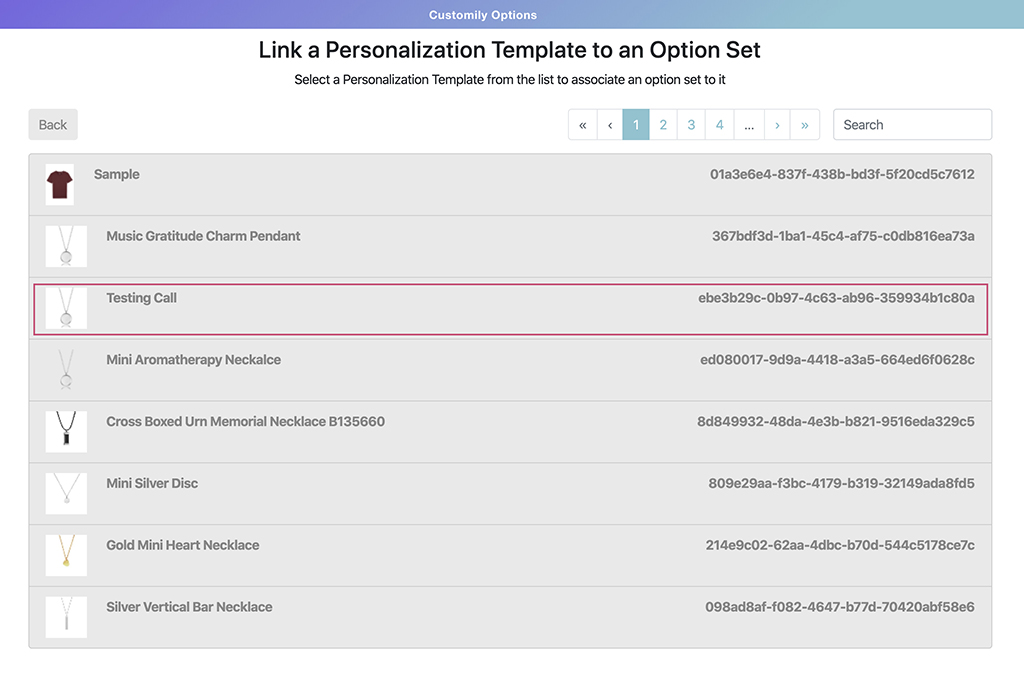
Tip
You can search for a specific template by its name or template ID using the
search bar.
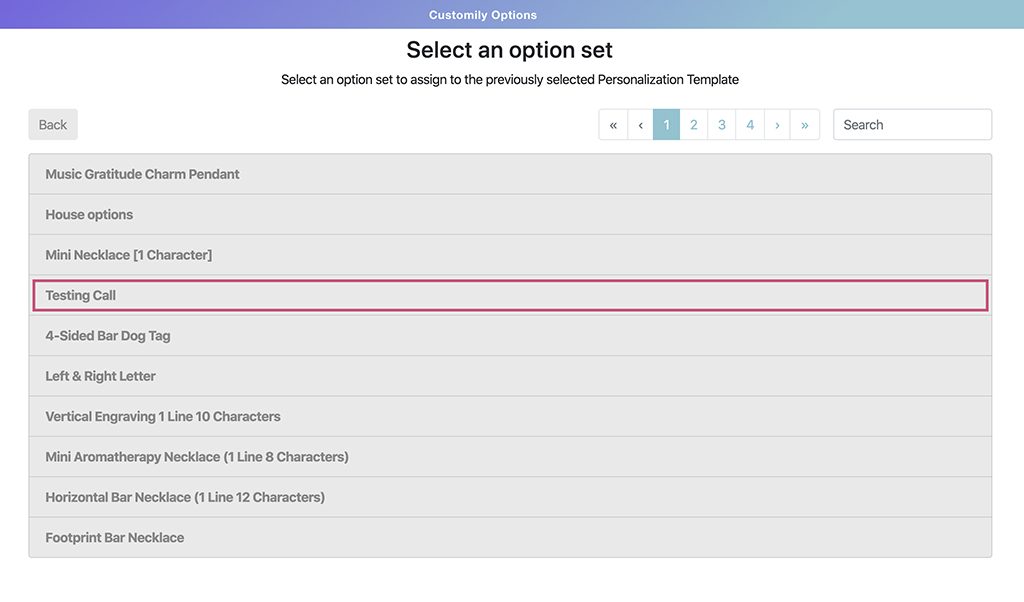
- Select an option set for your product.
Next to the SKU, you will see the Customily Template ID, as well as the name
of the selected option set.
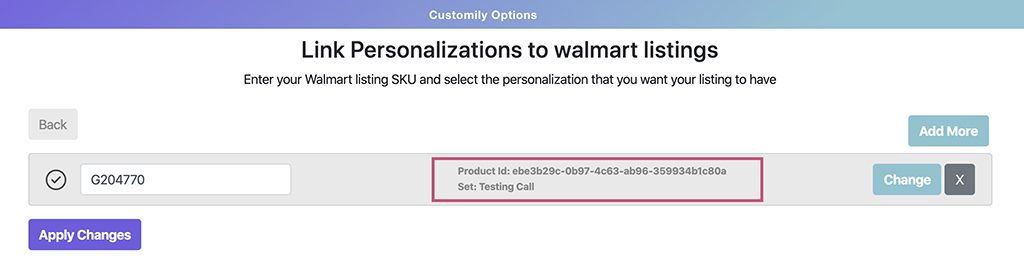
- Click on apply changes to save. Now your Walmart product should have
the preview and the options live!
How to obtain your products SKU number from Walmart
- Open your Walmart store’s backend and select the product you wish to
connect.
- Copy the SKU number from the product attributes.

▶ How to find Customily's personalization files on a Magento Order?
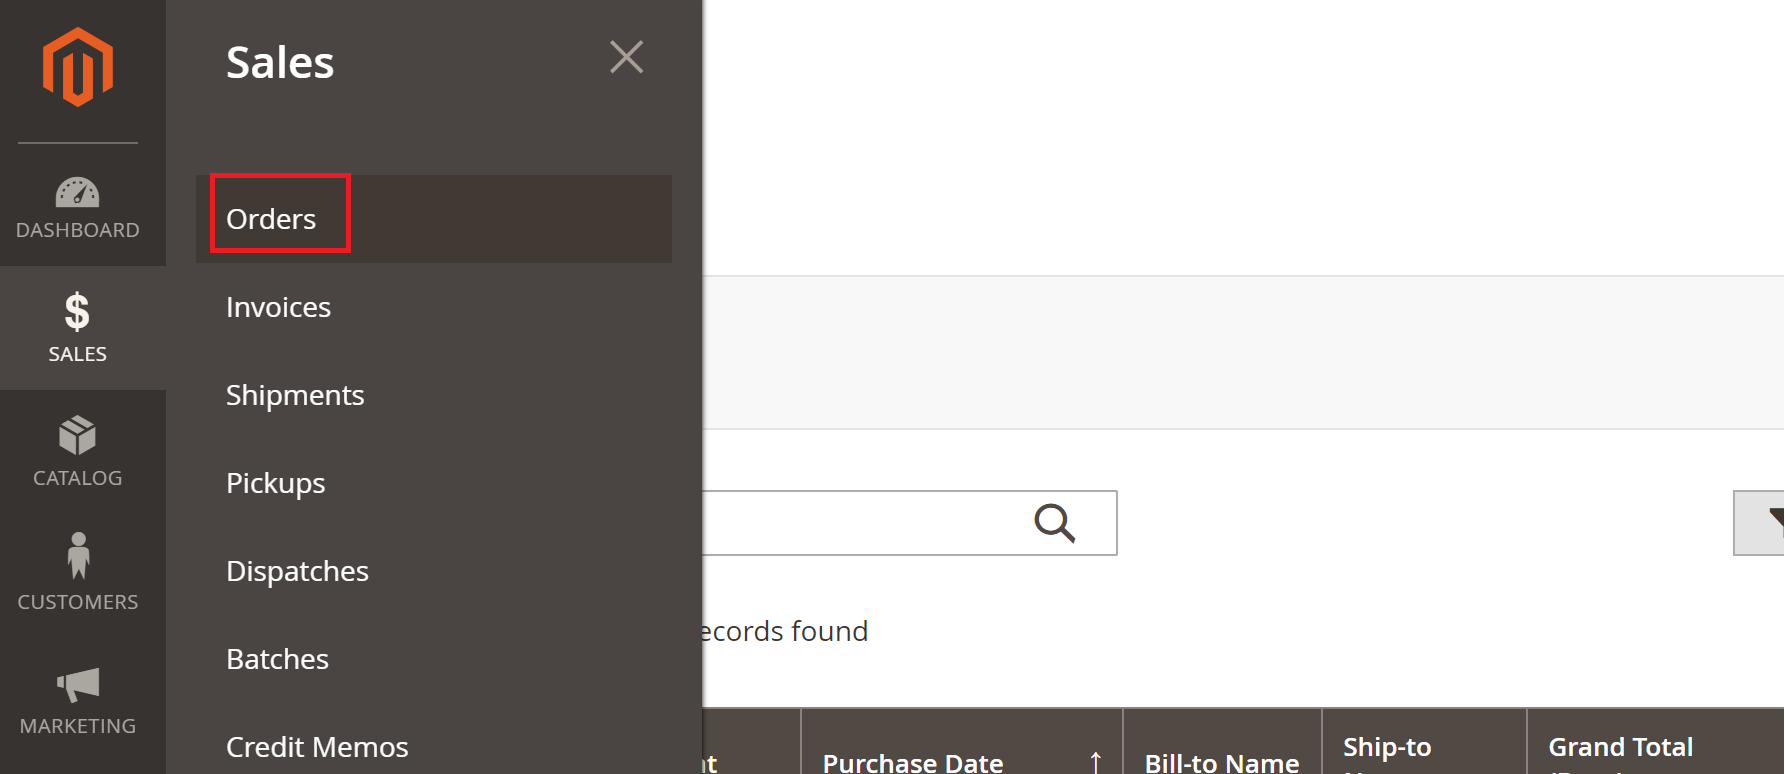
After your client has submitted an order, you'll be able to find all the
personalization details on your Magento admin panel under the "Orders" menu
Once you open your client's order you'll be able to see Magento's regular
order details such as your client's name, their address and so on.
Additionally, you'll also find Magento's Customizable Options selection(1)
andCustomily's Preview and Production file links(2).
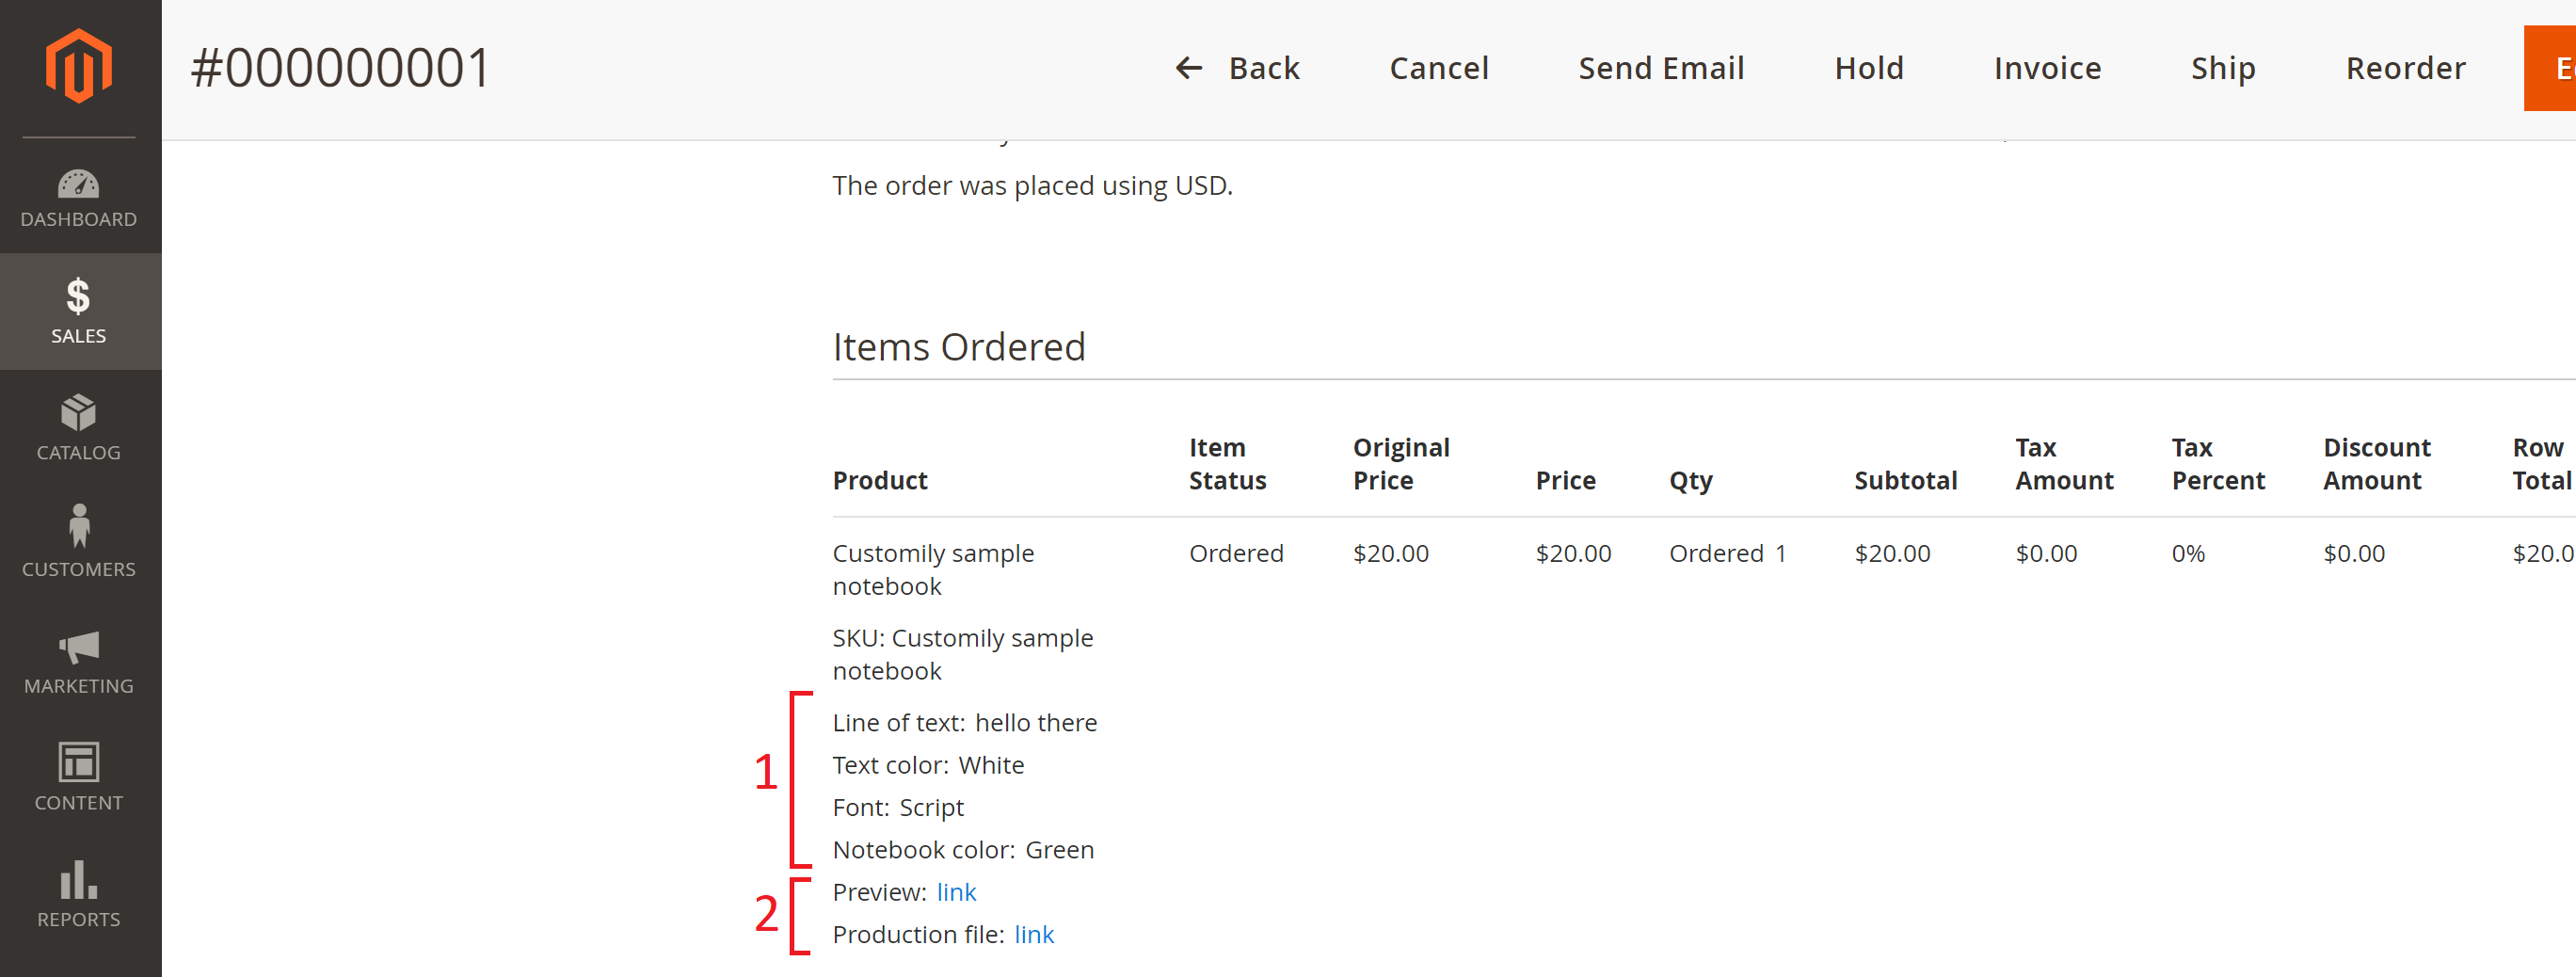
The Preview link will show up only for the orders that were personalized
using Customily.
The production file link will only show up if you are subscribed to the
Preview & Production plan.
If you open the Preview link you'll see the same image with the
personalization that the user saw when he added his product to the cart.
On the other hand, the production file link will contain an export file
(EPS, PDF, PNG, PNG, DXF or AI) with the client's personalziation ready to be
printed or engraved.
Want to download files in Bulk
If you have an automated system to feed your printers/engravers, we can give
you access to our S3 amazon bucket so you can obtain your files directly from
there. Contact our support team so
they can enable this feature for you. This option is limited for our
unlimited plan suscriptors
only.
▶ Change Dynamic Image Function
This function executes the change of a dynamic image in the preview. This can
be many things depending on the dynamic image, like the color of the product,
pattern, icons, etc.
The changes will always be between the different options available in the
dynamic image element.
It is used with dropdowns and swatch options.
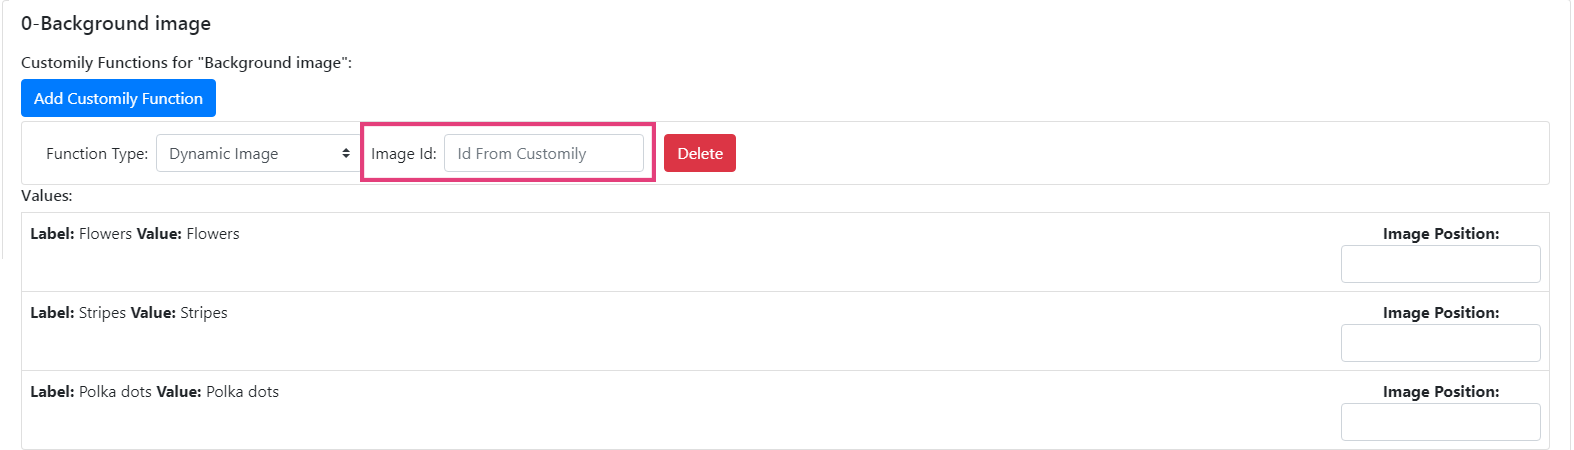
To add a dynamic image function
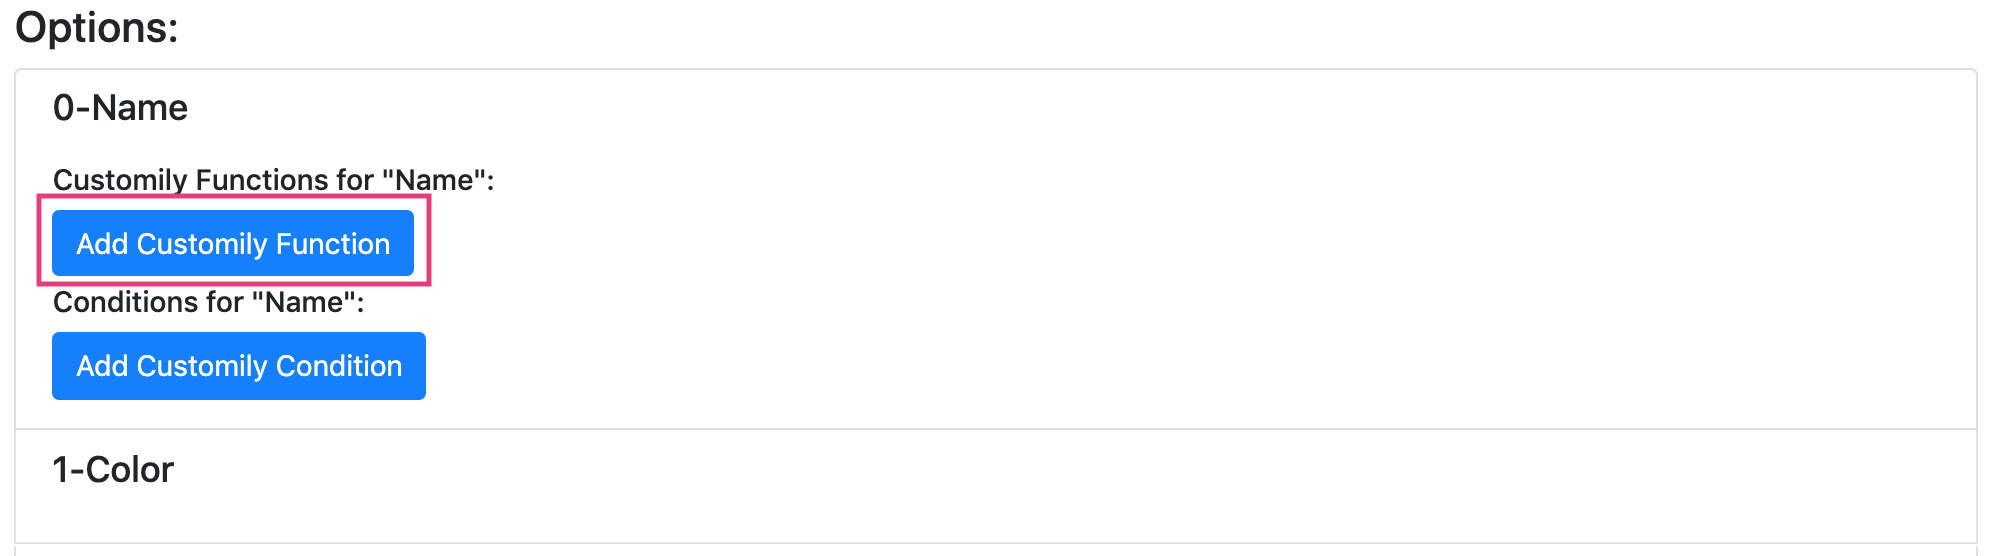
- Go to the option you want to work with
- Go the Customily Functions for (input name) section and click **Add
Customily Function
**

- Select the **Function Type = Dynamic Image
**

- Enter the Personalizable Element ID to connect the dynamic image
function with a specific dynamic image element from the preview. This is
the Unique ID of the dynamic image element that was created on your template.
💡 Tip:
If you want to change several dynamic images at the same time, you can assign
multiple dynamic image functions to the option. Just click again **Add
Customily Function** to add another dynamic image function, and link it to the
extra dynamic image element you want to change.
- Go to the options values and make sure they are connected with the correct
dynamic image option of your dynamic image element.
Image position = dynamic image option of the dynamic image element on your
template
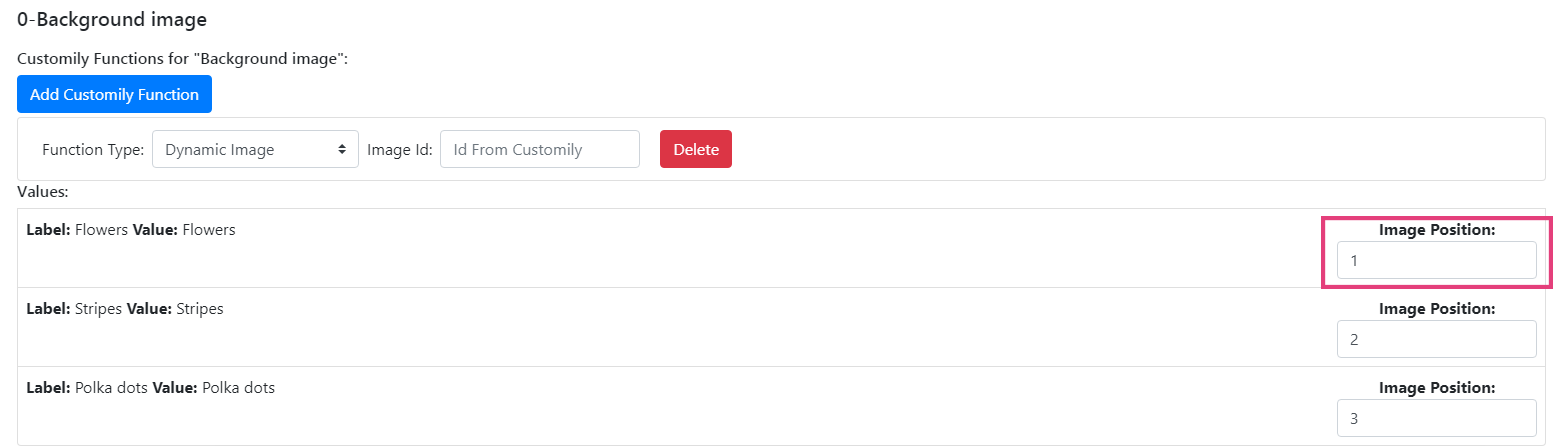
By default, all image positions will start in 1, 2, 3... and so on. So if your
values are in the same order of the dynamic image options you are good to go!
▶ Connecting your Walmart products with Customily
Connecting your Walmart products with your Customily preview requires you to
follow 2 easy steps.
1. Creating option sets
Create groups of options to use on your products.
The different option types you can create are:
- Text inputs
- Dropdowns
- Swatches
- Image (file) upload
- Checkbox
2. Assigning an option set and personalization template to your Walmart
products
Connect your Walmart product listing with the option sets created on the step
before, and with the personalization template created on Customily's Admin Panel.
▶ Image upload Option
Add an image upload option to your option sets so customers can upload their
own photos on your products.

To add an image upload option
- Create a new option set or edit an existing one
- Click Add option 
- Expand the newly added Option by clicking on it
- Select Image upload as option type 
- Configure the options parameters
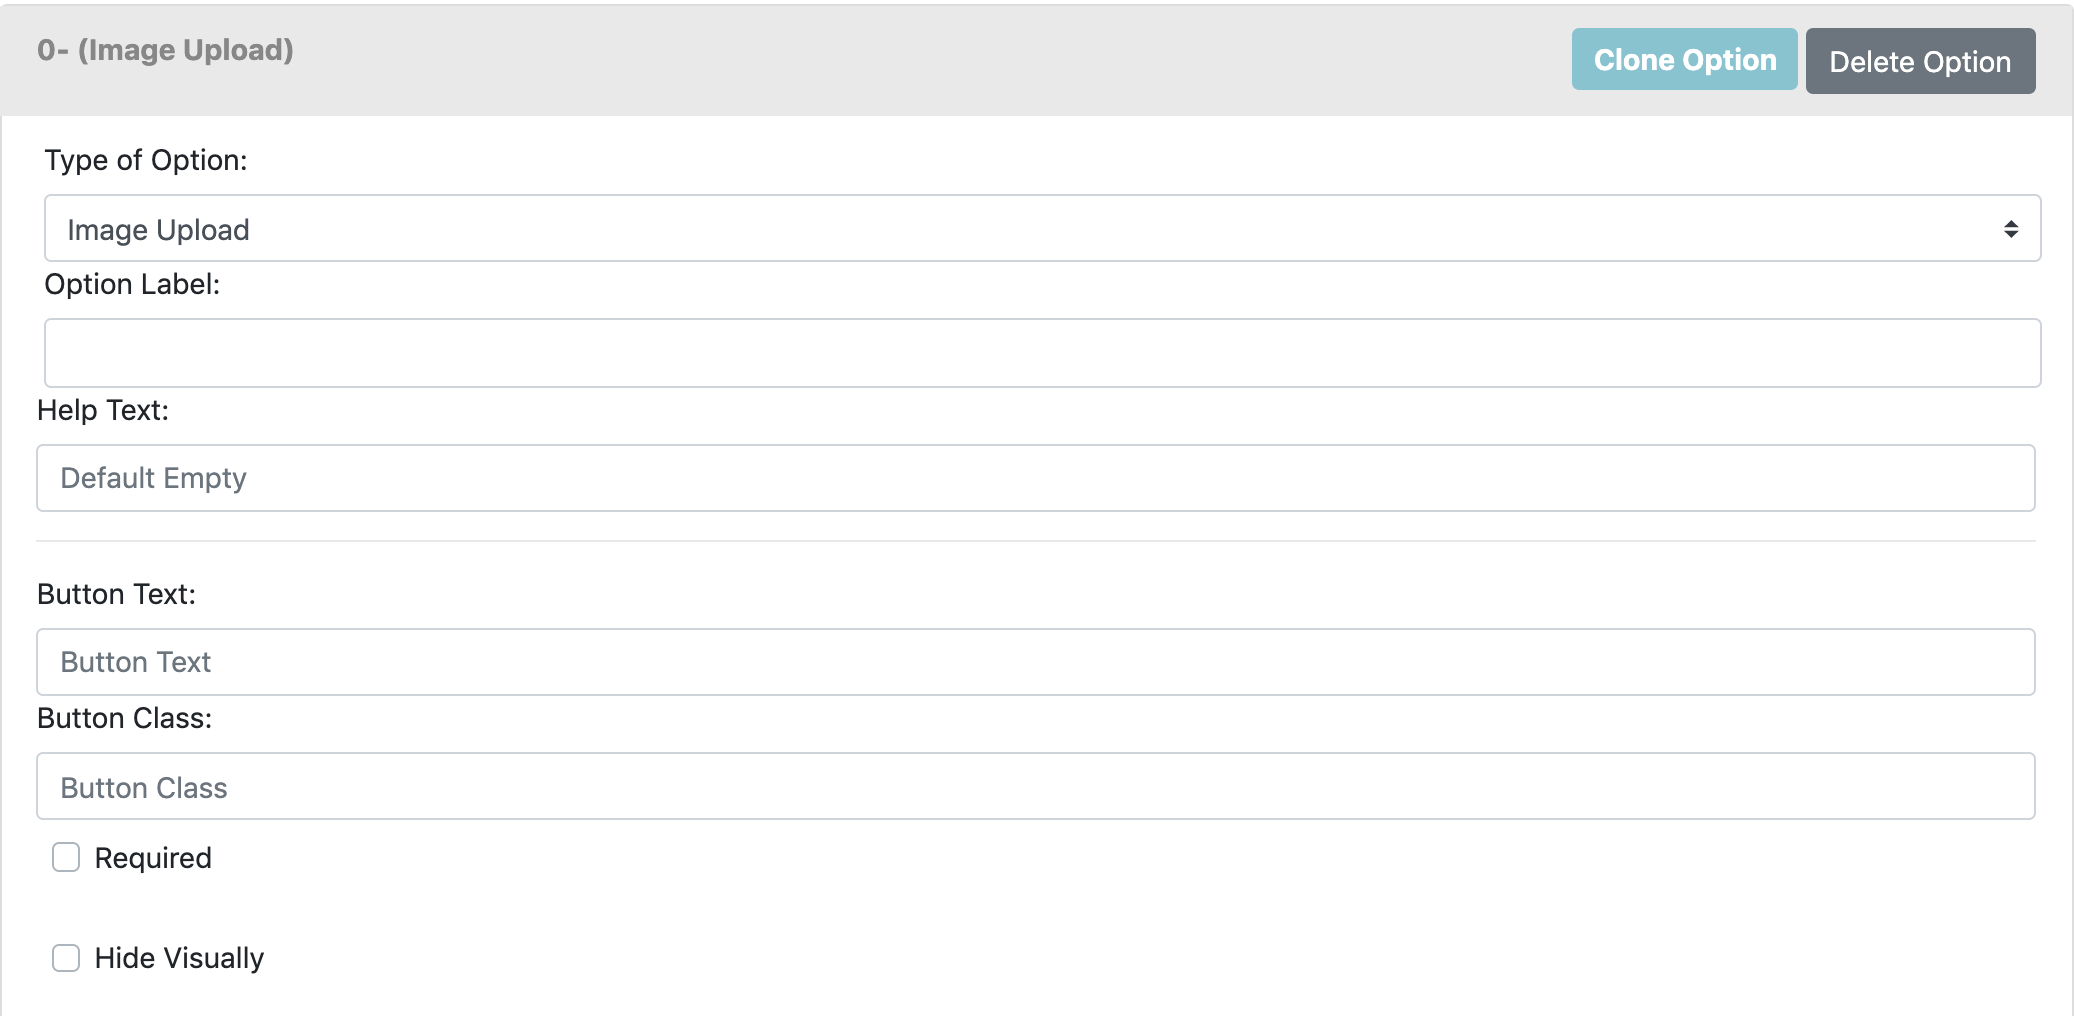
Option Label
The title of the option that will appear on your product page.
Something like "Add your photo", "Photo upload", or "Upload a picture" are the
most used labels.

Help Text
A secondary text to give customers some extra information, tips or help.
It's a good place to guide customers on what types of files they can upload,
or let them know the recommended size and quality of the photos.
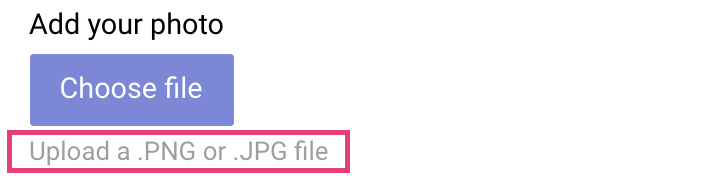
Button Text
Text that will appear on the button. Something like "Choose file" or "Browse"
will look good.

Button Class
To assign a CSS class to the button. Usually, the button picks up the CSS
class of your Add to Cart button. If you want to apply a different class to
it, just type the class name there.
Min. Width and Min. Height (px)
Type a minimum width and height if you want to limit the size of the pictures
customers upload. This way you can make sure pictures have a minimum quality
that will look good on products. It's especially useful if you are going to
print the pictures customer's upload.
Minimum width and height are measured in pixels.
If photos uploaded don't reach the minimum requirements, customers will be
encouraged to upload one that meets the requirements.

Required
The text input will be required to add the product to cart. This means the
customer will have to type something in it to be able to make a purchase.
If the customer leaves the text input empty, it will let them know so they can
fill it and add to cart properly.
An asterisk (*) next to the option's title indicates that the field is
required.

Hide visually
Check it if you want to hide the option from the product page. It is useful if
you want to have some predefined photo on the preview you don't want customers
to change.
However, it is hardly used.
- * *
To assign a Customily Function to an image upload option
Once you have defined your option, you need to add a Customily Function to it.
Customily Functions are the way we assign actions to the options. It tells the
option how to affect the preview. For example, in the case of image upload
options, it tells it where the image the customer uploads will be placed.
To assign a Customily Function:
- Expand the Customily Functions section by clicking on it.
- Image upload options get automatically assigned an Upload Image Function since it's the only function available for this type of option. 
- Assign the Unique ID of the element that will work with that function. 
If you are not sure what the Unique ID for the element is, learn how to know the Unique ID of an element here.
- * *
To assign Conditions to an image upload option
Conditions create rules that will show or hide an option based on the
customer's previous selections. With conditions you can, for example, show an
option only if another specific option is selected.
To assign Conditions:
- Expand the Conditions section by clicking it 
- Click Add Condition 
- Complete the condition's rules
- Select action Show / Hide
- When select option(the option that will generate the condition)
- is -> select a value from that option

- * *
Once you have finished configuring your image upload option, you can move on
to adding more options to the option set. If you are done with all the options
just hit save and go back to the main menu.
▶ How to create a user on your store for the Customily team.
During installation, our team will request you to create an account for us on
your store, so we can check that Customily is working perfectly with your
store's layout and design.
Follow these instructions to create the account for our team.
Creating an administrator account for Customily
- Log in to your BigCommerce store, and on the left menu, access **Account
Settings > Users**
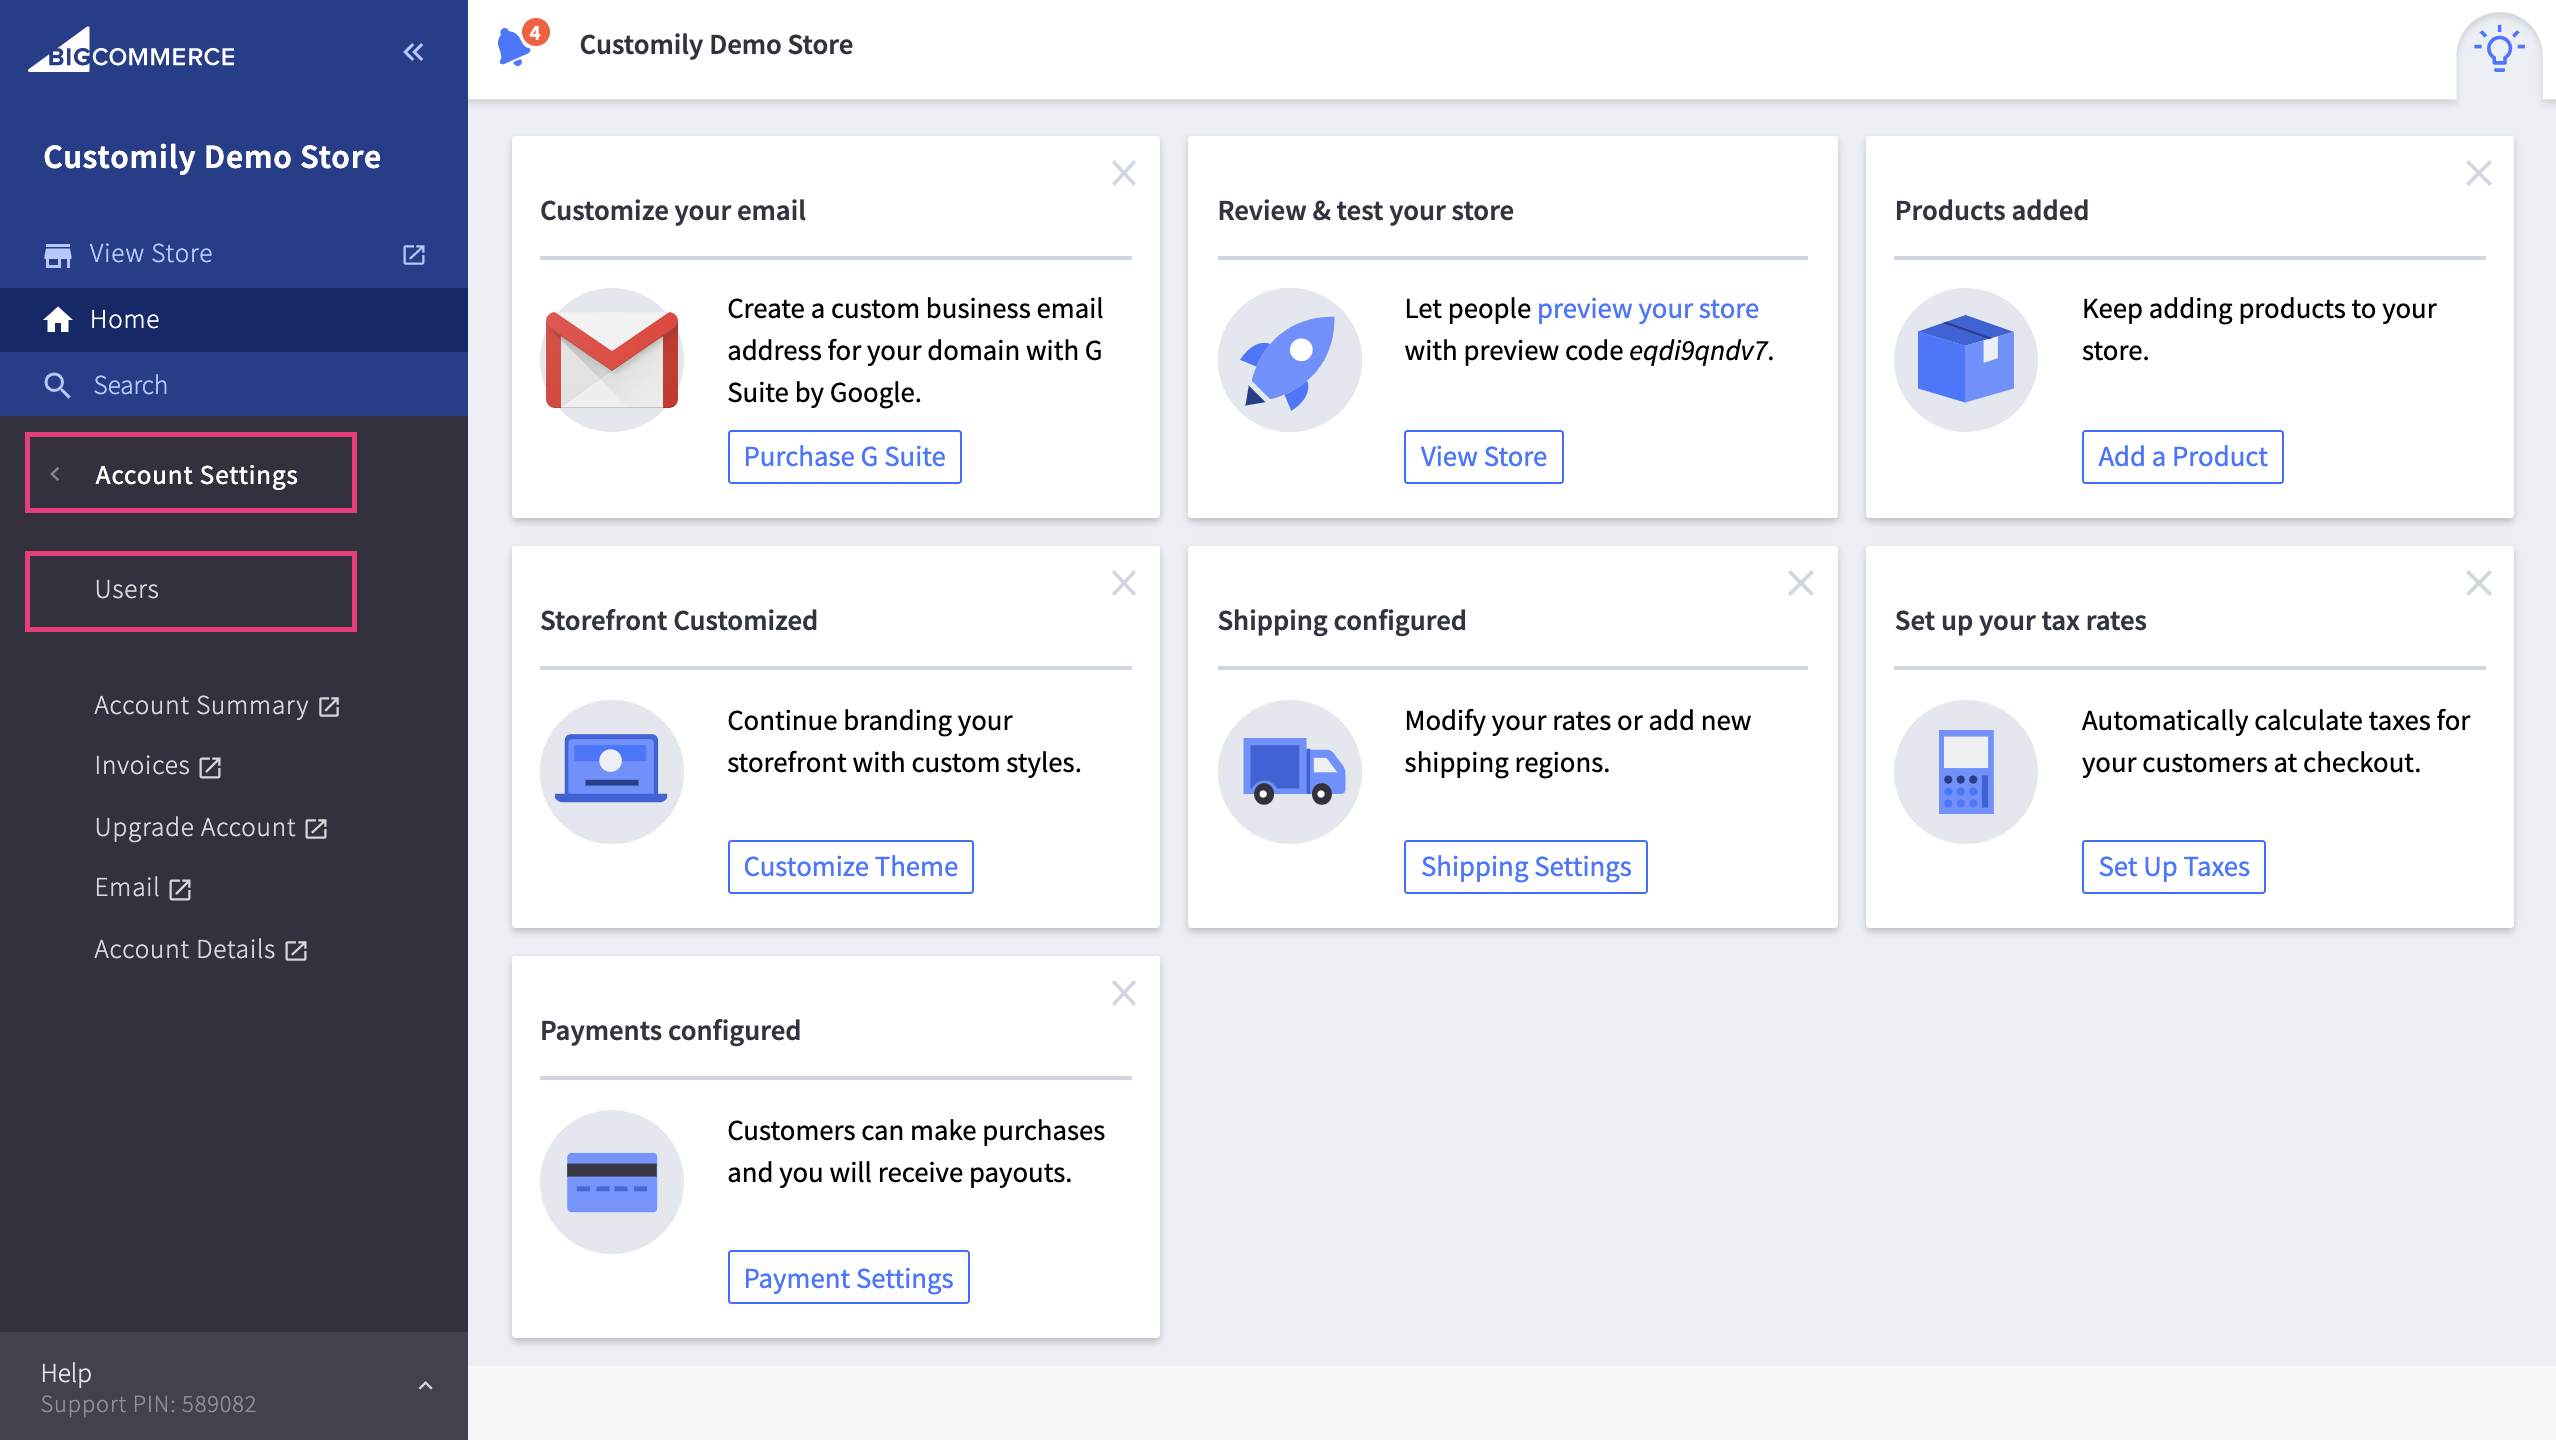
- Create a new user account, by clicking on Create a user account.
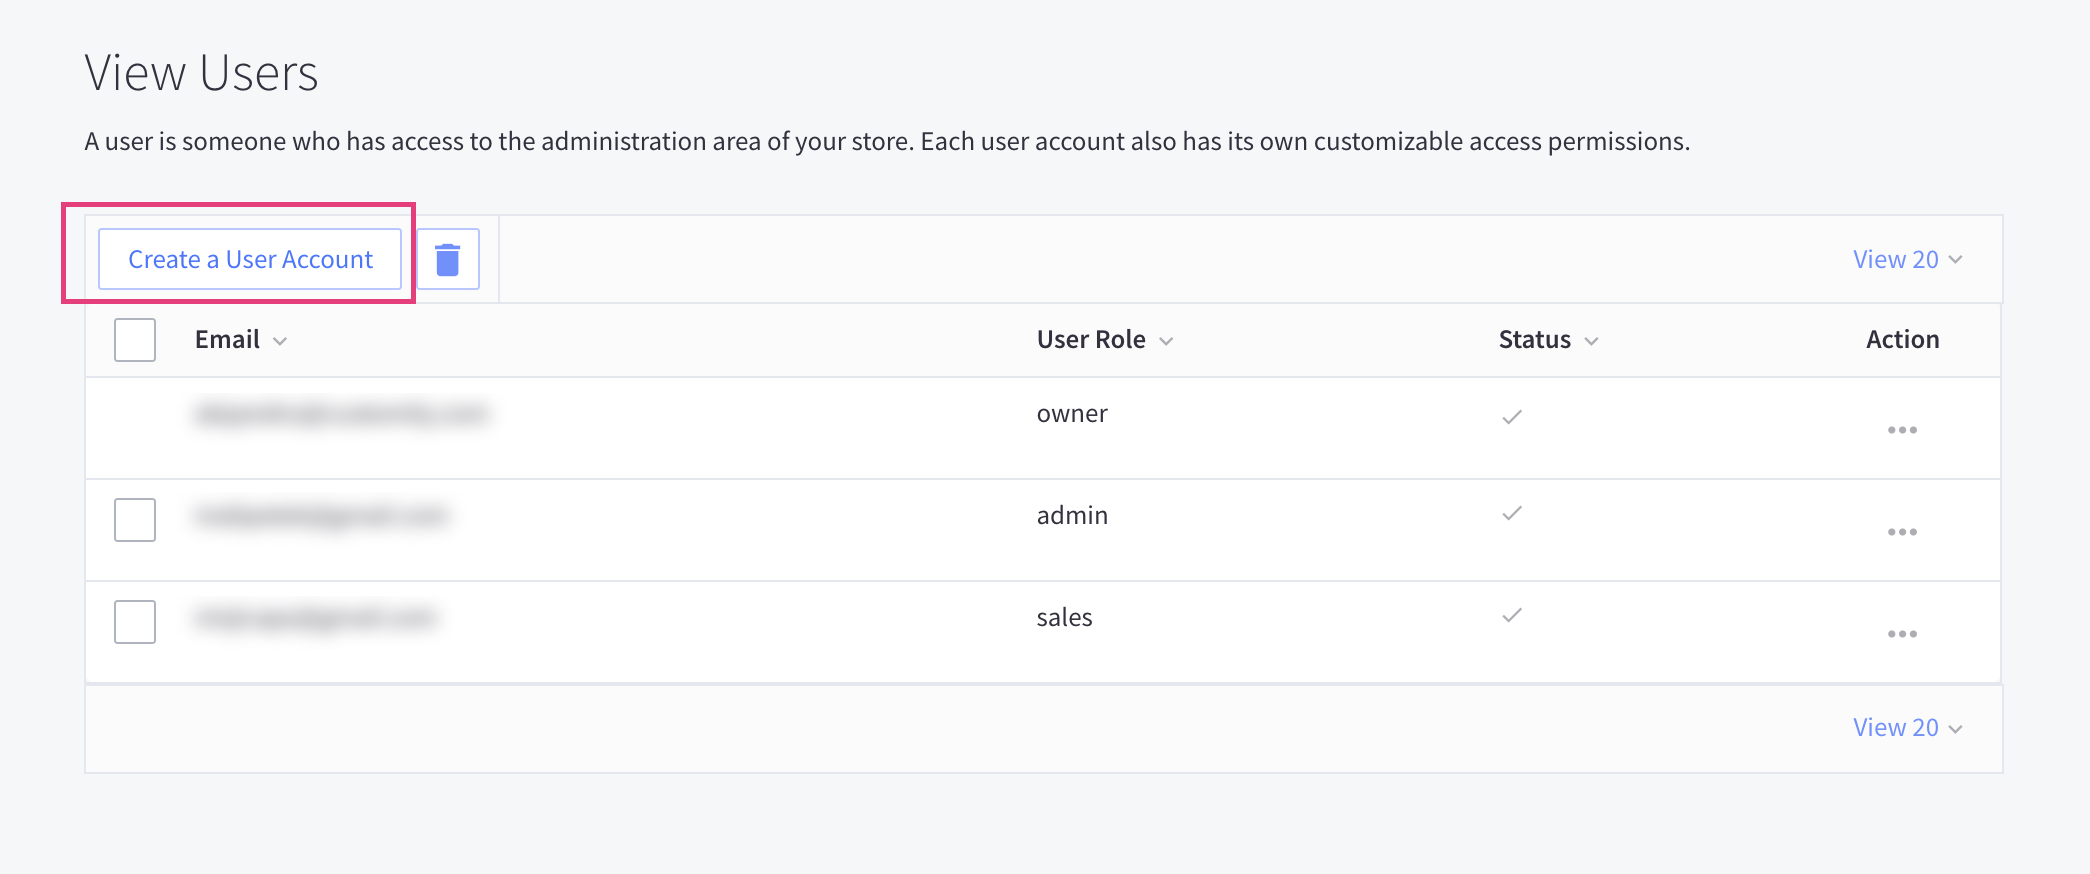
- Use the email alejandro@customily.com to create the account
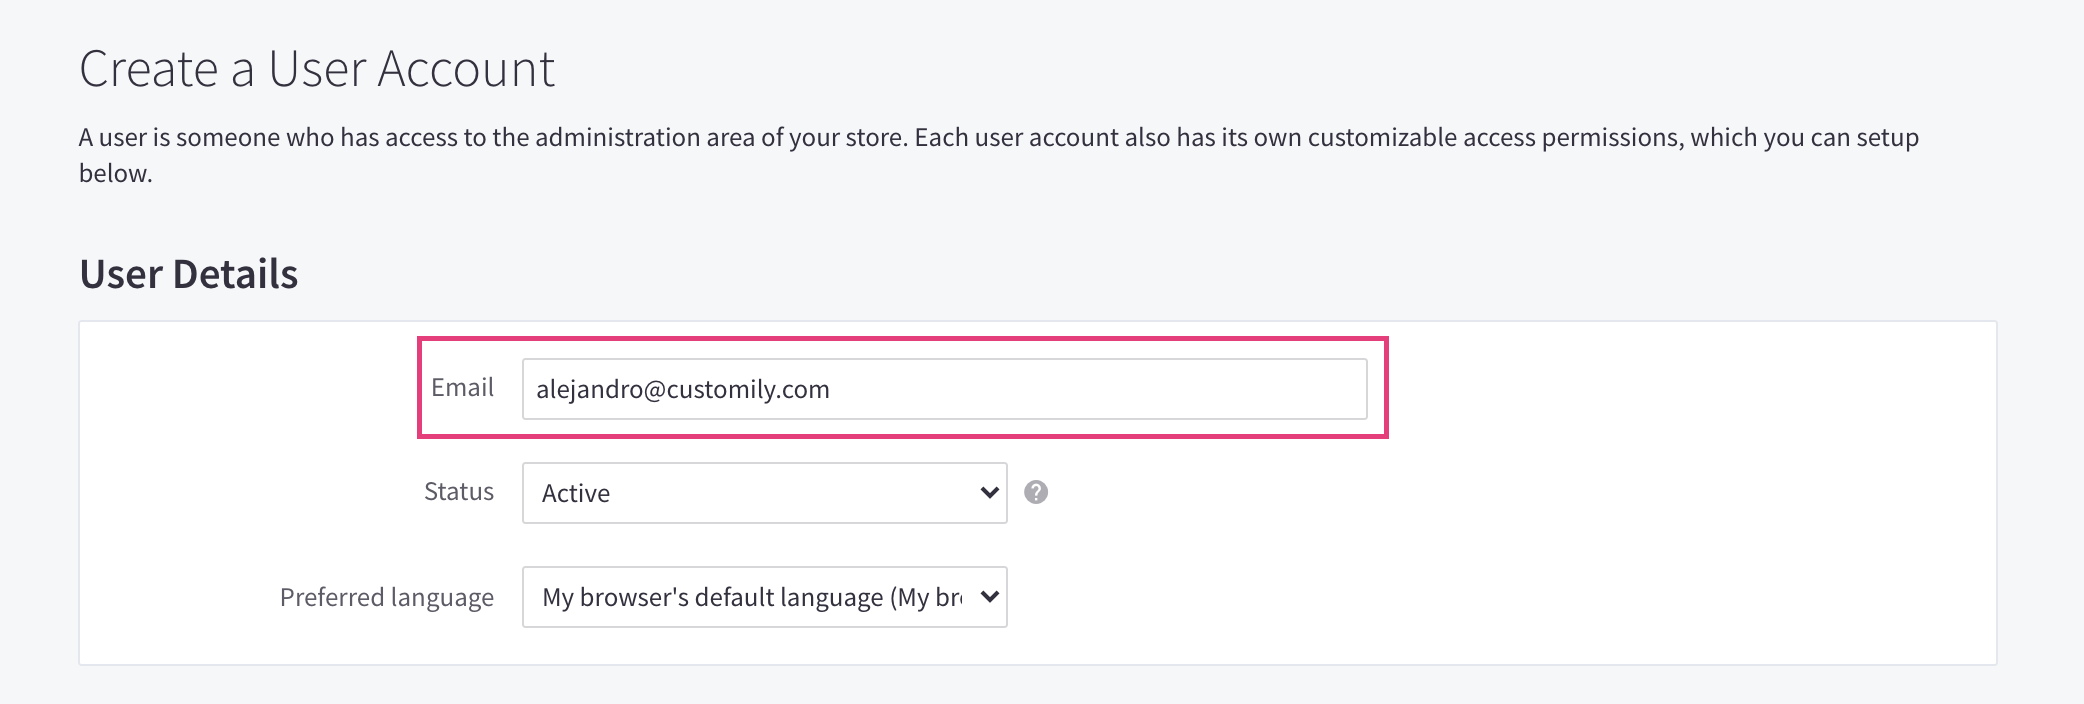
- Give that new account permissions as Store Administrator.

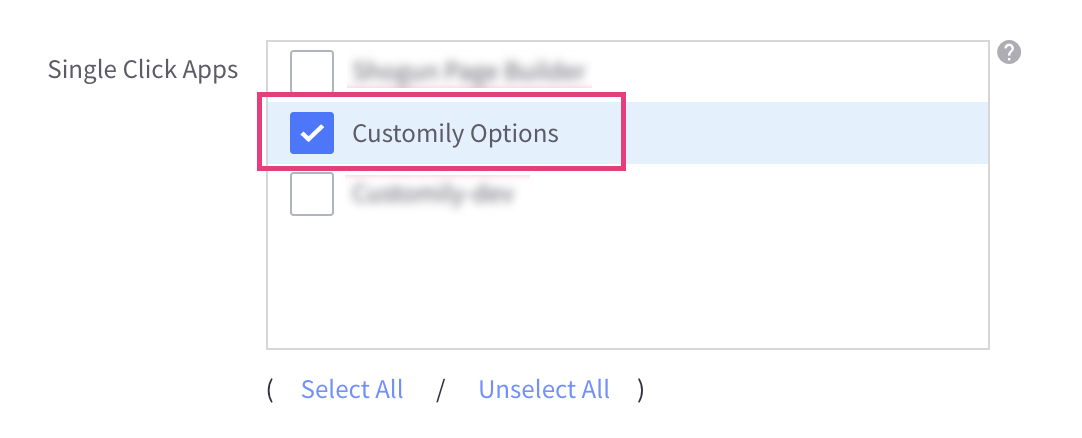
- Make sure the account has access to Customily Options App
▶ Find personalization details for your Walmart orders
To get the personalization details for your Walmart orders, you will need to
search for the order in the Customily Options App.
To find an order's personalization information
- Select Orders to search an order
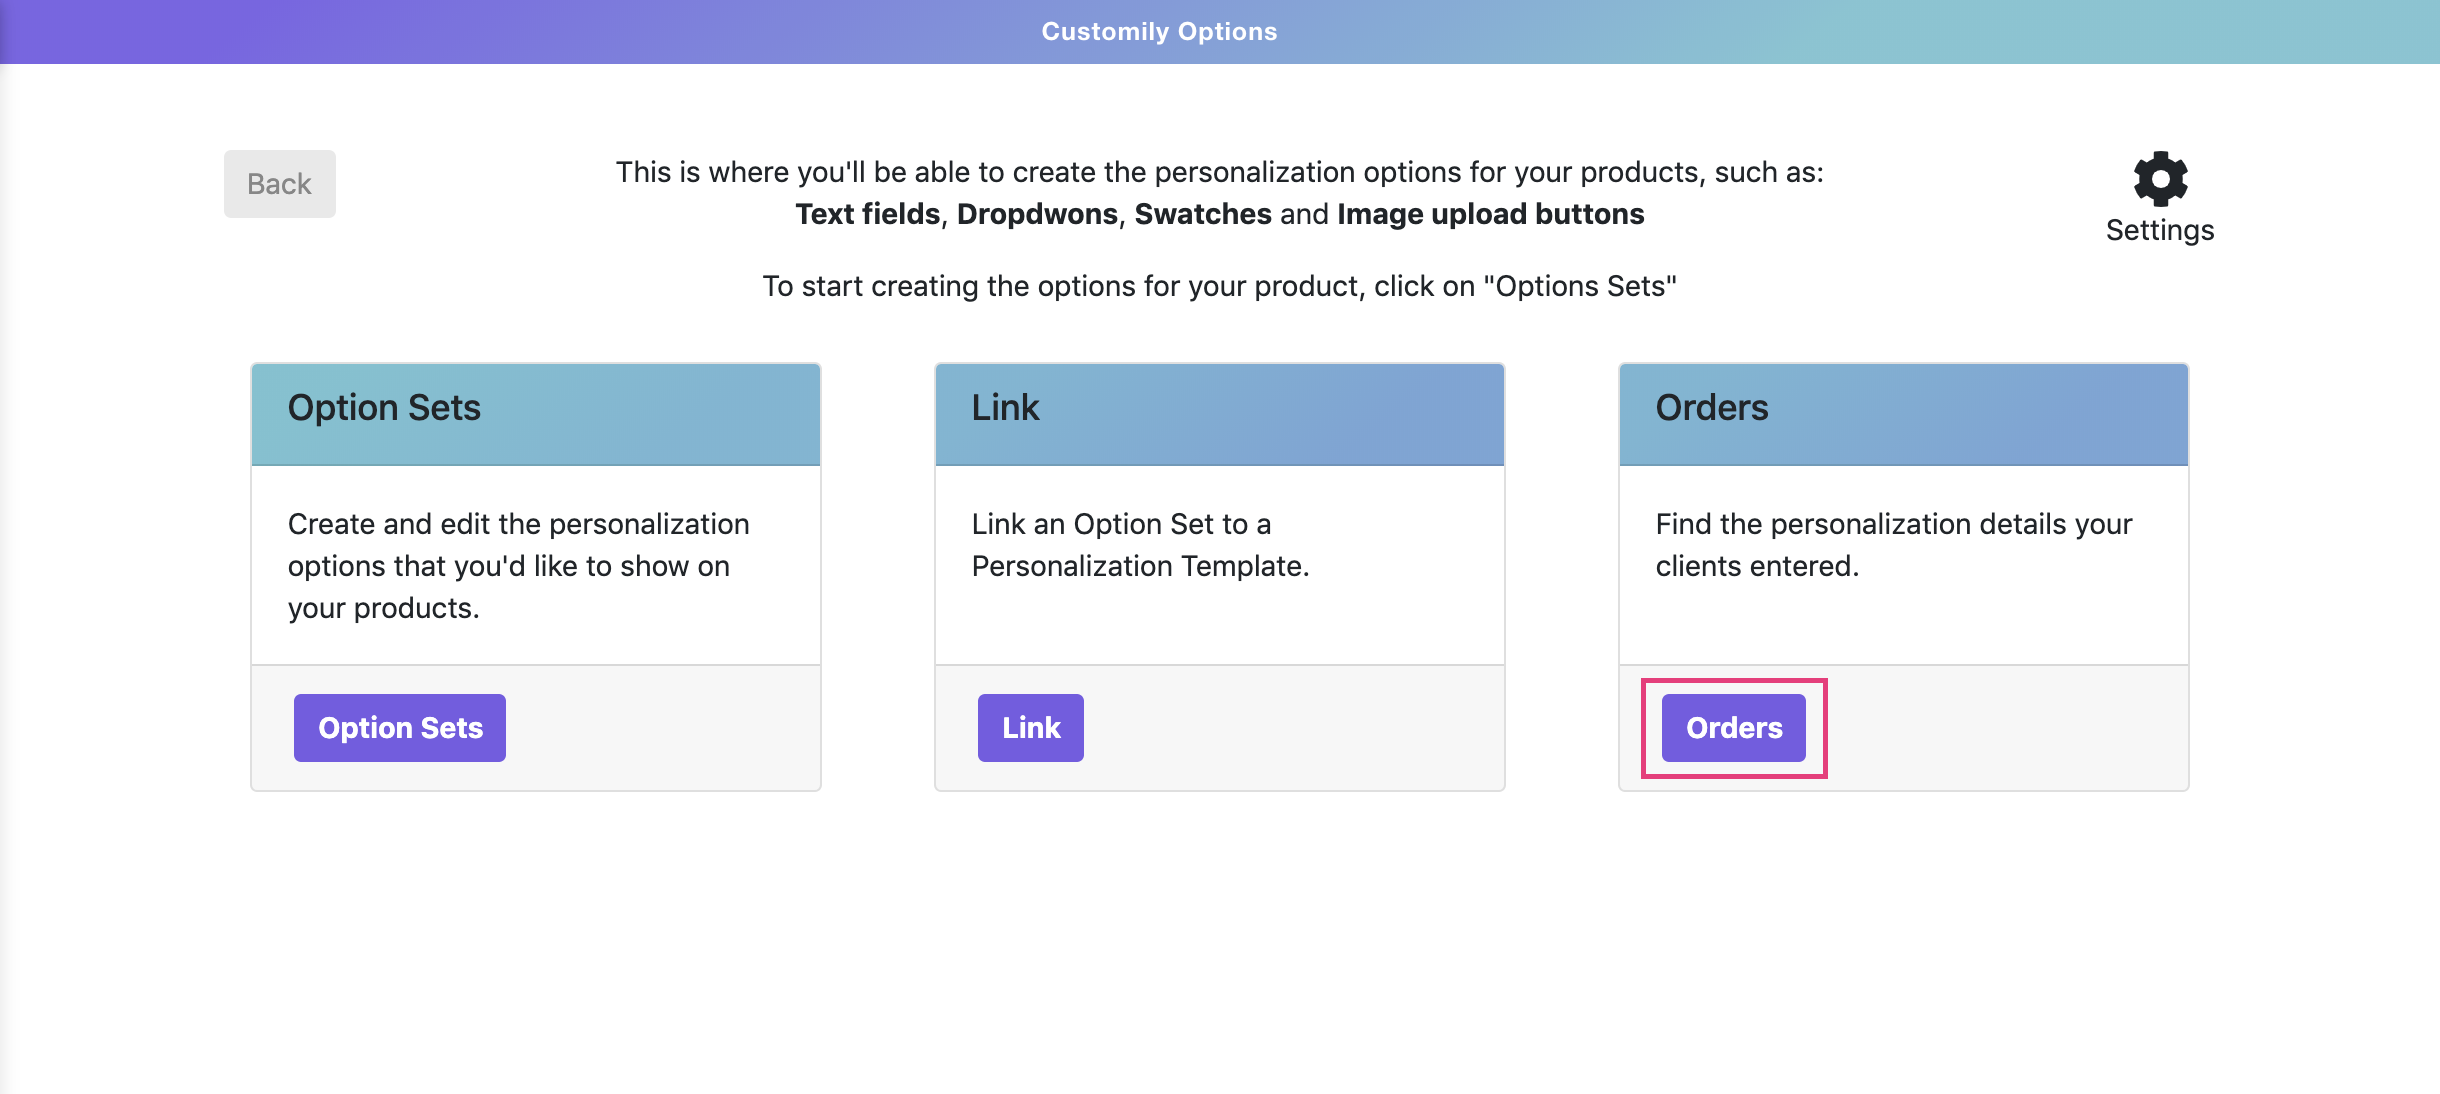
- Search for an order by using a Walmart PO Number. If you are not sure how to get the Walmart PO Number, you can learn more about it here.

- The personalization details will appear together with the order information.
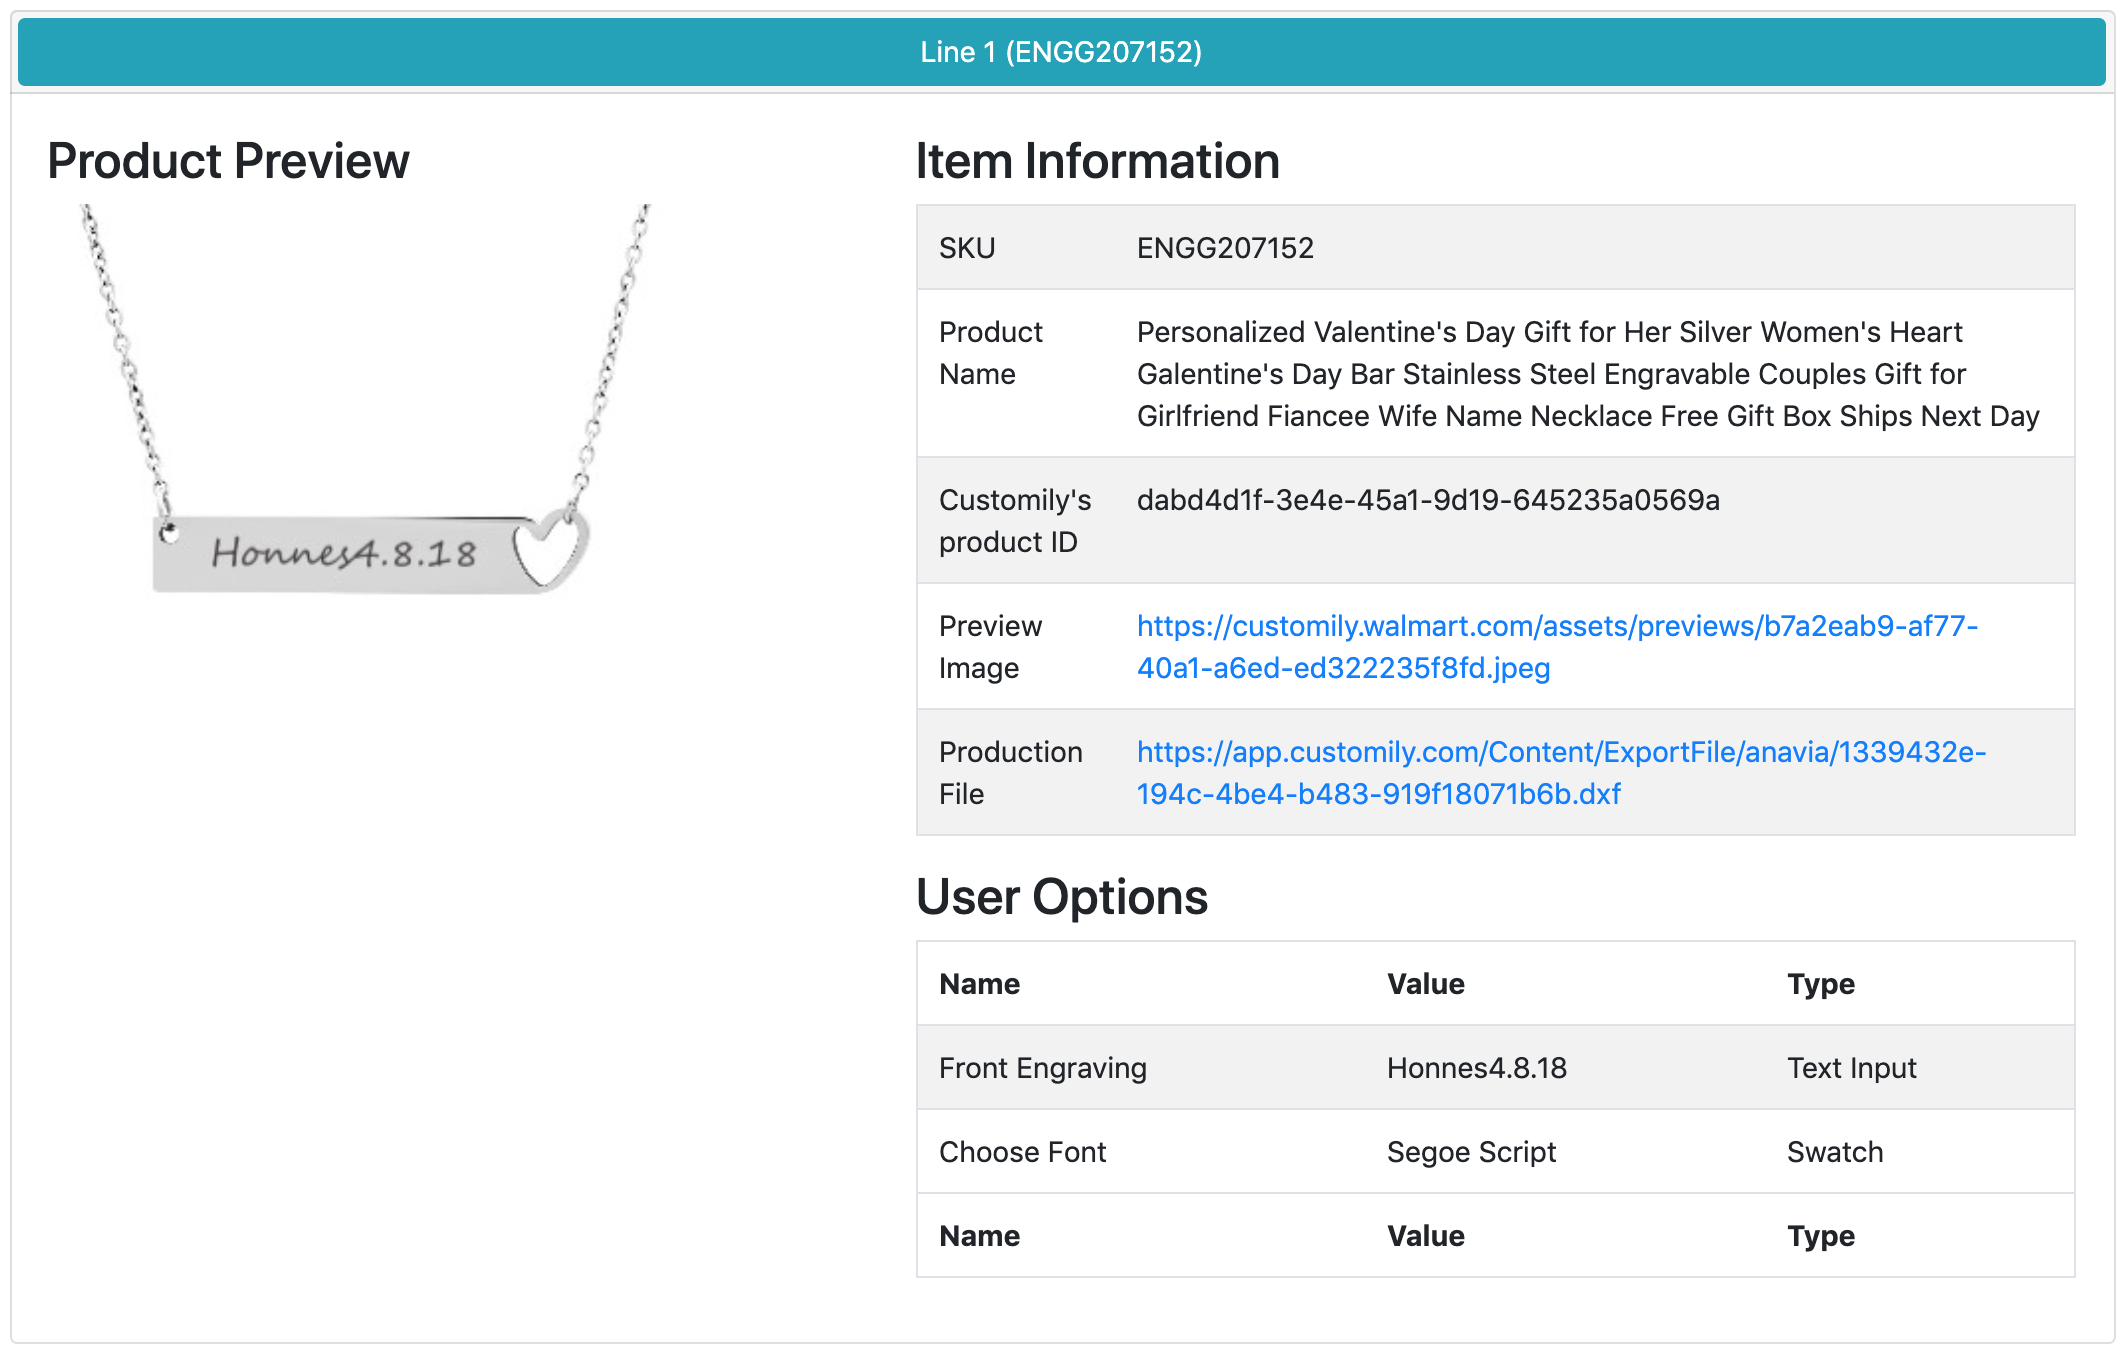
**The personalization details include:
**
- Product SKU
- Product Name
- Customily's Product ID
- Preview Image: The preview the customer was seeing when he made the purchase
- Production File: Only available when subscribed to Preview + Production Plans
- User Options: All the personalization options selected by the customer (this includes, text inputs, dropdowns, swatches, etc.)
📝 Note:
If the order has more than one element, all elements will appear in the
details cataloged as Line Items.
Get the personalization details via API
If you have a lot of orders and you prefer to retrieve these details via API,
check this article
▶ Change Product Function
This function executes the loading of a different template in the preview.
This is used to load a different preview template ID on the product, whether
it's because it's a different size, design, etc.
It is used with dropdowns and swatch options.
To add a change product function
- Go to the option you want to work with
- Go the Customily Functions for (input name) section and click **Add
Customily Function
**

- Select the **Function Type = Product
**
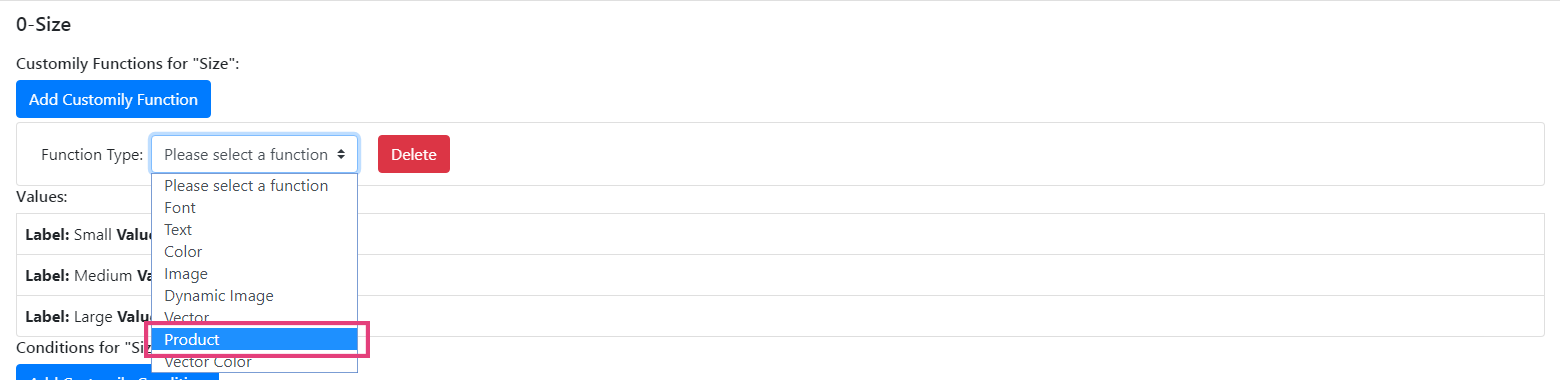
- There is no need to enter an element ID for this function, instead, go
straight to giving each value the desired template ID that it should
load.

- Go to the options values and make sure they are connected with the correct
template ID.
Product ID = Customily Template ID

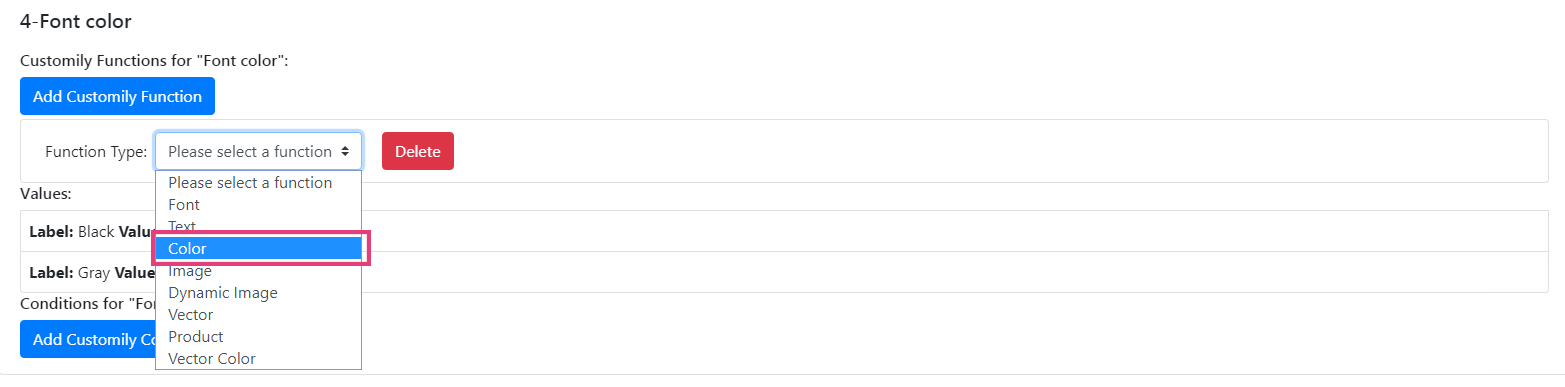
▶ Change Text Color Function
This function executes the action of changing the color of a text on the
preview.
It is used with dropdowns and swatch options.
To add a text color function
- Go to the option you want to work with
- Go the Customily Functions for (input name) section and click **Add
Customily Function
**

- Select the **Function Type = Color
**
- Enter the Personalizable Element ID to connect the color function with
a specific text element from the preview. This is the Unique ID of the
text element that was created on your
template.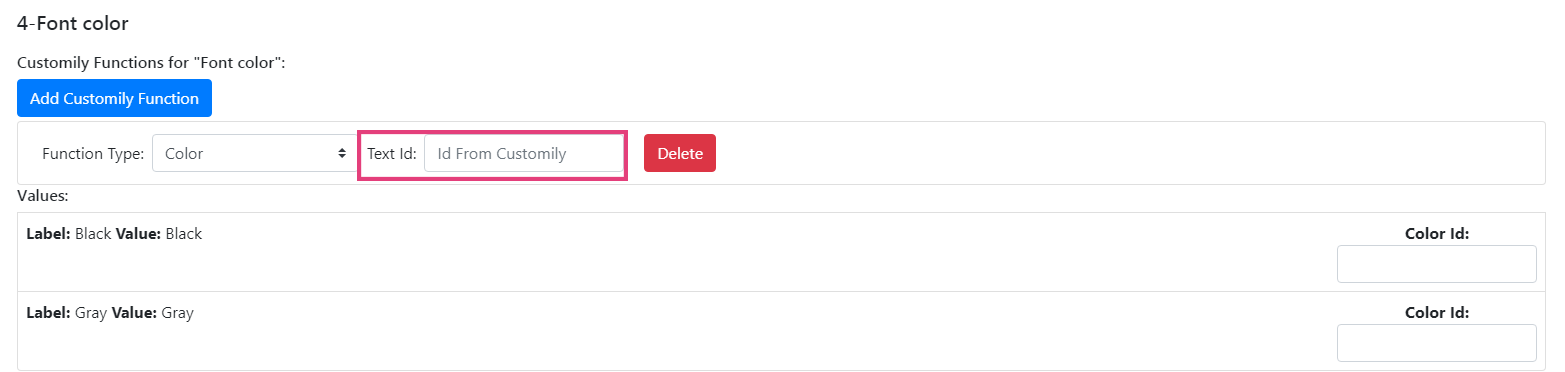
💡 Tip:
If you want to change colors of several text elements at the same time, you
can assign multiple text color functions to the option. Just click again **Add
Customily Function** to add another text color function, and link it to the
extra text element you want to change.
- Go to the options values and make sure they are connected with the correct
color option of your text element.
Color id = color option of the text element on your template
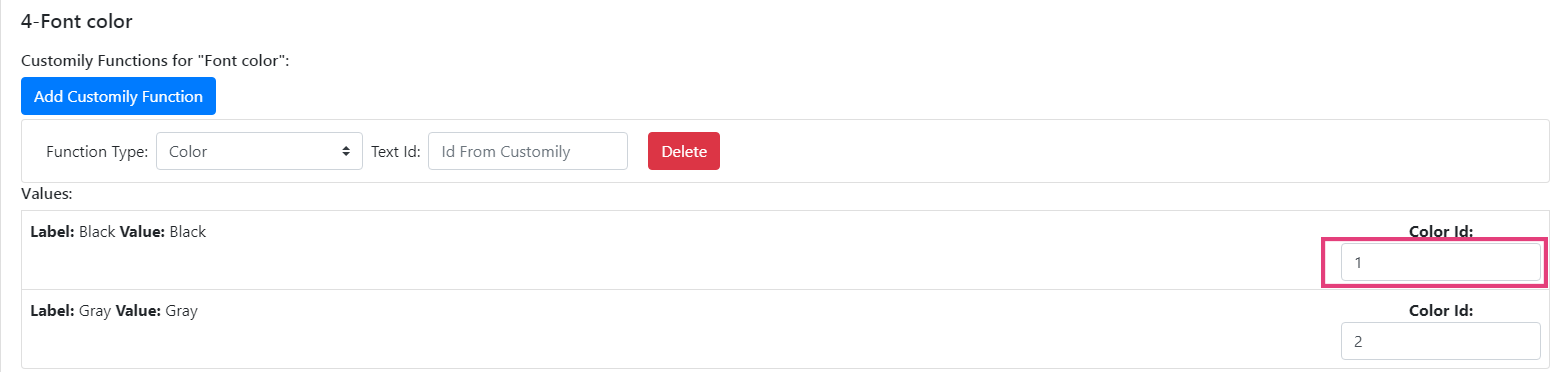
By default, all color id will start in 1, 2, 3... and so on. So if your values
are in the same order of the color options you are good to go!
▶ Change Dynamic Vector Function
This function executes the change of a dynamic vector in the preview. This can
be many things depending on the dynamic vector, like an icon, clipart, frame,
etc.
The changes will always be between the different options available in the
dynamic vector element.
It is used with dropdowns and swatch options.
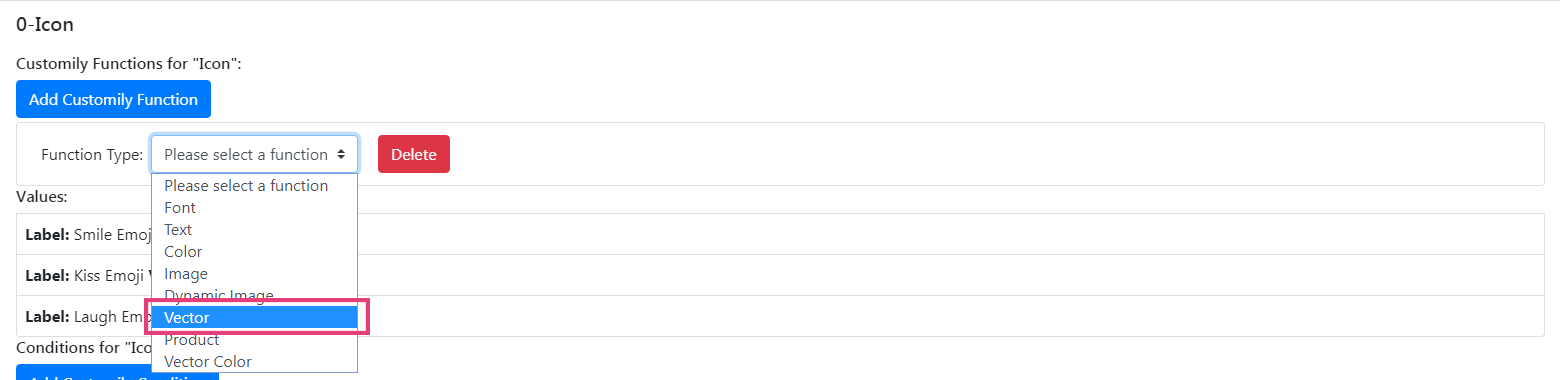
To add a dynamic vector function
- Go to the option you want to work with
- Go the Customily Functions for (input name) section and click **Add
Customily Function
**

- Select the **Function Type = Vector
**
- Enter the Personalizable Element ID to connect the dynamic vector
function with a specific dynamic vector element from the preview. This is
the Unique ID of the dynamic vector element that was created on your
template.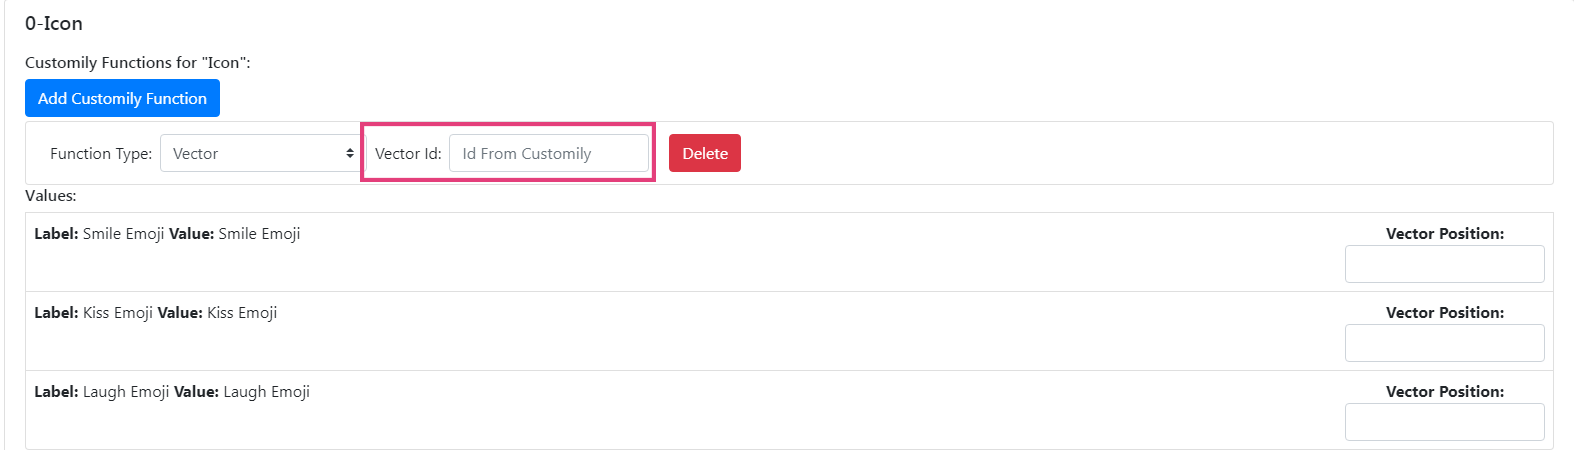
💡 Tip:
If you want to change several dynamic vectors at the same time, you can assign
multiple dynamic vector functions to the option. Just click again **Add
Customily Function** to add another dynamic vector function, and link it to
the extra dynamic vector element you want to change.
- Go to the options values and make sure they are connected with the correct
dynamic vector option of your dynamic vector element.
Vector position = dynamic vector option of the dynamic vector element on
your template
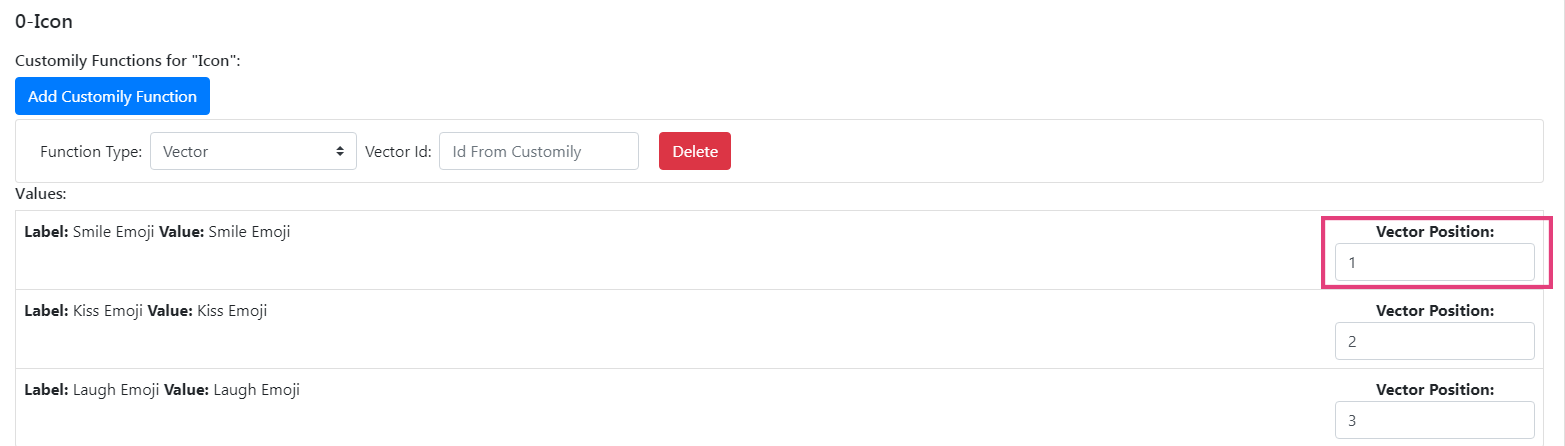
By default, all vector positions will start in 1, 2, 3... and so on. So if
your values are in the same order of the dynamic vector options you are good
to go!
▶ Add sticky preview
Sticky Preview is the ability to keep the preview on the top of the page while
scrolling through the options. While Sticky Preview is enabled, the preview
will "stick" to the screen even as the user scrolls up or down the page.
To enable sticky preview
- Go to your Storefront menu on BigCommerce 
- Go to the Script Manager section 
- Click create a script 
- Name your script customily storefront options and copy the following configuration 
- Paste the following code in the script contents and save the script
<script>
window.customily = window.customily || {};
window.customily.stickyPreview = true;
window.customily.stickyLeftContainer = 'preview parent element';
window.customily.stickyRightContainer = 'form parent element';
window.customily.stickyMarginTop = 200;
</script>
Important:
This script enables and disables several features, such as zoom on hover,
uploaded images cover and sticky preview. To enable sticky preview, make sure
stickyPreview is set to true , like this:
**window.customily.stickyPreview = true;
To disable sticky preview, instead set stickyPreview to false.**
▶ What is Customily Options App for BigCommerce
Customily Options is a BigCommerce App that provides you with the ability to
offer more dynamic versions of your products with different option selections,
connecting them with the templates created on Customily.
Here you can connect your BigCommerce Options, with the preview so any
selection a customer makes will be reflected on the dynamic preview.
With Customily Options you can:
▶ Access Customily Options App on BigCommerce
Follow these steps to login to your Customily Options App:
- From your BigCommerce Admin, select Apps 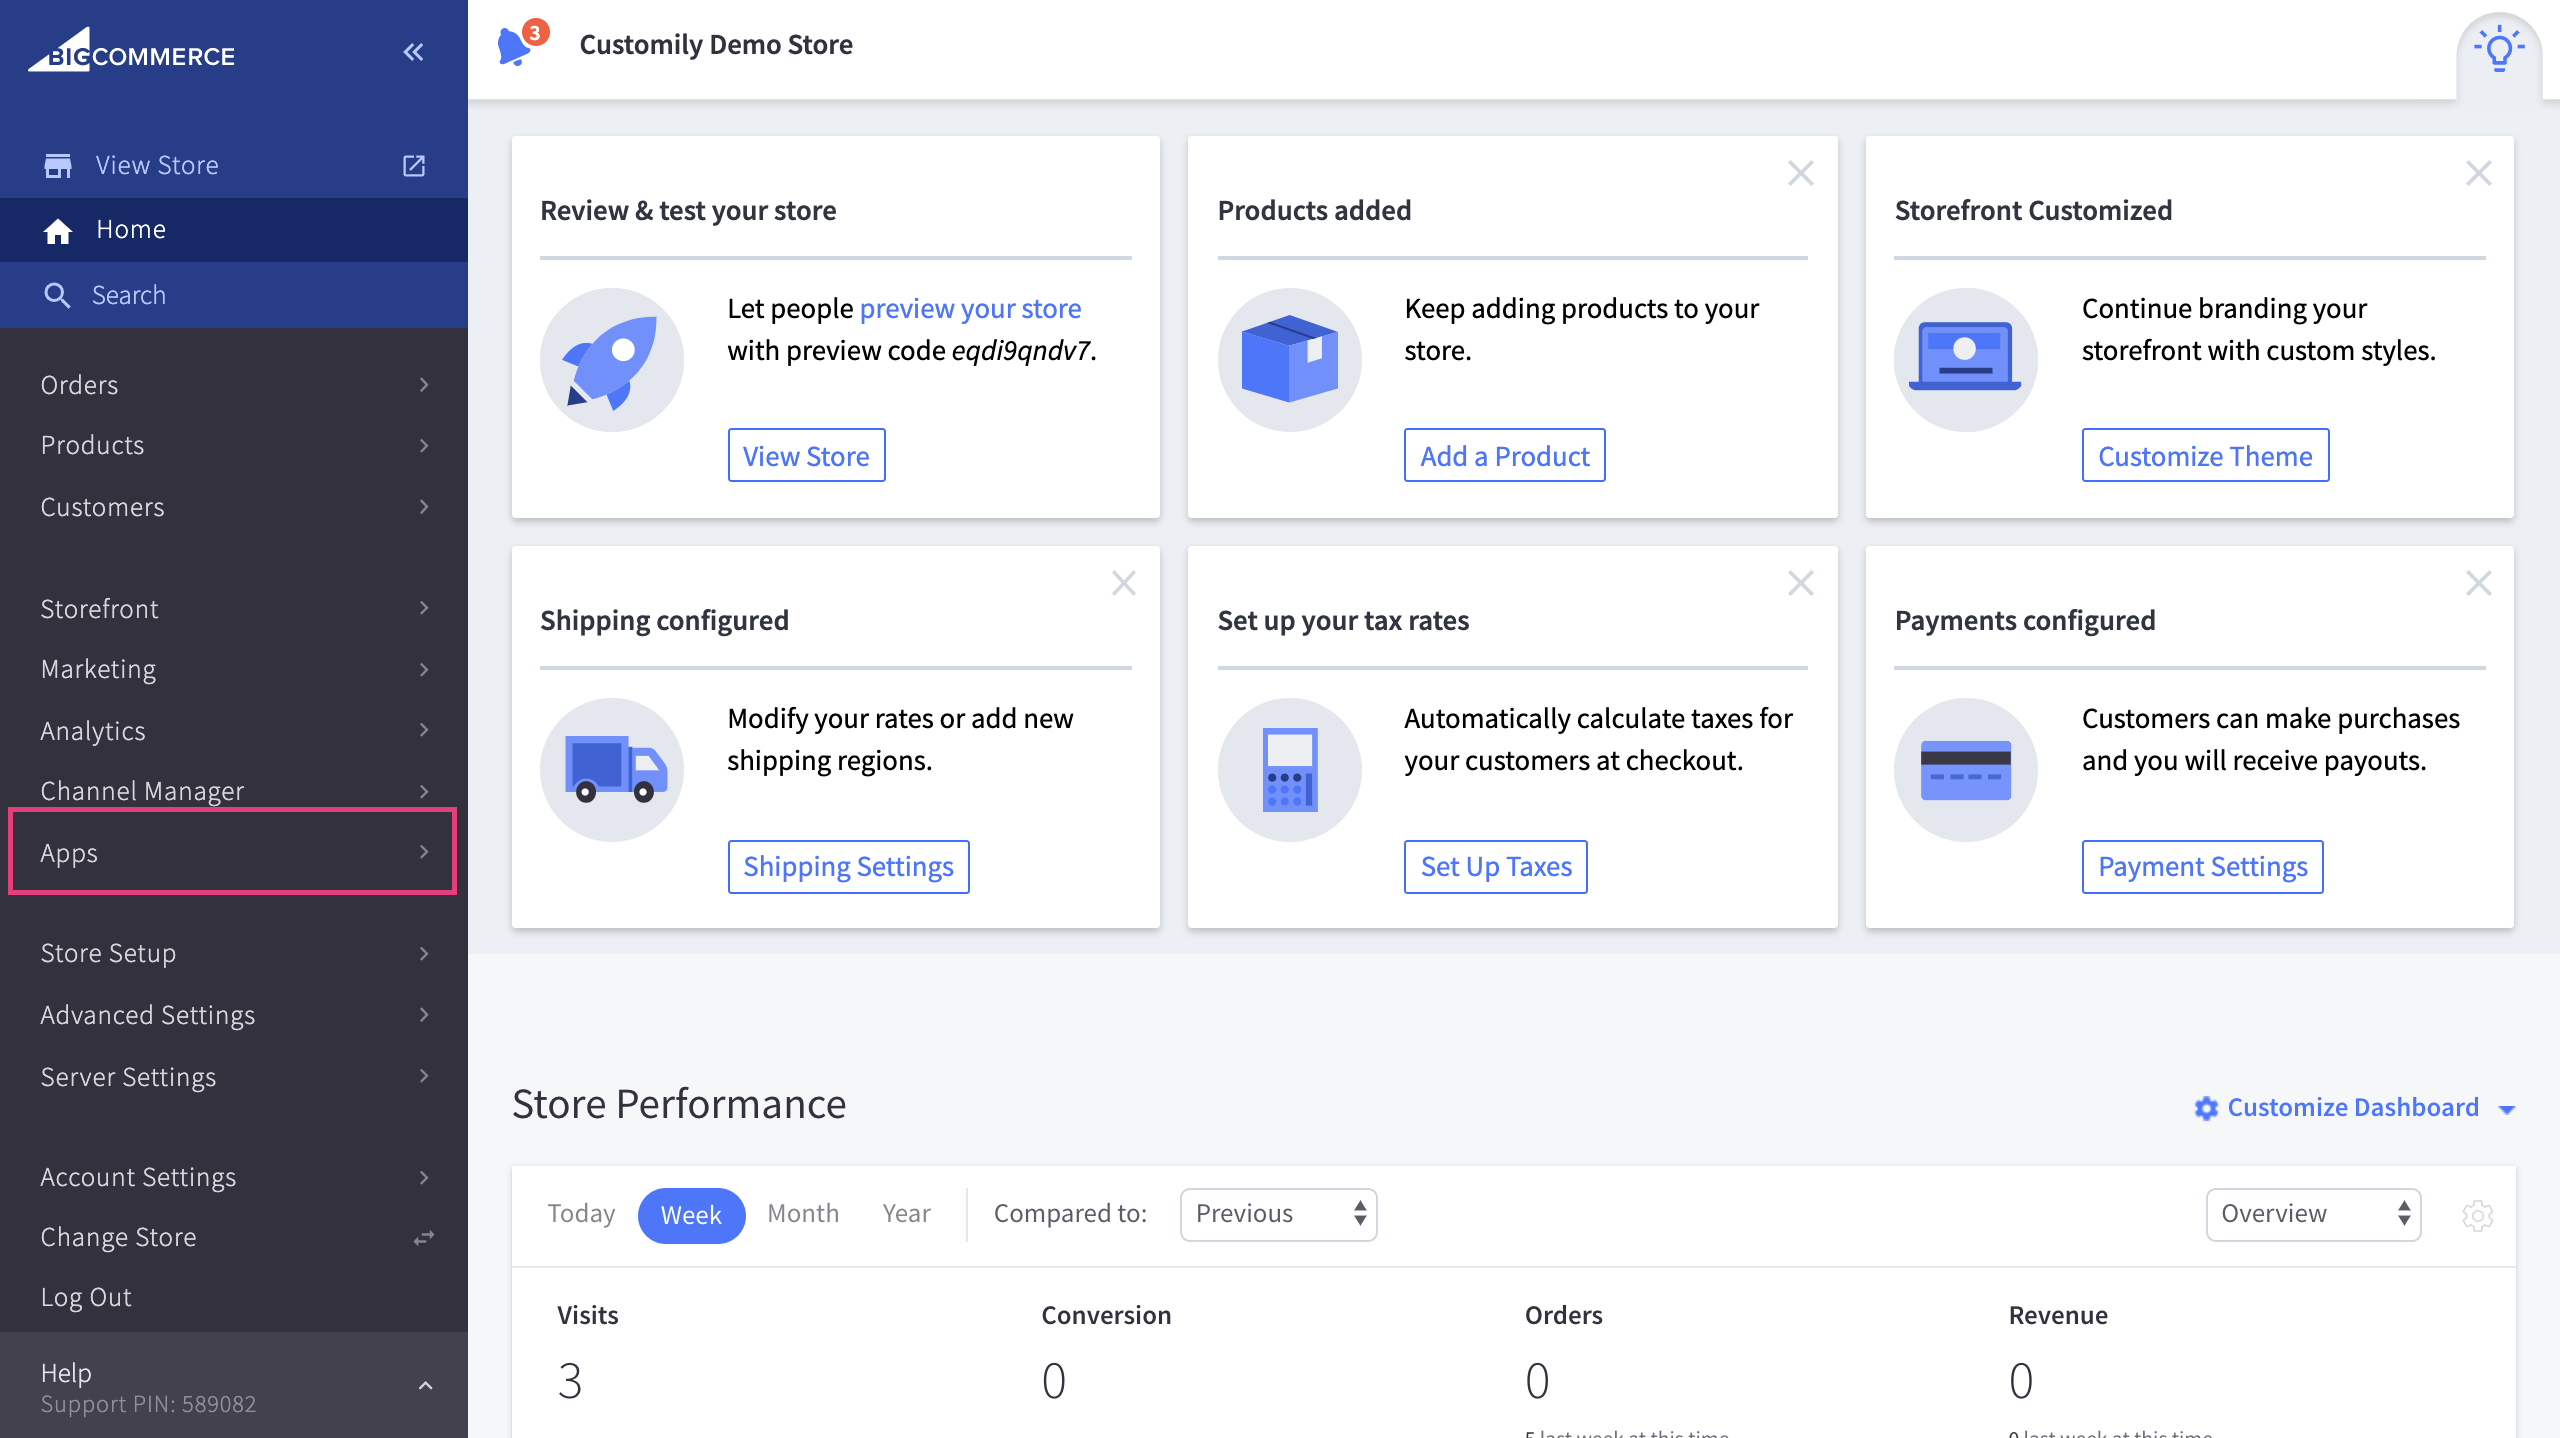
- From your App list select Customily Options 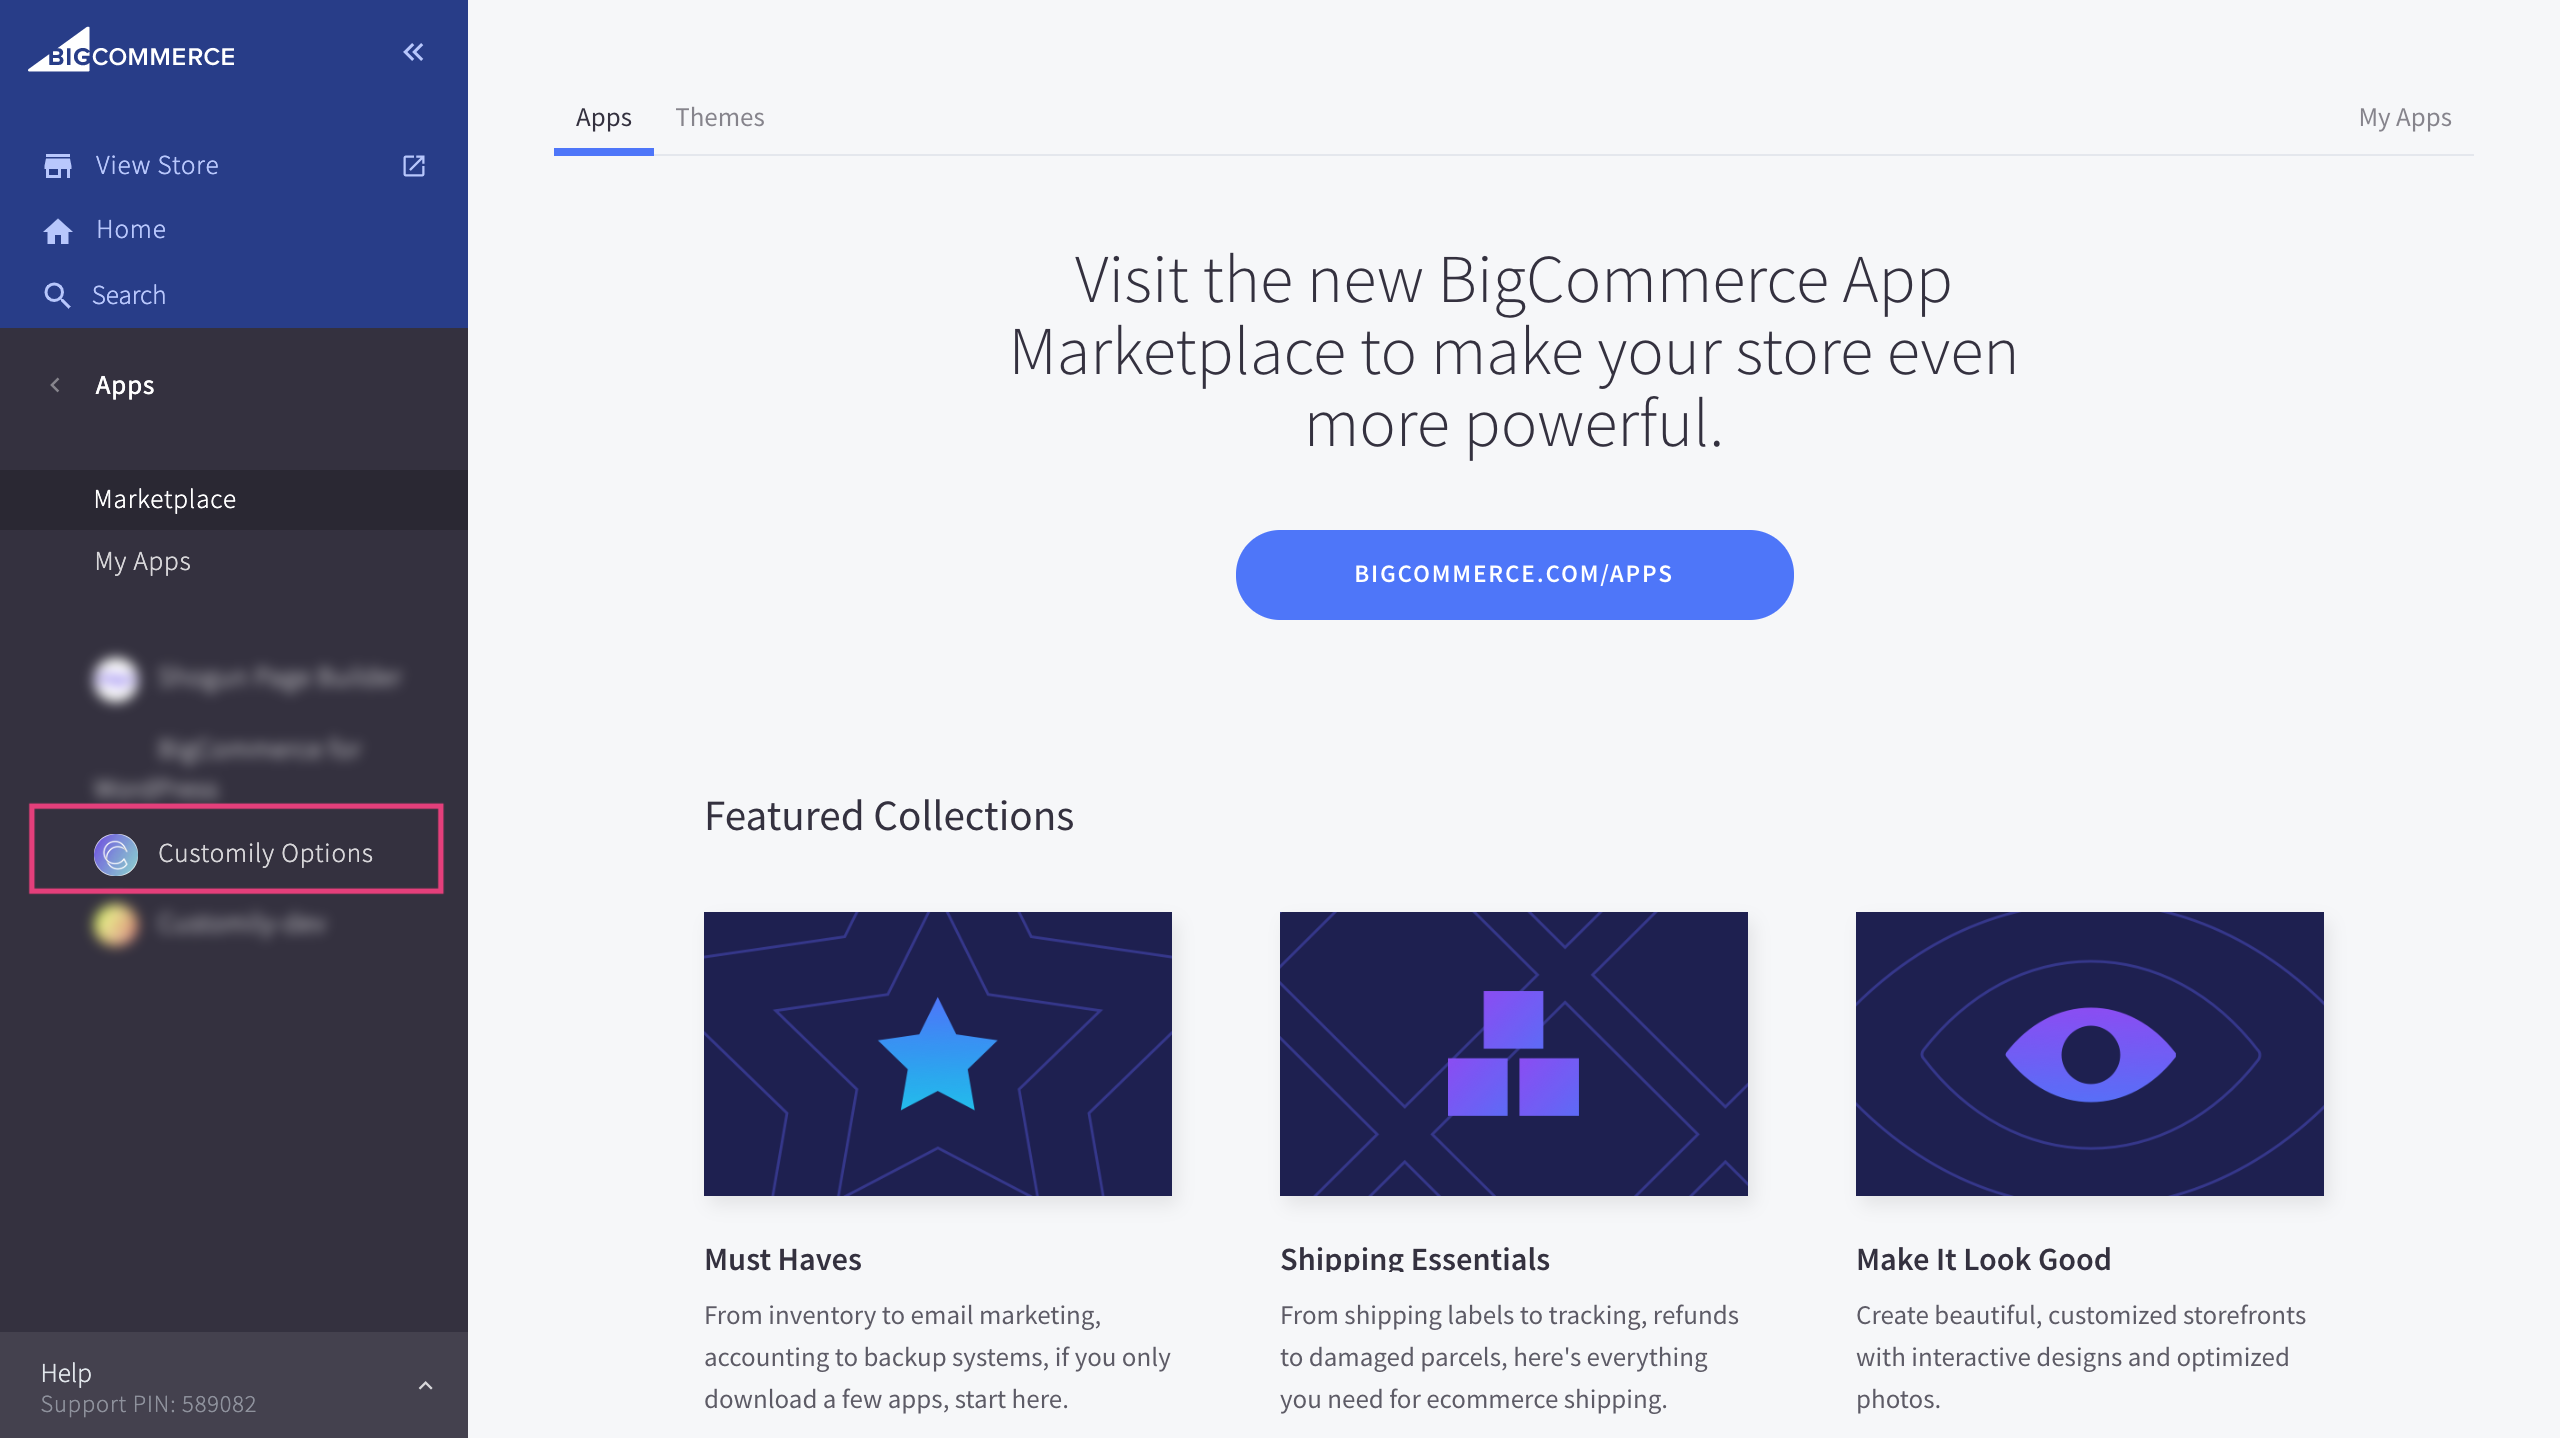
▶ Add conditions to an option
Conditions create rules that will show or hide an option based on the
customer's previous selections. With conditions you can, for example, show an
option only if another specific option is selected.
When creating an option in an option set, you can add to it conditions.
To assign a condition to an option
- Browse to the option set, and to the option you want to add a condition to, click that option to expand it
- Scroll to the Conditions section and expand it by clicking it 
- Click Add Condition 
- Complete the condition's rules
- Select action Show / Hide
- When select option(the option that will generate the condition)
- is -> select a value from that option

▶ Change options styles
The way Customily Options are displayed depends on the type of option if it's
a text field, a swatch, a dropdown, etc.
Specific styles can be defined through the settings panel
To change Customily Options styles
- Click on settings 
- Click on the styles tab
- There you'll find all the different styles you can edit for the different Customily Options. The styles you can edit are:
Style | What does it change?
---|---
Enable accordions on options | This will hide each option inside an expandable accordion.
Hide options under 'Personalize' button | This will hide all the options. Options will only be visible when customers hit the “personalize button”.
Spacing between options | Determine how many space there is between options
Line between options | Add a line between each option
Change swatch shape | Choose from square, round or rounded square swatches
Change swatch size | Choose from small, medium and big swatches
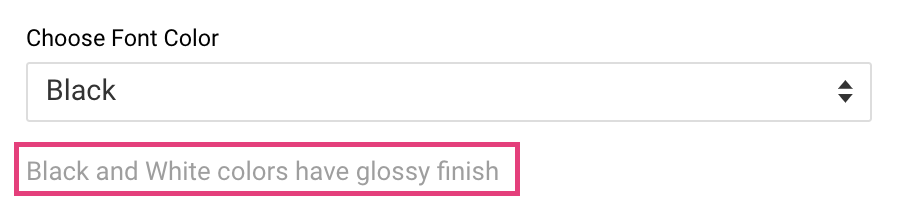
Required message styles | Change the wording from the required text, and the text color
▶ Change Option Styles in Magento
The way Customily Options are displayed depends on the type of option if it's
a text field, a swatch, a dropdown, etc.
Styles are usually picked up from your store's styles automatically, however,
if you want to change styles you can do that through simple CSS.
To change Customily Options styles through CSS
- Go to Store on the tab on the left and then to
Configuration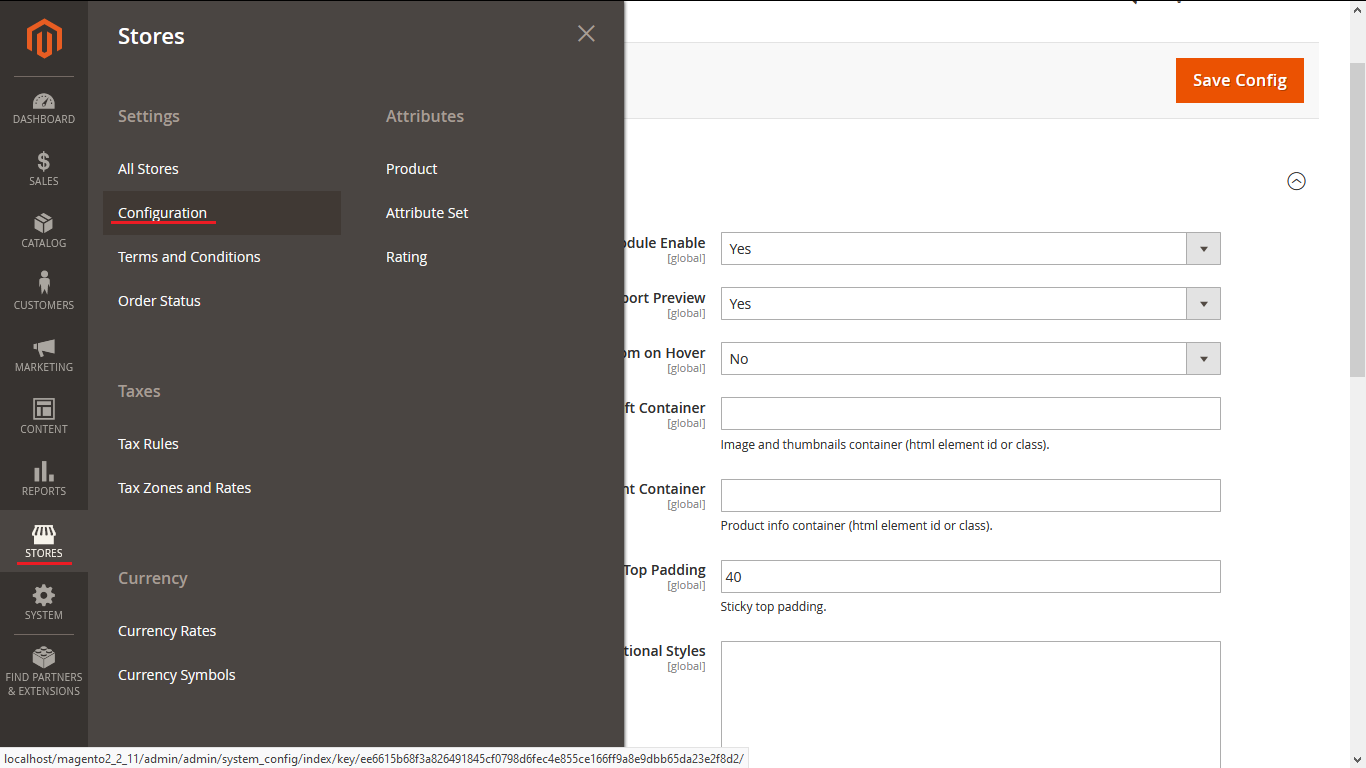
- Pick Customily and you'll see the panel labeled additional styles
where you can modify Customily's CSS

- Remember to flush the caché for the changes that you made to take place,
use php bin\magento cache:flush.
Be careful
If you are not familiar with CSS, we recommend you find someone to help you
adjust the styles of your options. Changing styles without knowing how can
result in breaking the layout of your product page.
CSS Classes for Customily Options
Element | Class Selectors
---|---
Text Input | .clfield_group input
Drodpown | .clfield_group select
Swatch | .cloptions .swatch-container .swatch .cloptions .swatch-container label .cl_options .swatch-container label img
Image upload button | .cl_upload-button
Remove uploaded photo button | .cl_remove-image
Option Labels | .customily_option label
Help Text | .help-text
Photo size limit text | .cl_image-invalid-size
▶ Make user uploaded images cover the entire area
By default, user-uploaded images are set to fit the area of the
placeholder. If you want user-uploaded images to cover the entire area
instead, you should enable image cover on your store.
Here's the difference between images uploaded to fit, and images uploaded to
cover the placeholder area.
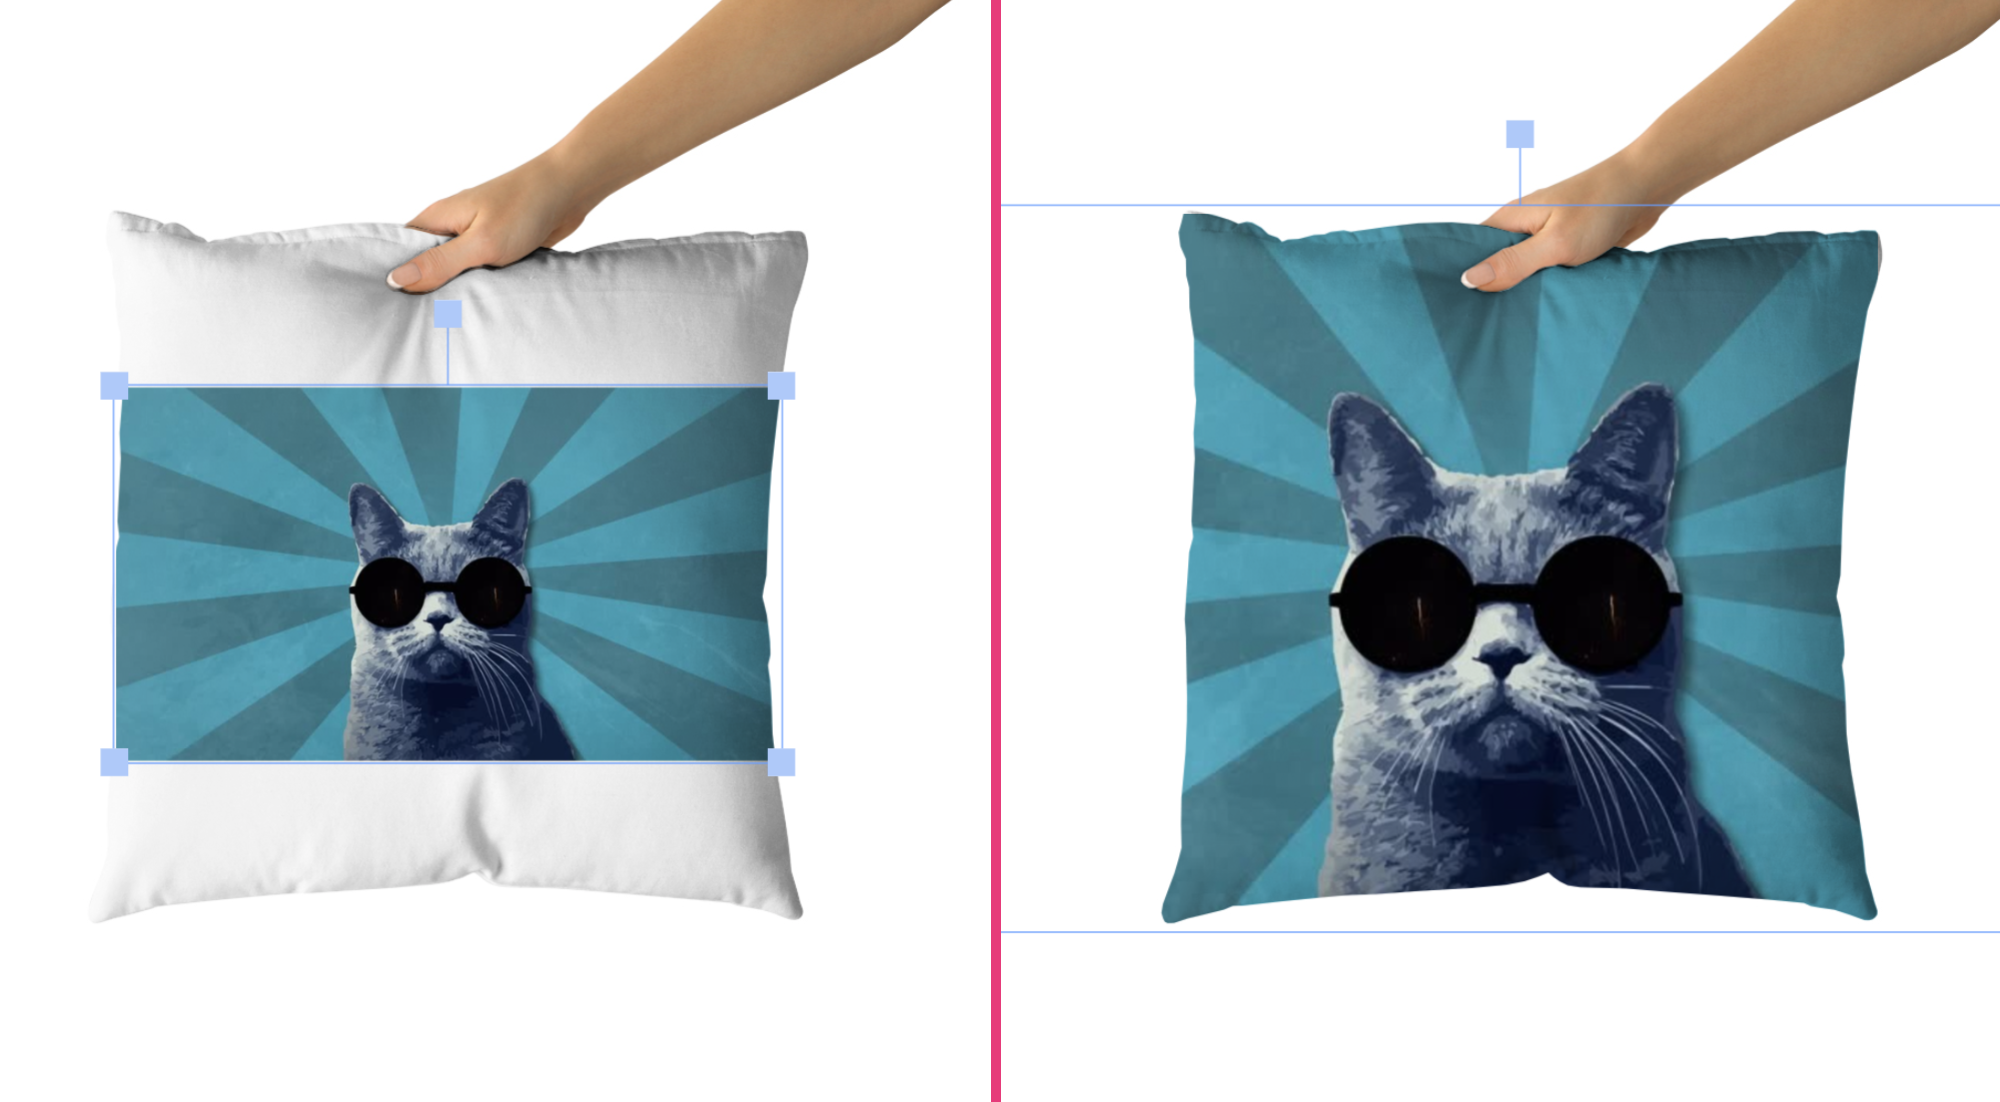
The image on the left is set to fit (default behaviour, with image cover disabled). Here, the uploaded picture is resized to make sure **the entire
picture fits inside the placeholder**. Depending on the proportions of the
picture, some areas of the placeholder will remain empty.
The image on the right is set to cover (image cover enabled). Here, the
uploaded picture is resized to make sure **the picture covers the entire
placeholder** , where no areas of the placeholder are empty. This is also
referred to as auto stretch.
To enable image cover
- Go to your Storefront menu on BigCommerce 
- Go to the Script Manager section 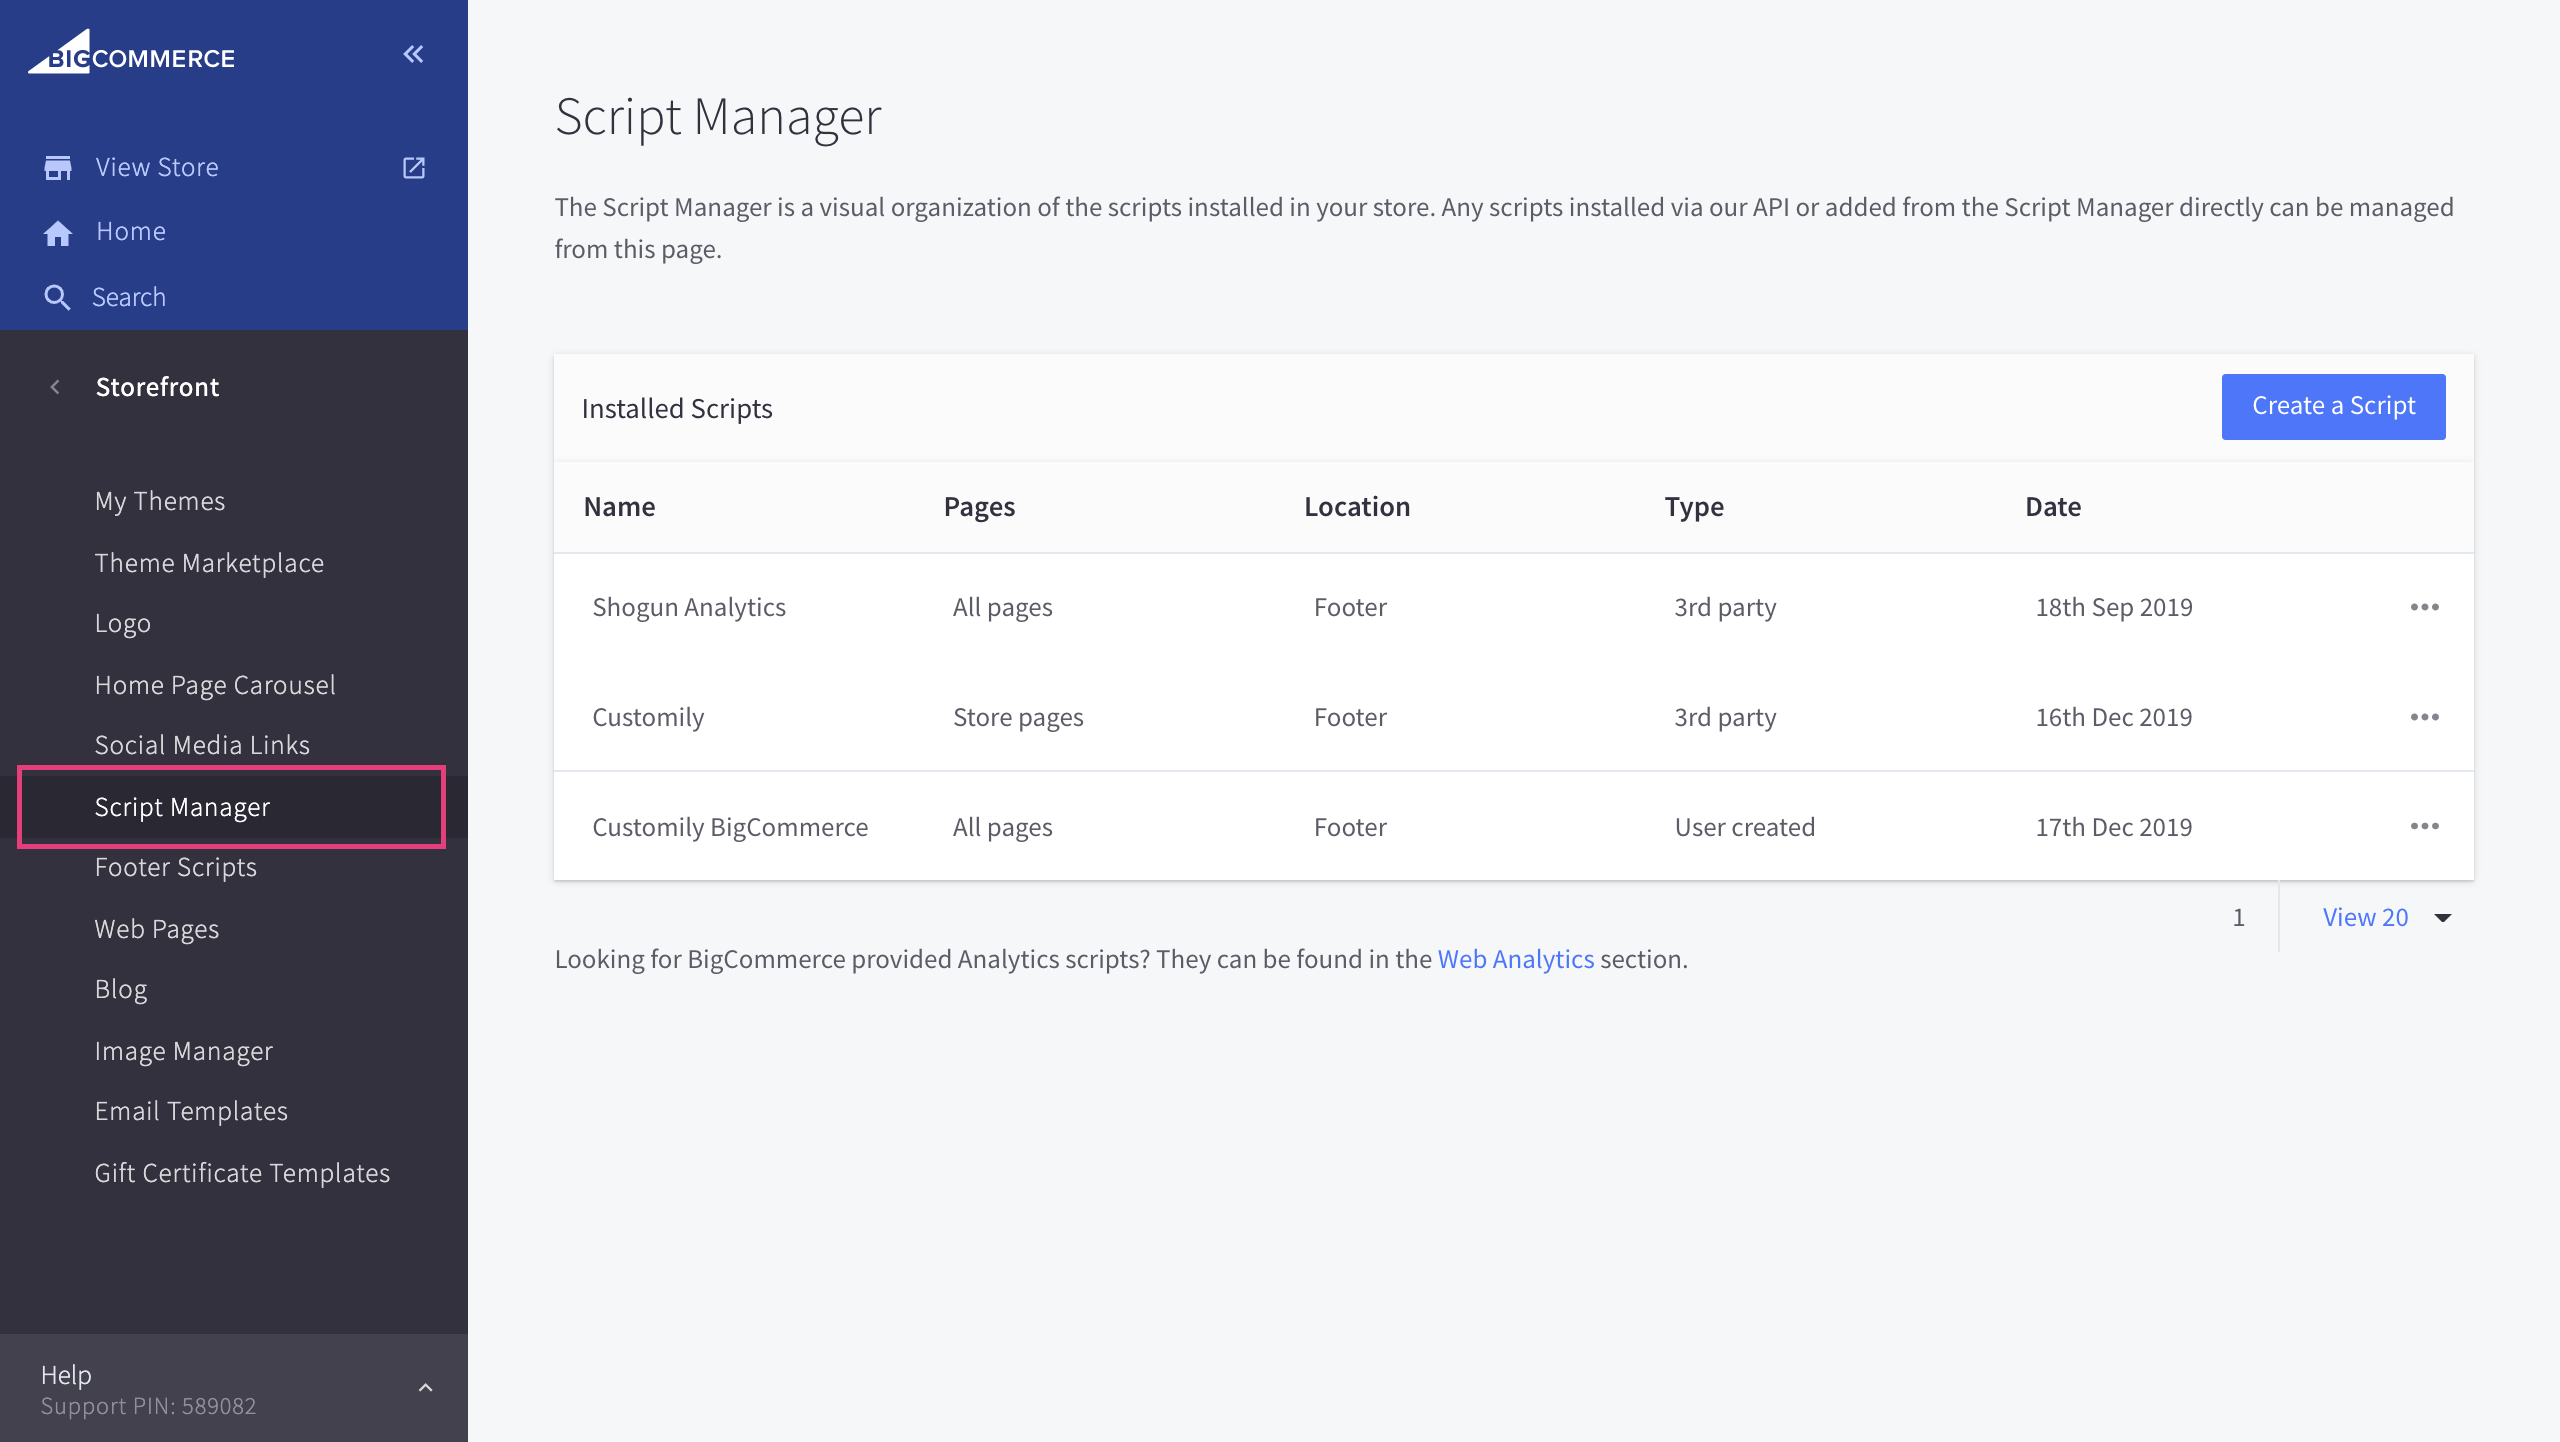
- Click create a script 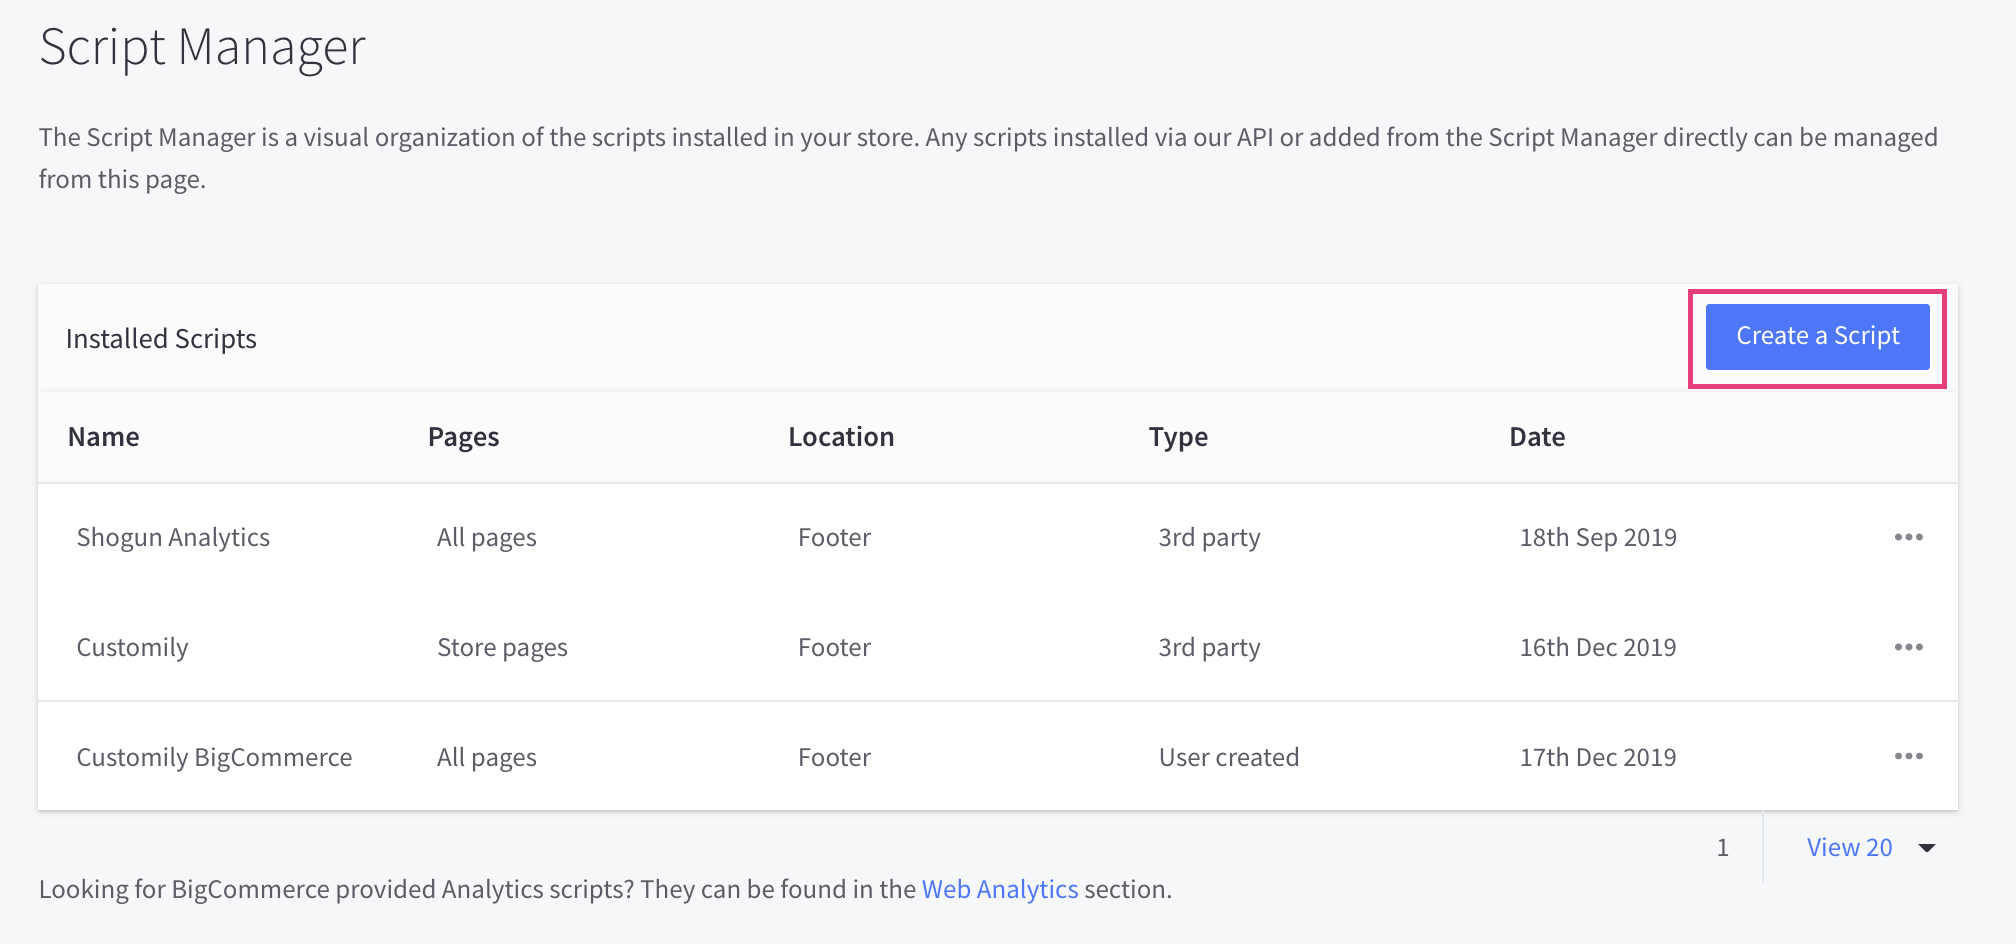
- Name your script customily storefront options and copy the following configuration 
- Paste the following code in the script contents and save the script
Important:
This script enables and disables several features, such as zoom on hover,
uploaded images cover and sticky preview. To enable image cover, make sure
imagesCover is set to true , like this:
**window.customily.imagesCover = true;
To disable sticky preview, instead set imagesCover to false**.
▶ Upload Image Function
This function executes the upload of the customer's image into the preview.
It is used exclusively with the upload image option.
To add an upload image function
- Go to the option you want to work with
- Make sure it is an**image upload option
**
- Go the Customily Functions for (input name) section and click **Add
Customily Function
**

- Select the **Function Type = Image
**
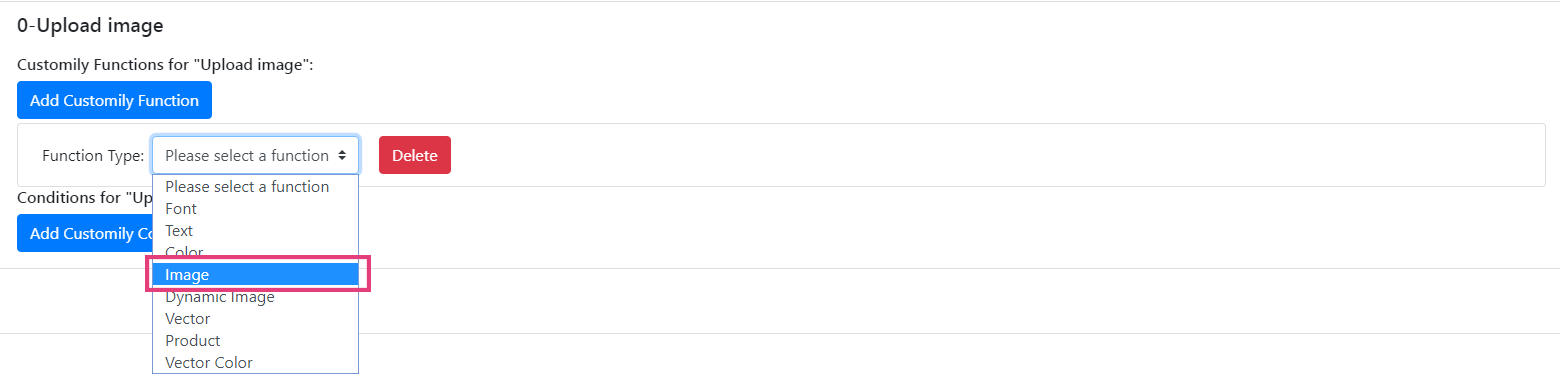
- Enter the Personalizable Element ID to connect the upload image
function with a specific image placeholder element from the preview. This
is the Unique ID of the image placeholder that was created on your template.

▶ Change Text Font Function
This function executes the action of changing the font of a text on the
preview. The changes will always be between the text font options you have
added on the template.
It is used with dropdowns and swatch options.
To add a text font function
- Go to the option you want to work with
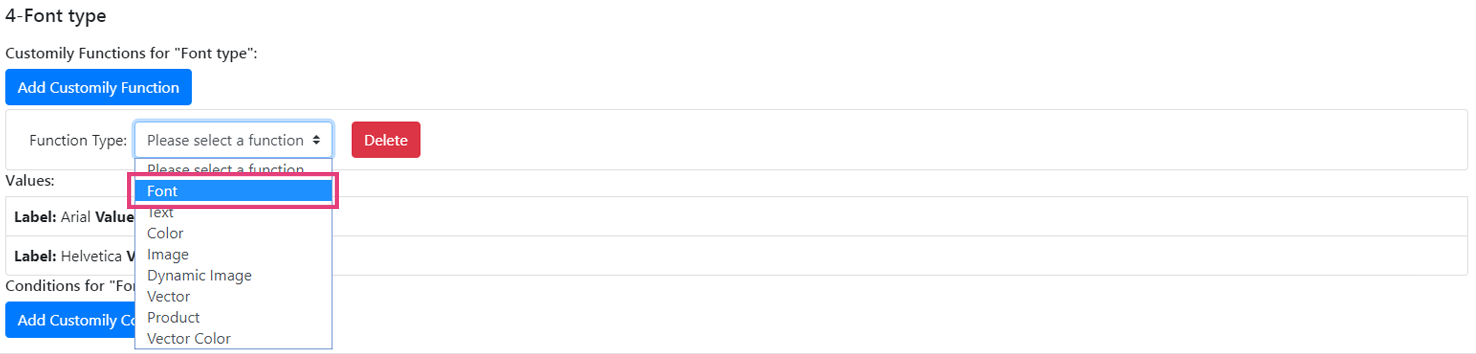
- Go the Customily Functions for (input name) section and click **Add
Customily Function
**

- Select the **Function Type = Font
**
- Enter the Personalizable Element ID to connect the font function with
a specific text element from the preview. This is the Unique ID of the
text element that was created on your
template.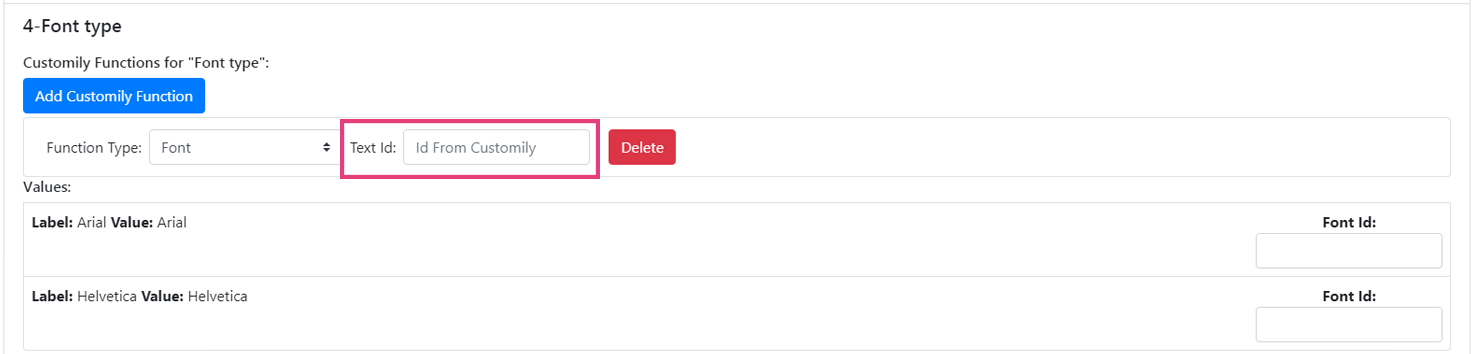
💡 Tip:
If you want to change fonts of several text elements at the same time, you can
assign multiple font function type to the option. Just click again **Add
Customily Function** to add another font function, and link it to the extra
text element you want to change.
- Go to the option values and make sure they are connected with the correct
font option of your text element.
Font id = font option of the text element on your template

By default, all font id will start in 1, 2, 3... and so on. So if your values
are in the same order of the font options you are good to go!
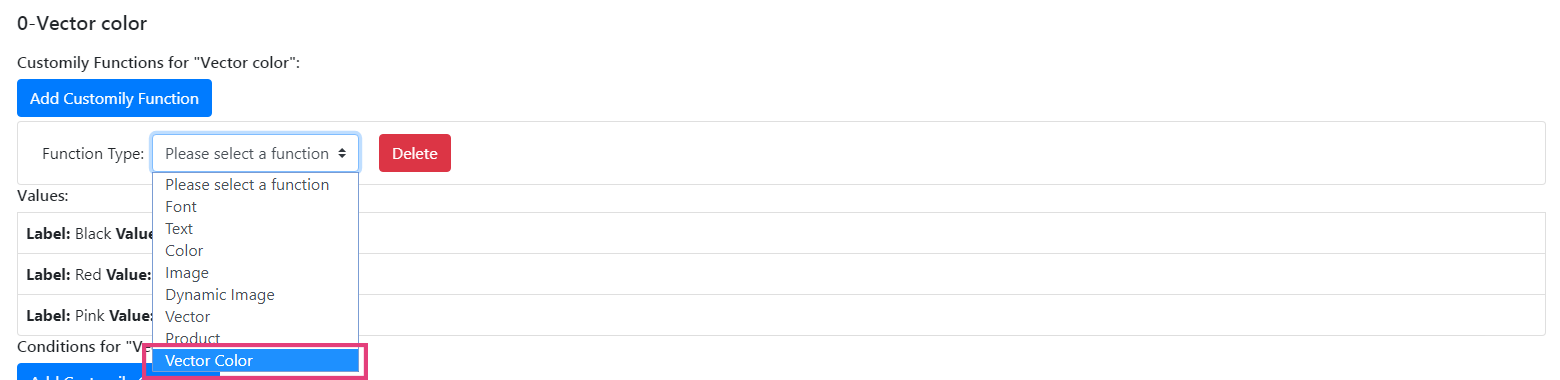
▶ Change Dynamic Vector Color Function
This function executes the change of the color of a dynamic vector in the
preview.
The changes will always be between the different color options available in
the dynamic vector element.
It is used with dropdowns and swatch options.
To add a dynamic vector color function
- Go to the option you want to work with
- Go the Customily Functions for (input name) section and click **Add
Customily Function
**

- Select the **Function Type = Vector Color
**
- Enter the Personalizable Element ID to connect the dynamic vector
color function with a specific dynamic vector element from the preview.
This is the Unique ID of the dynamic vector element that was created on your
template.
💡 Tip:
If you want to change several dynamic vectors color at the same time, you can
assign multiple dynamic vector color functions to the option. Just click again
Add Customily Function to add another dynamic vector color function, and
link it to the extra dynamic vector element you want to change.
- Go to the options values and make sure they are connected with the color
option of your dynamic vector element.
Color position = color option of the dynamic vector element on your
template
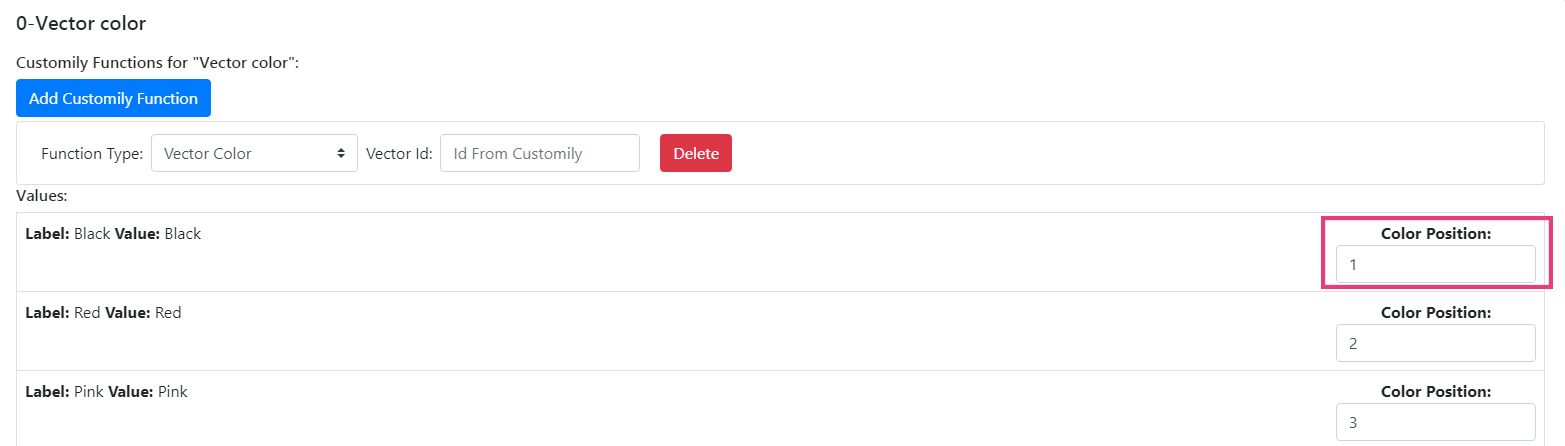
By default, all color positions will start in 1, 2, 3... and so on. So if your
values are in the same order of the dynamic vector color options you are good
to go!
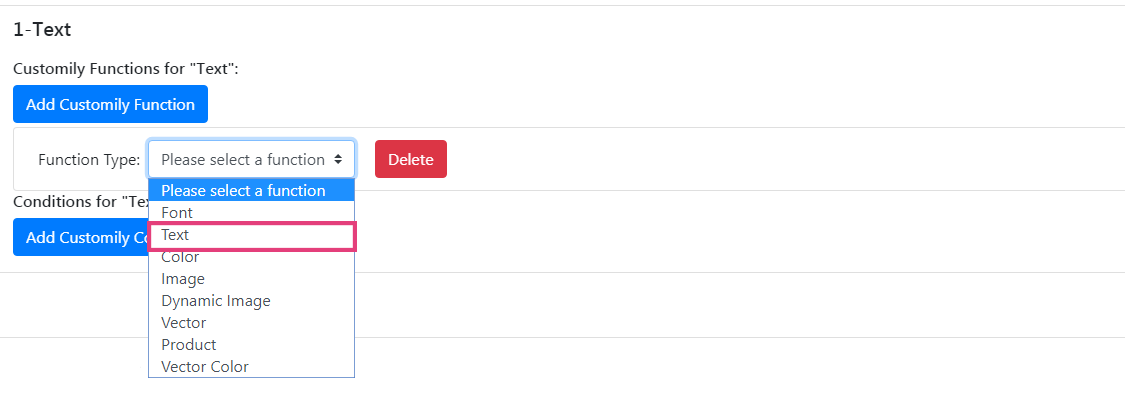
▶ Change Text Function
This function executes the action of adding text on the preview.
It is used mostly with text inputs, but it can also be used with dropdowns or
swatches if you want to type predefined text.
To add a text function
- Go to the option you want to work with
- Go the Customily Functions for (input name) section and click **Add
Customily Function
**

- Select the **Function Type = Text
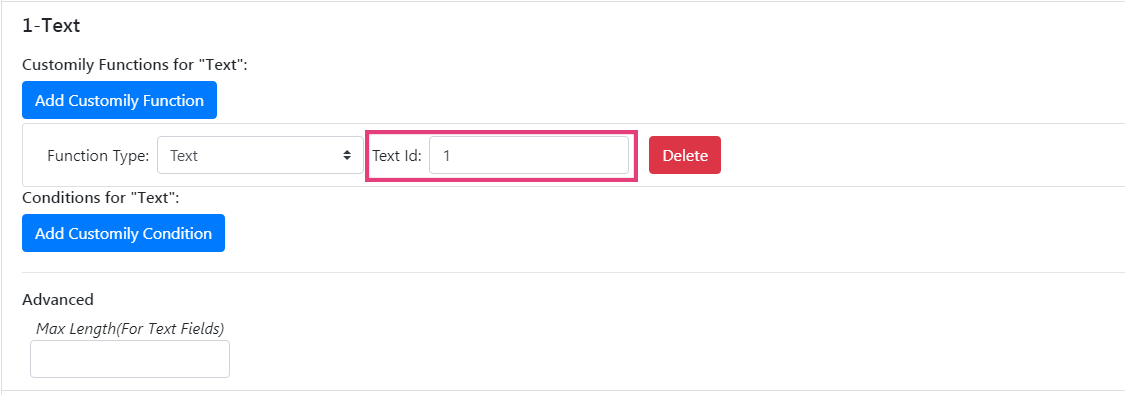
**
- Enter the Personalizable Element ID to connect the text function with
a specific text element from the preview. This is the Unique ID of the
text element that was created on your template.
💡 Tip:
If you want to change the writing of several text elements at the same time,
you can assign multiple text functions to the option. Just click again **Add
Customily Function** to add another text function, and link it to the extra
text element you want to change.
▶ Connecting Customily with your Walmart Store
To connect Customily to your Walmart store all you need to do is paste your
Walmart credentials into Customily, then the integration will be done
automatically.
To connect Customily with your Walmart store
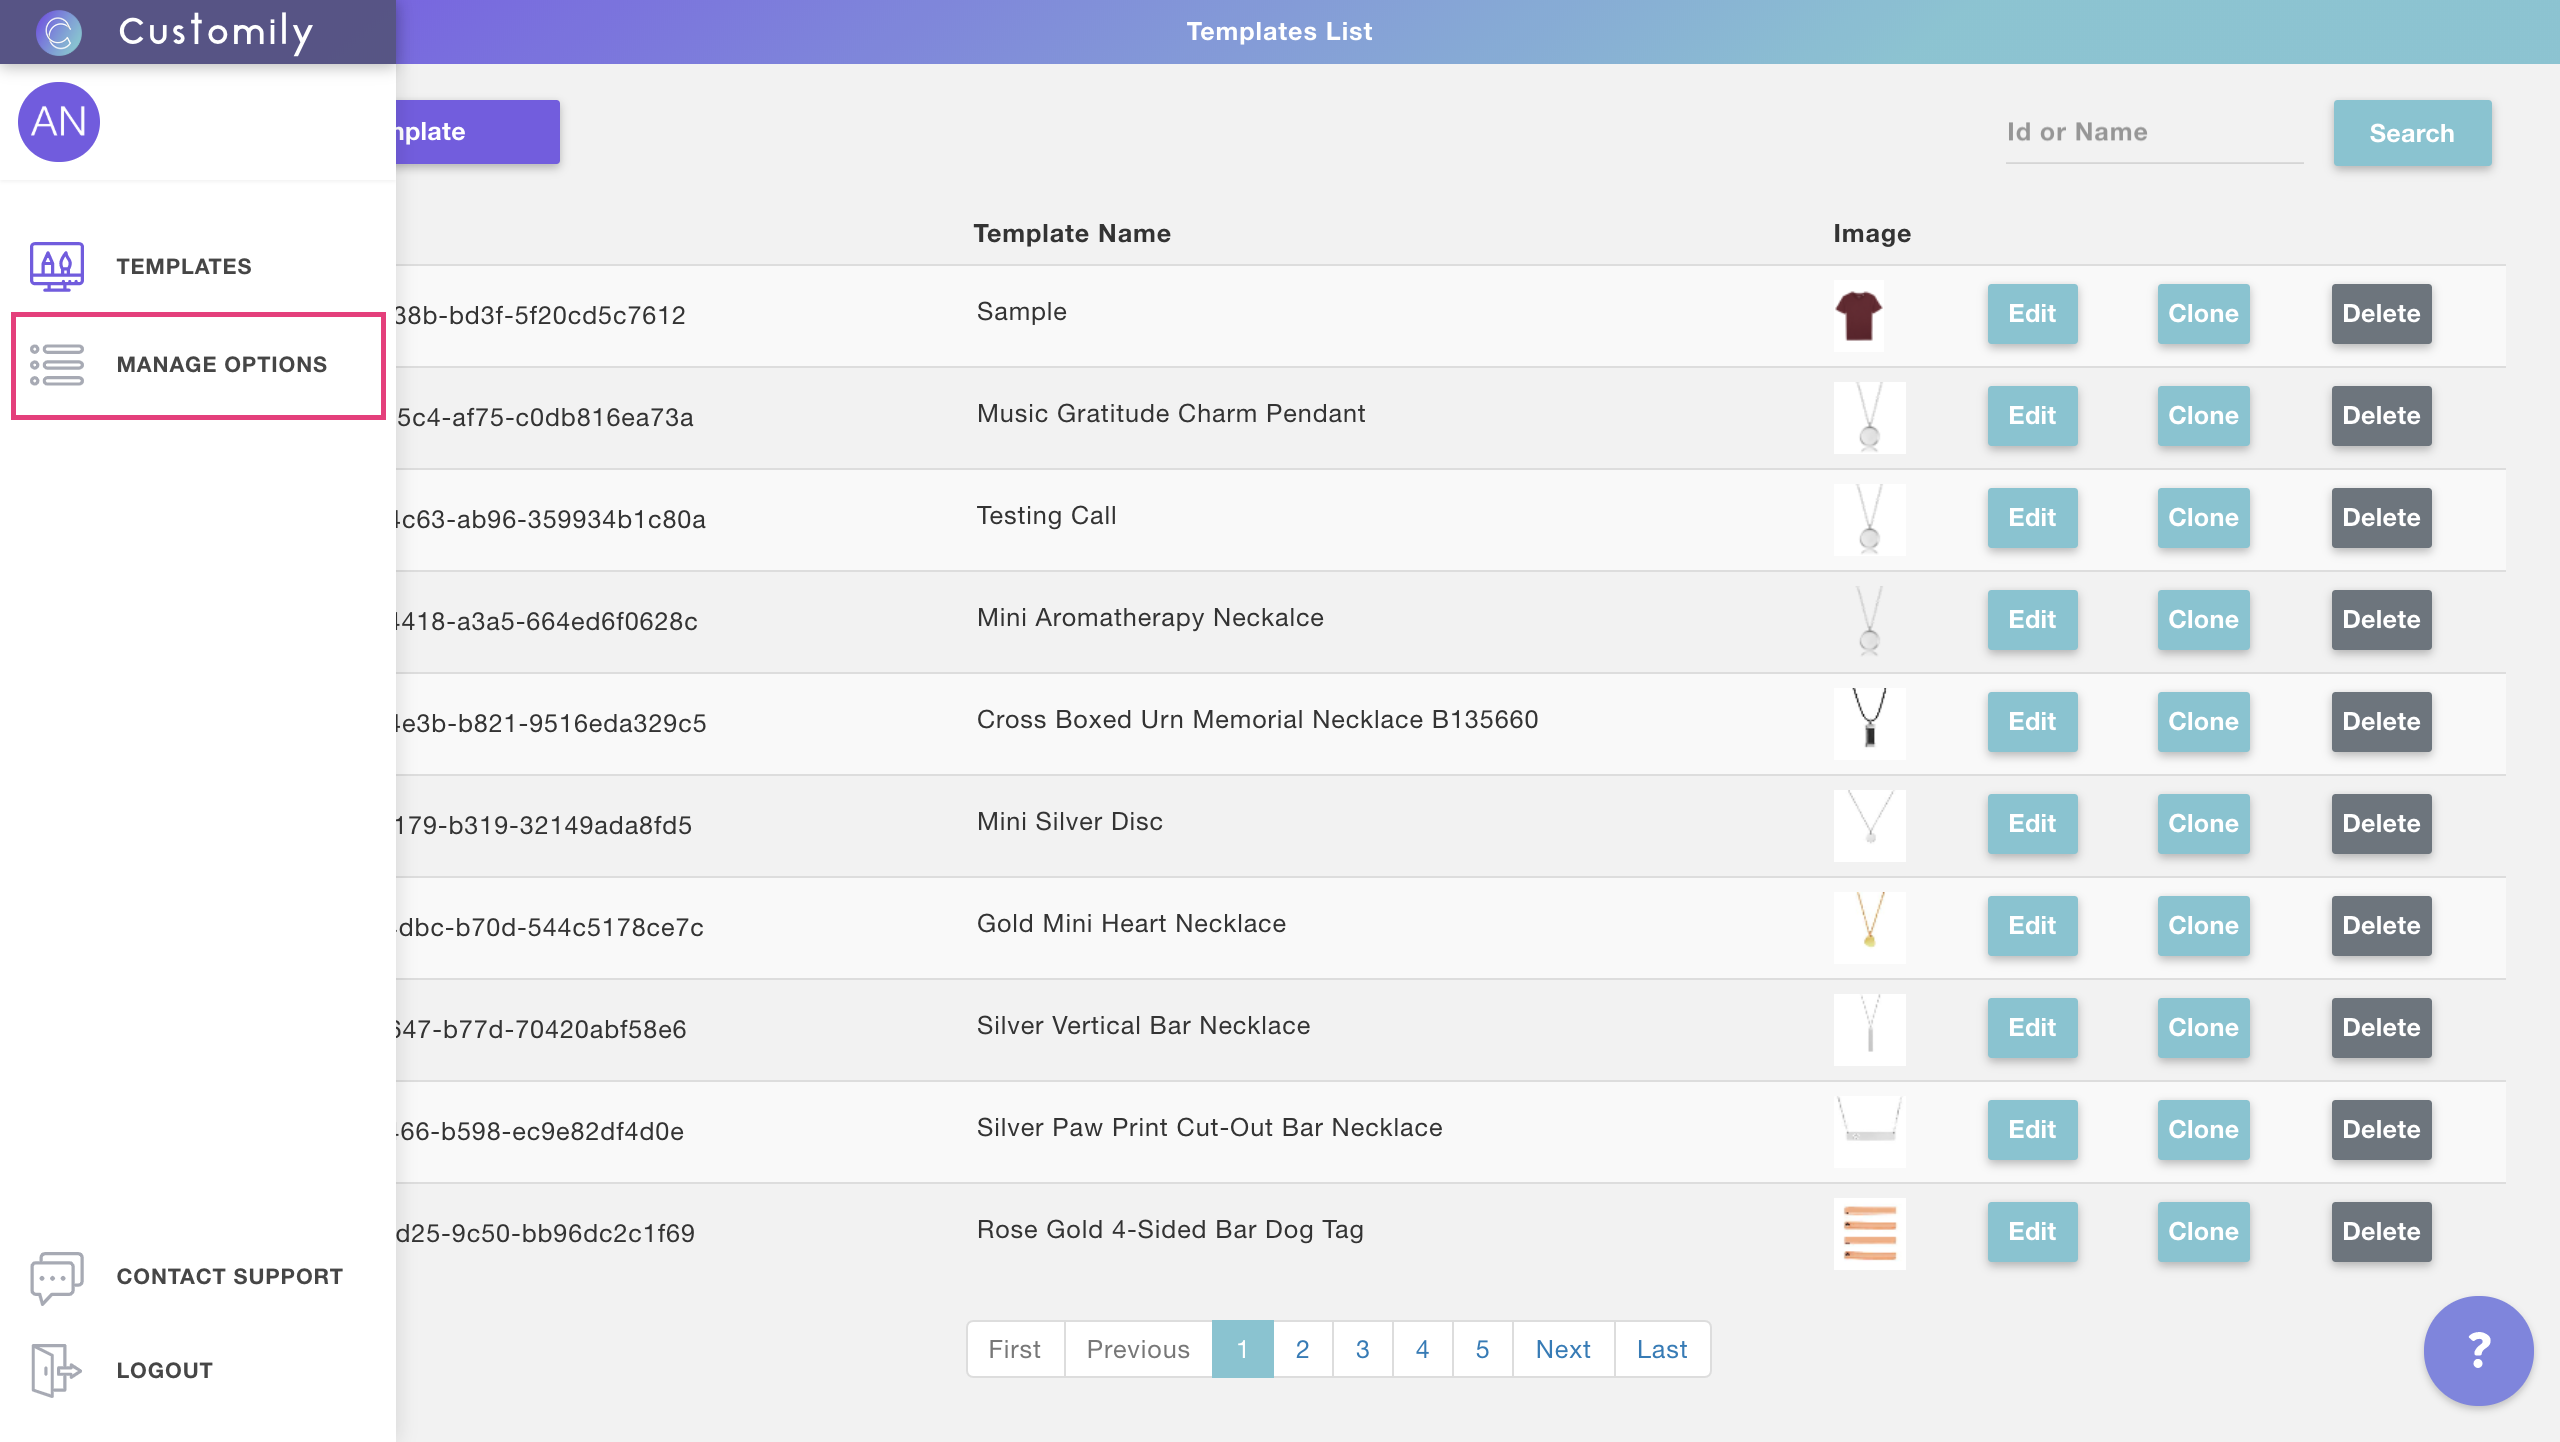
- Log in to your Customily User. On the sidebar, go to **Manage Options
**
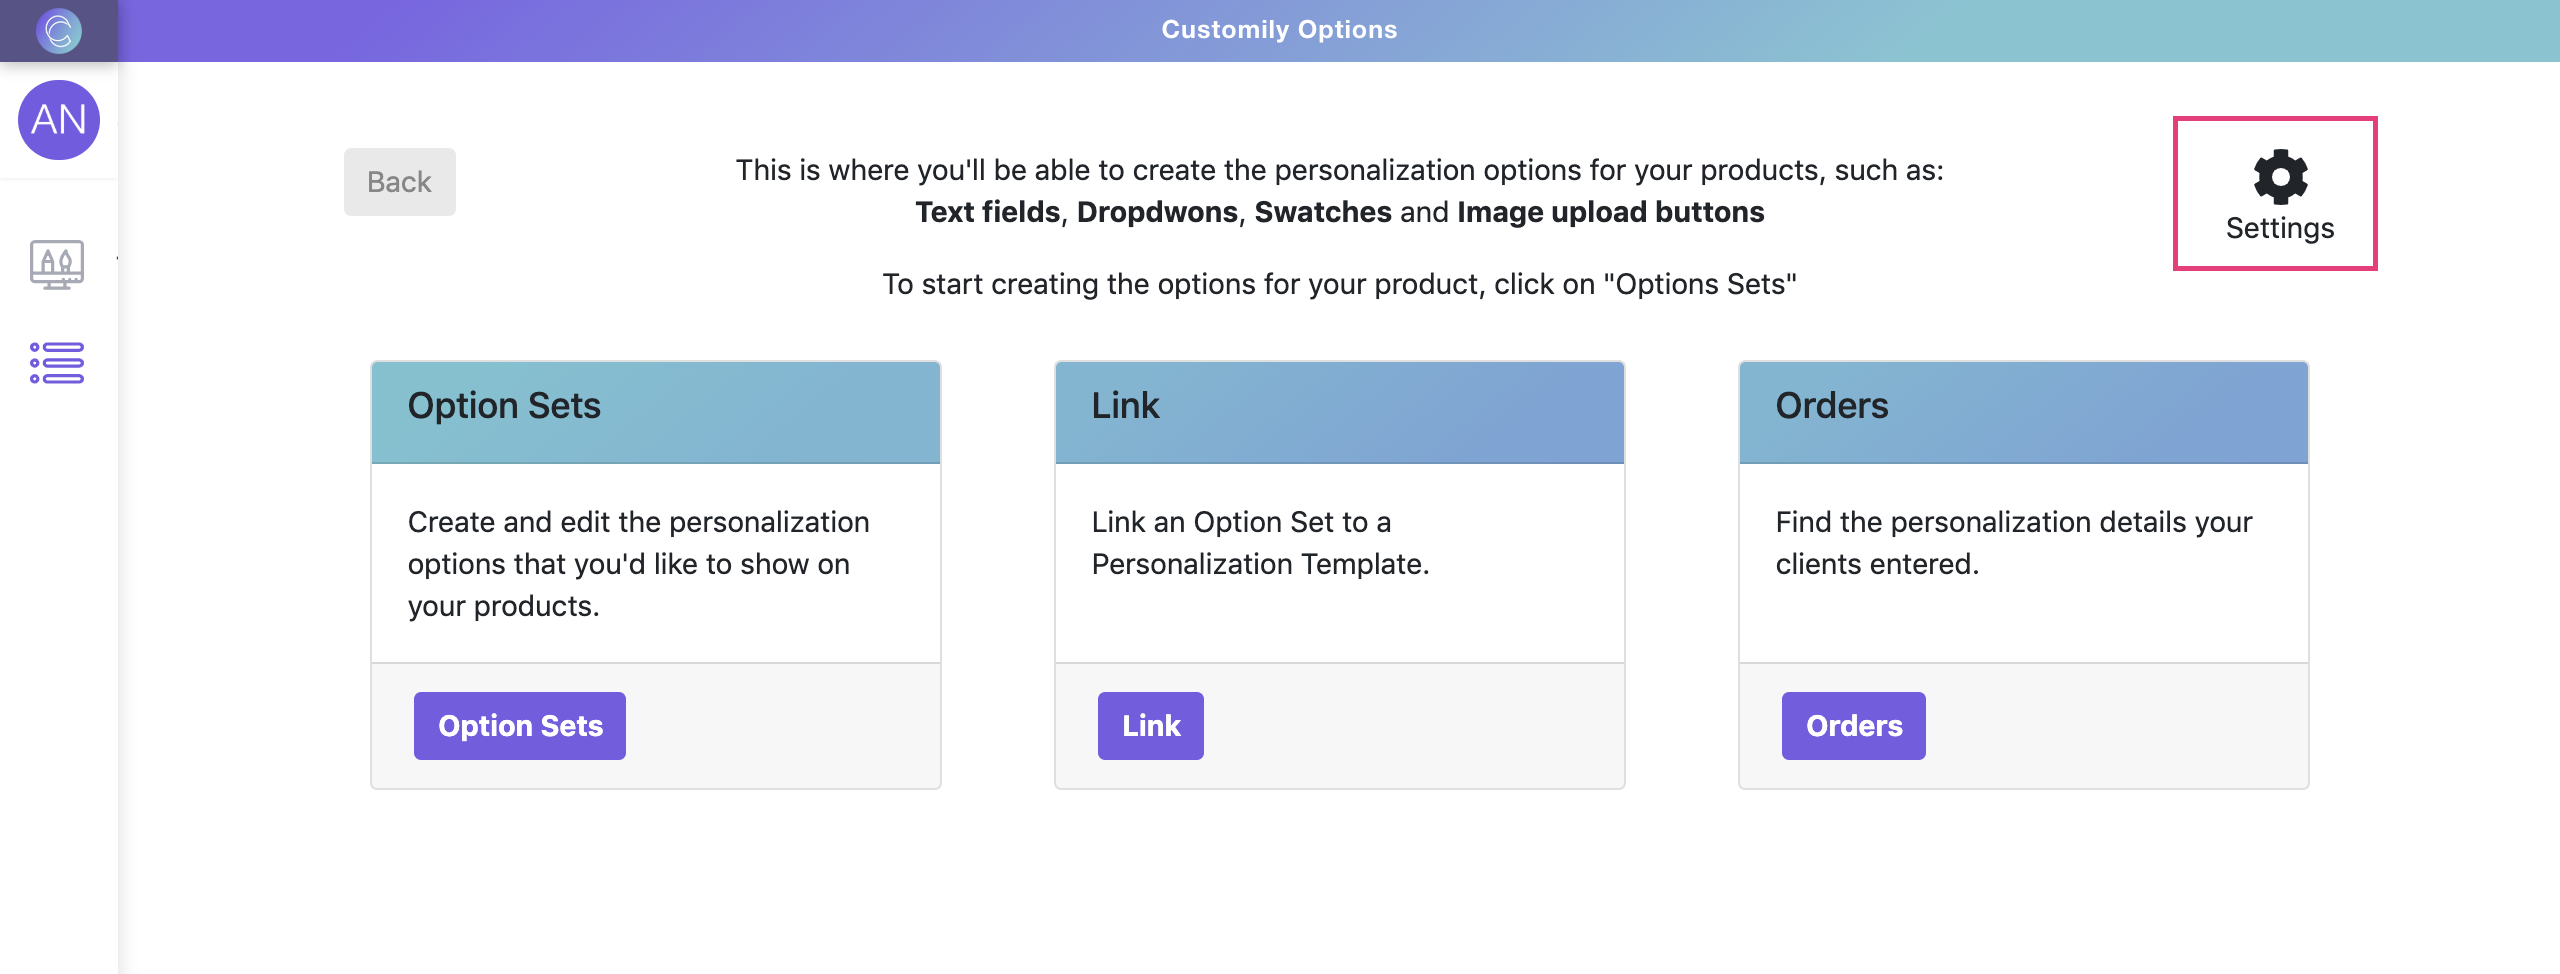
- On the options' page go to **settings
**
- Go to the advanced tab where you'll see the information you'll need to
provide to link Customily with your store
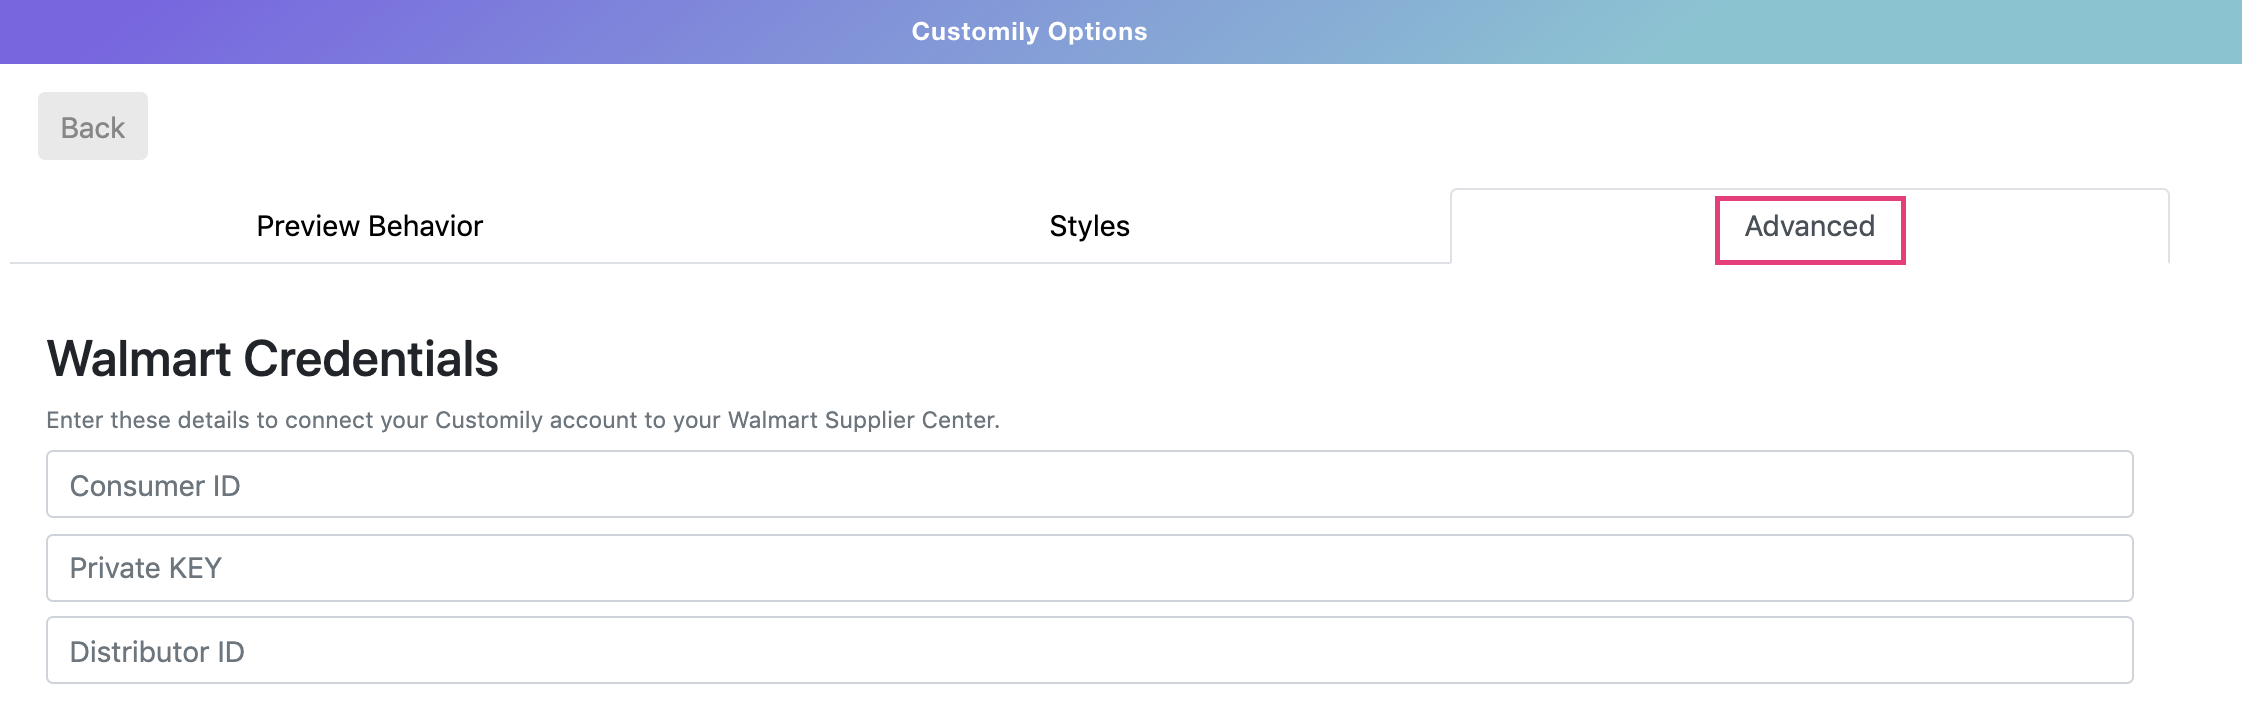
- The information you need to provide is:
- Consumer ID
- Private Key
- Distributor ID
If you don't know where to find your information on Walmart, follow the steps
below to find it.
Where to find your user credentials on Walmart
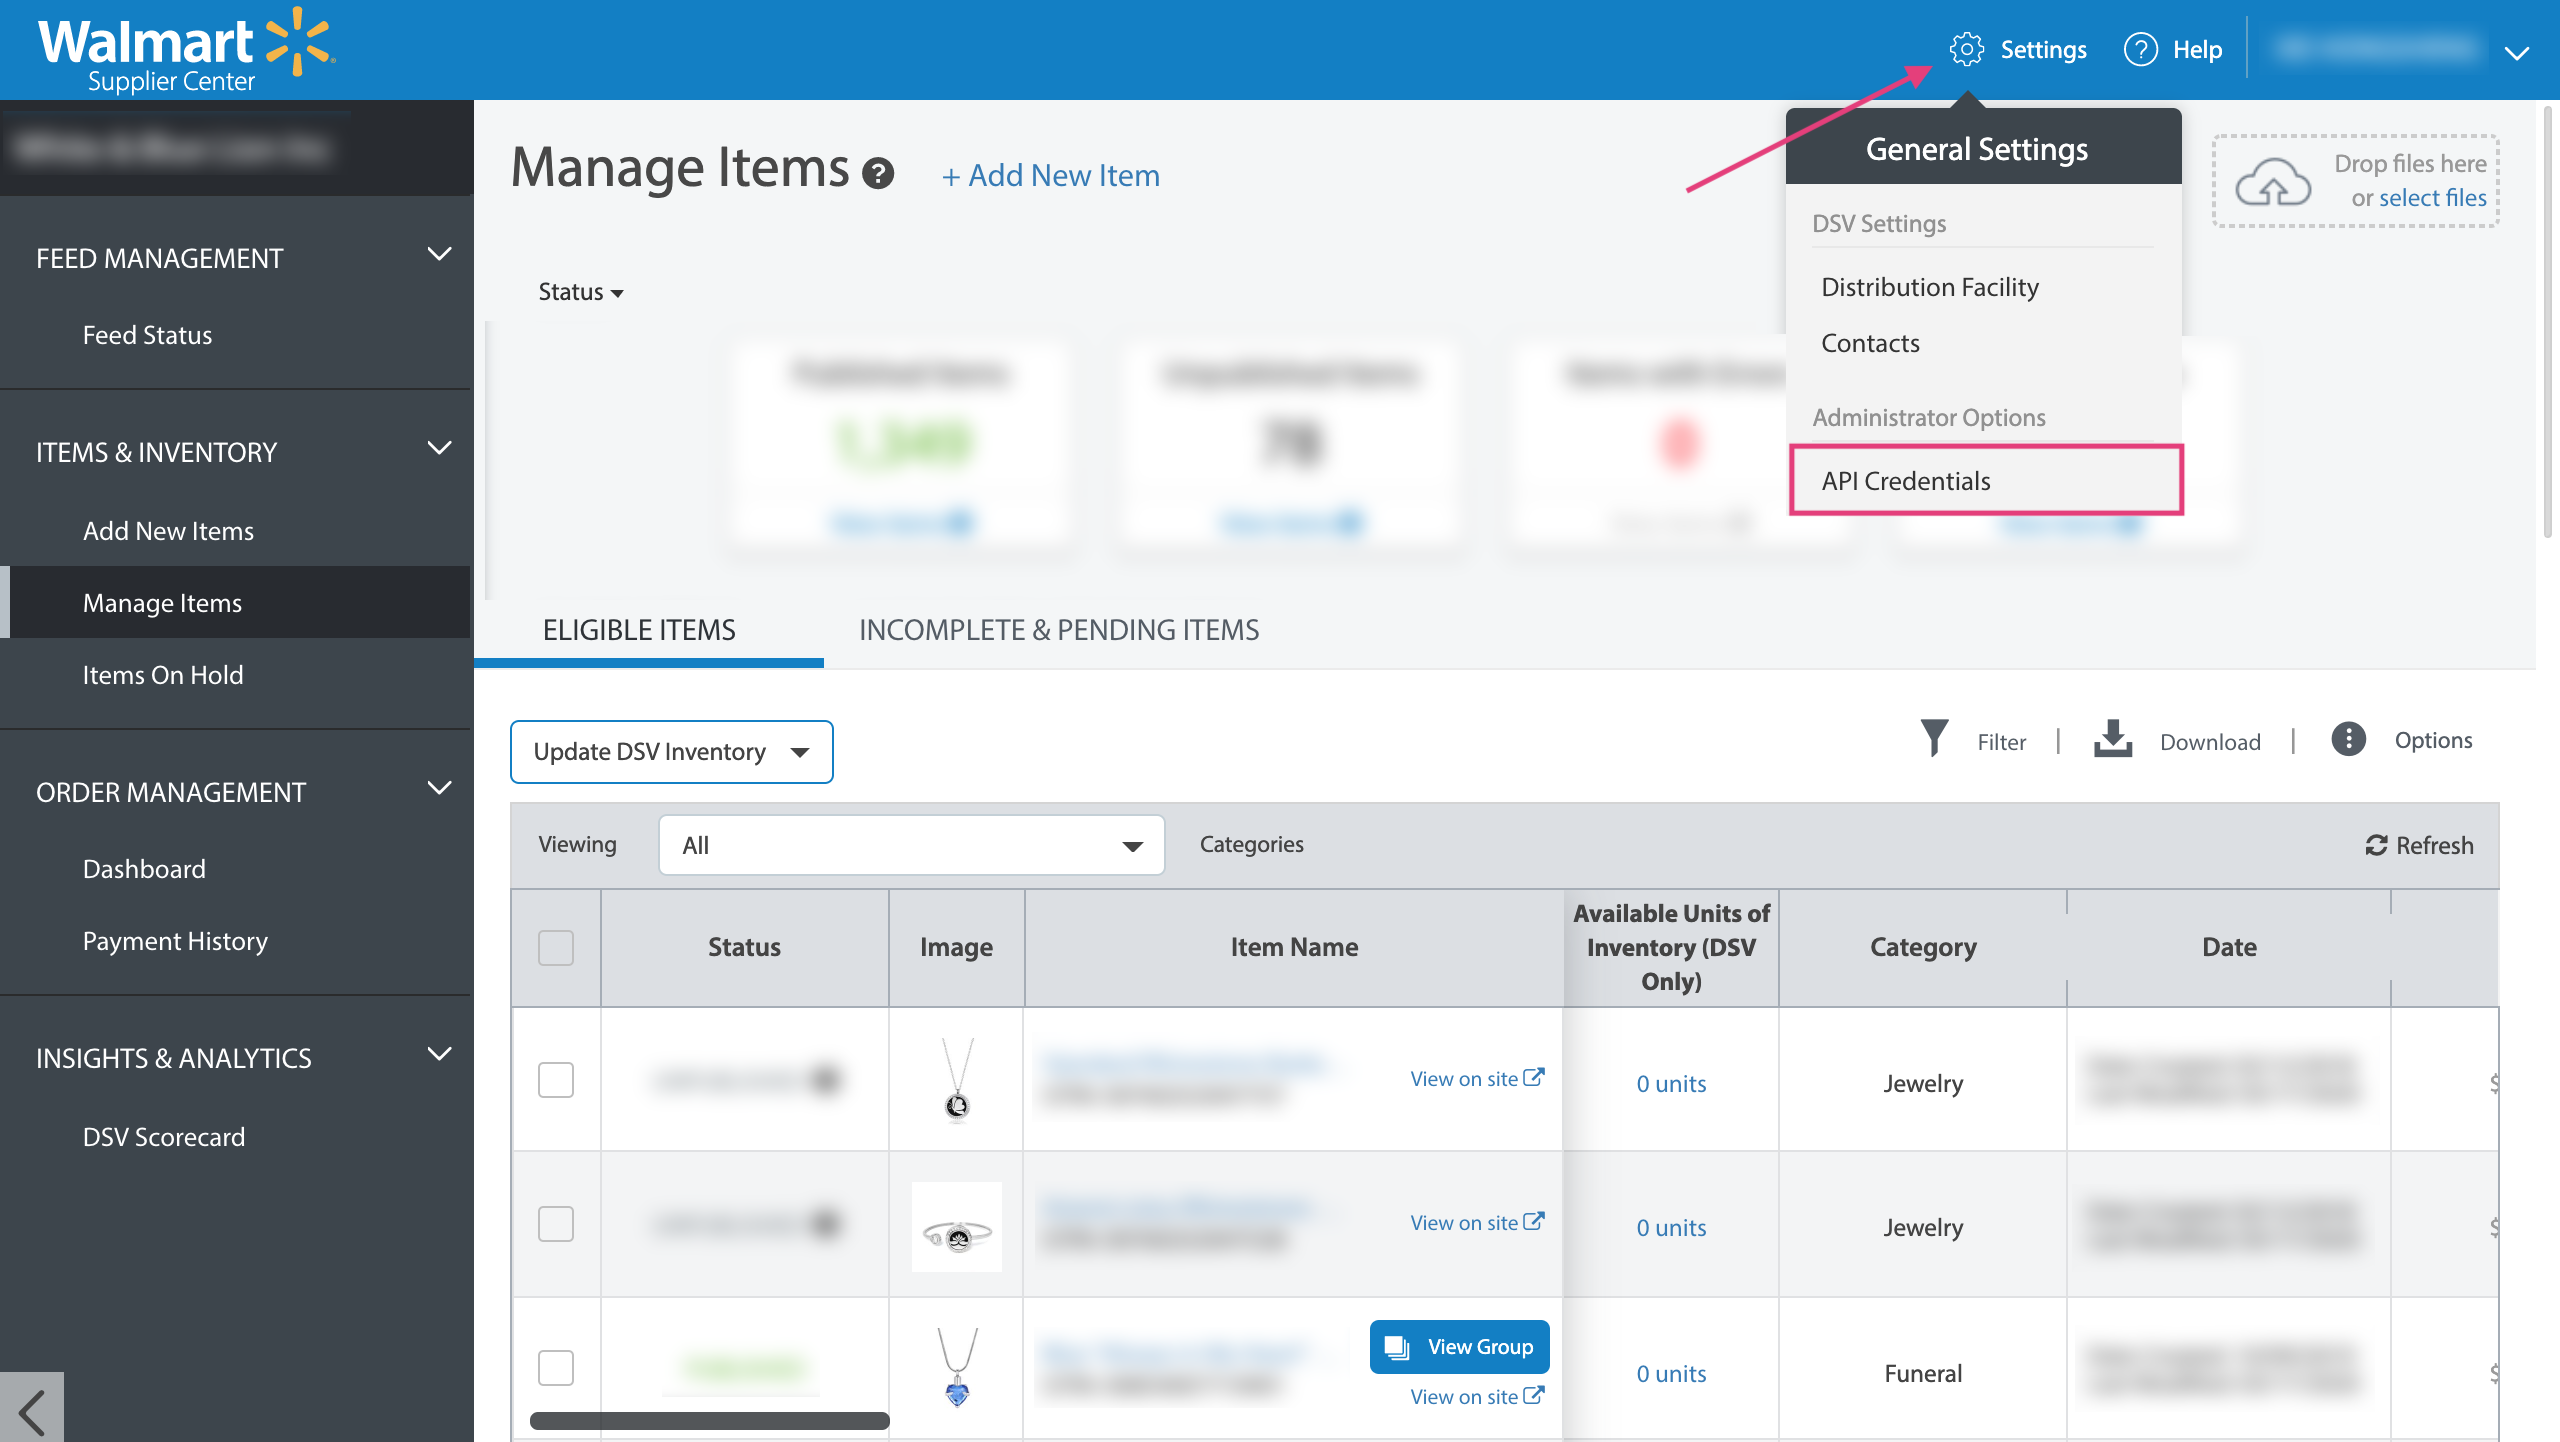
Log in to your Walmart Supplier Center to find the information you need to
link Customily with your store. Follow the next steps to find the different
information needed: Consumer ID, Private Key, Distributor ID
- Consumer ID
- Go to the settings menu and select API Credentials

- Copy your consumer ID from the
box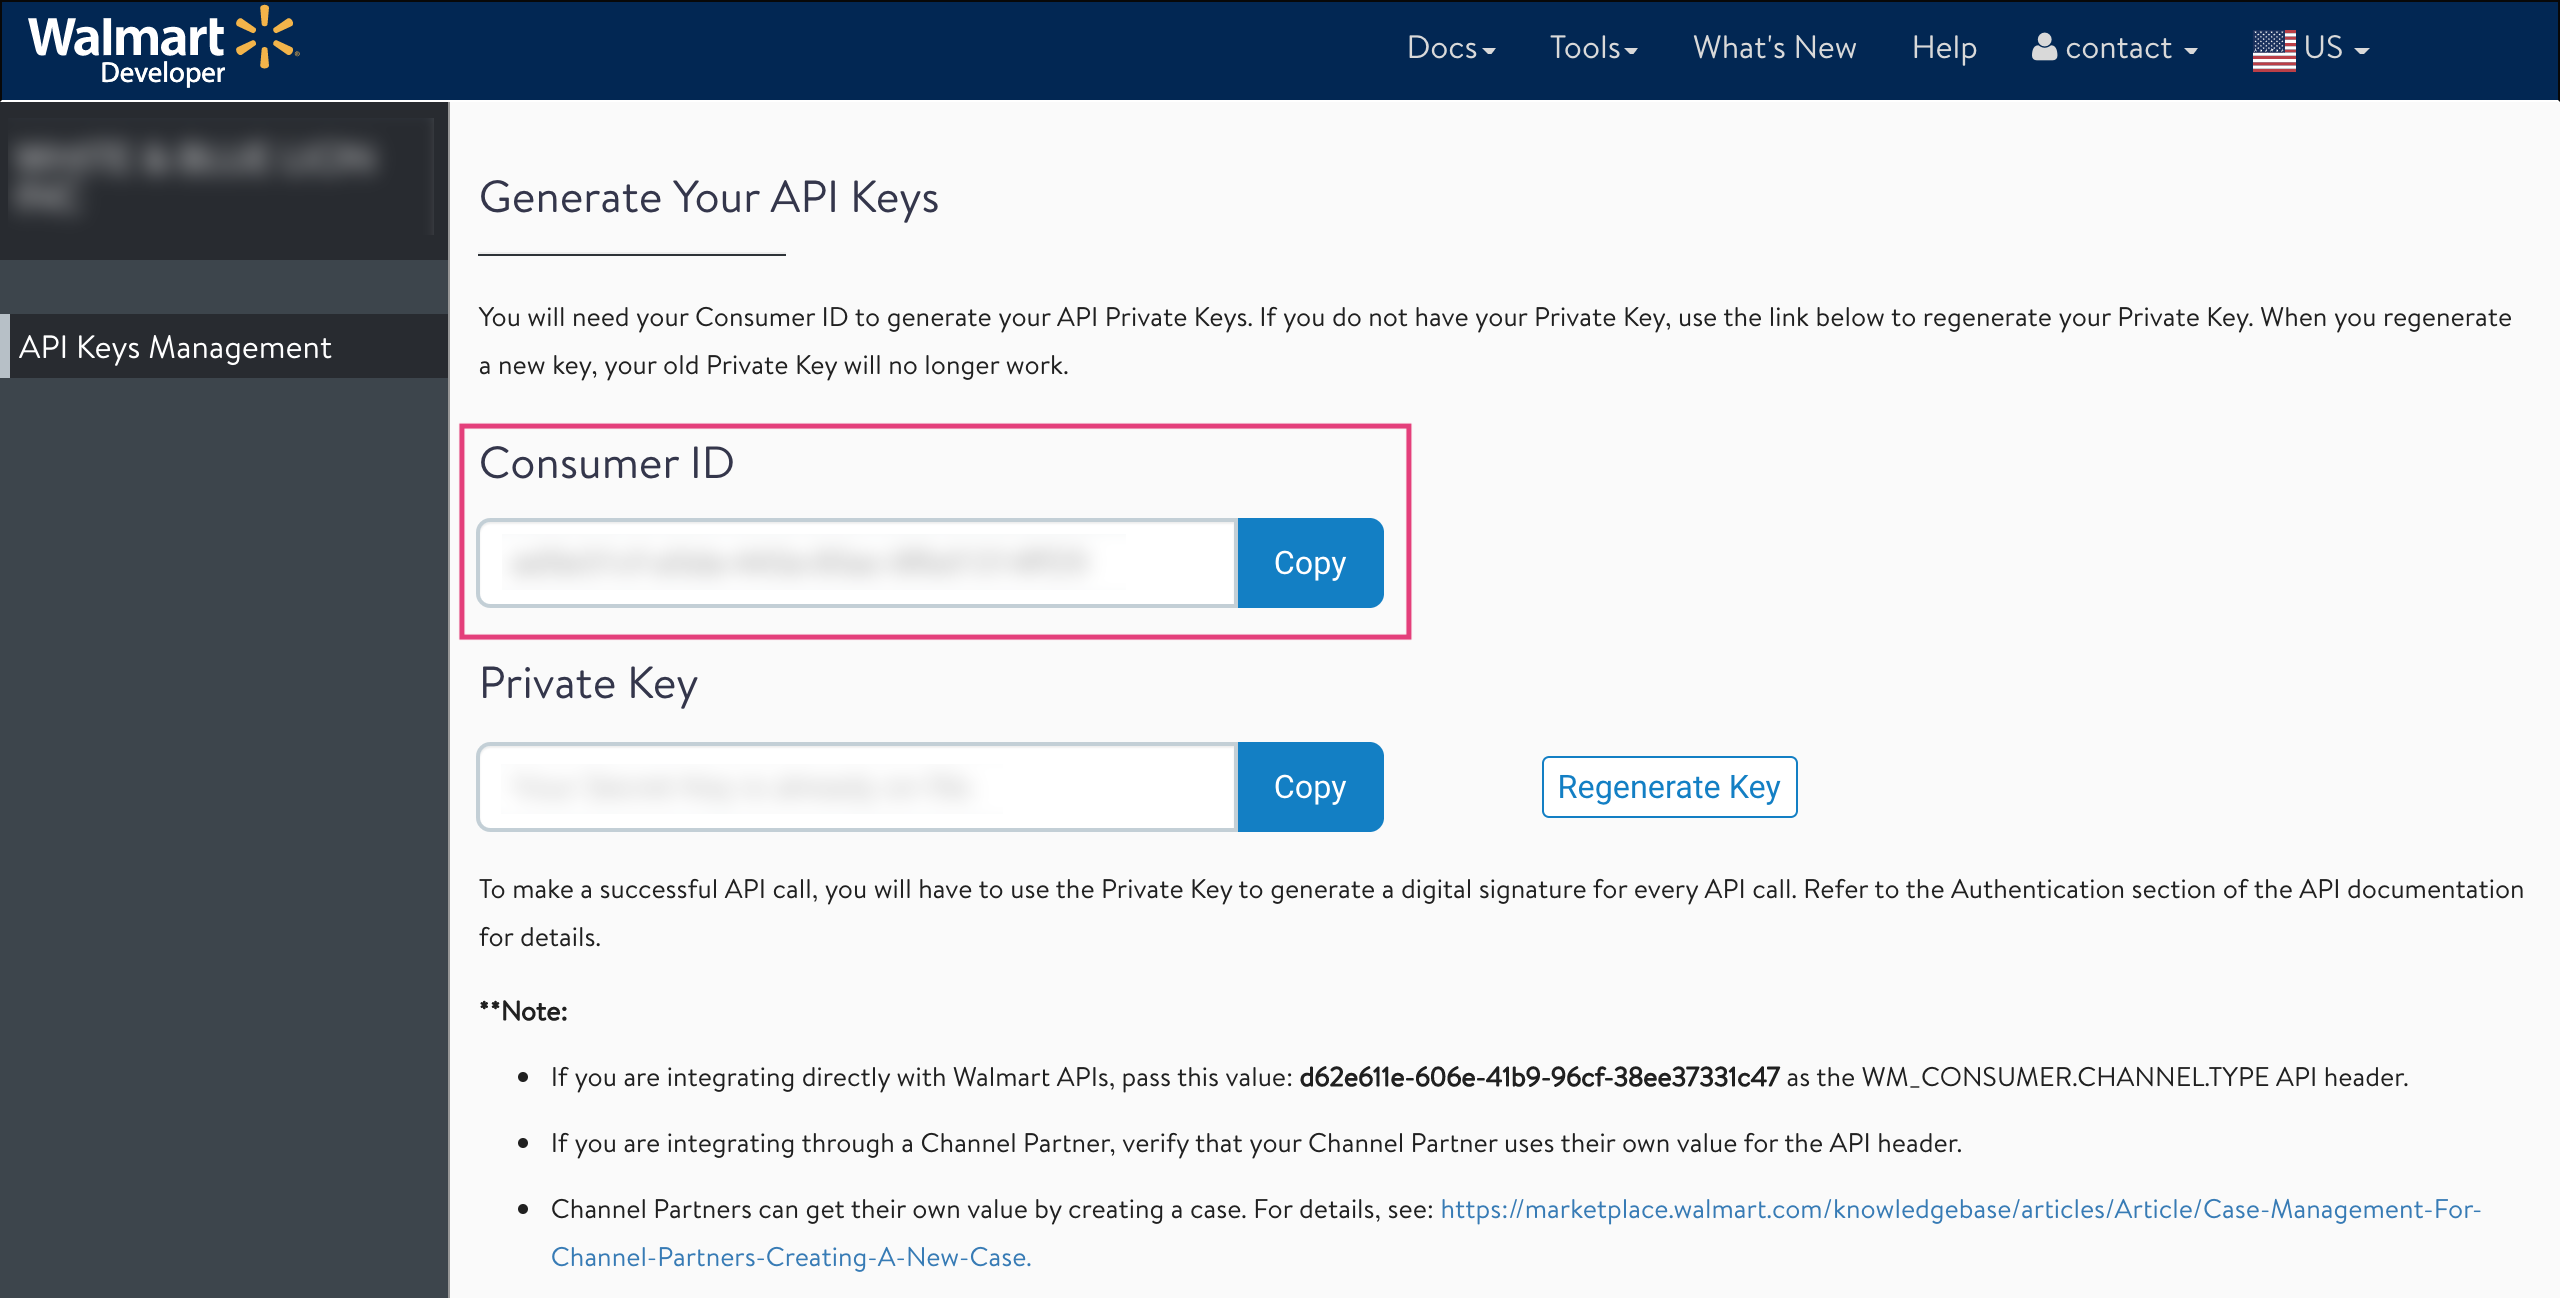
- Private Key
You should be in possession of your Private Key since this is a configuration
that is not visible or accessible through the supplier center. If you can't
find it ask around to your colleagues, probably someone stored it safely for
future use.
However, if you can't find your Private Key, or if you don't have one, you can
generate a new one
Warning
Don't generate a new Private Key if you have one already in use!
Generating a new Private Key will make the old one obsolete, and all
connections you had made using that Private Key will be lost.
To generate a new private key:
- Go to the settings menu and select API Credentials
- Copy your Private Key from the box and store it in a safe place. Once
you leave that page you won't be able to see your Private Key anymore, so make
sure you store it somewhere!

- Distributor ID
- Go to the settings menu and select **Distribution Facility
**

- Choose the distribution center you want to work with, and copy the
**Distributor ID
**

▶ Where can I find my Walmart PO Number?
PO Numbers are a number Walmart gives every order in order to identify it. It
stands for Purchase Order (PO) Number.
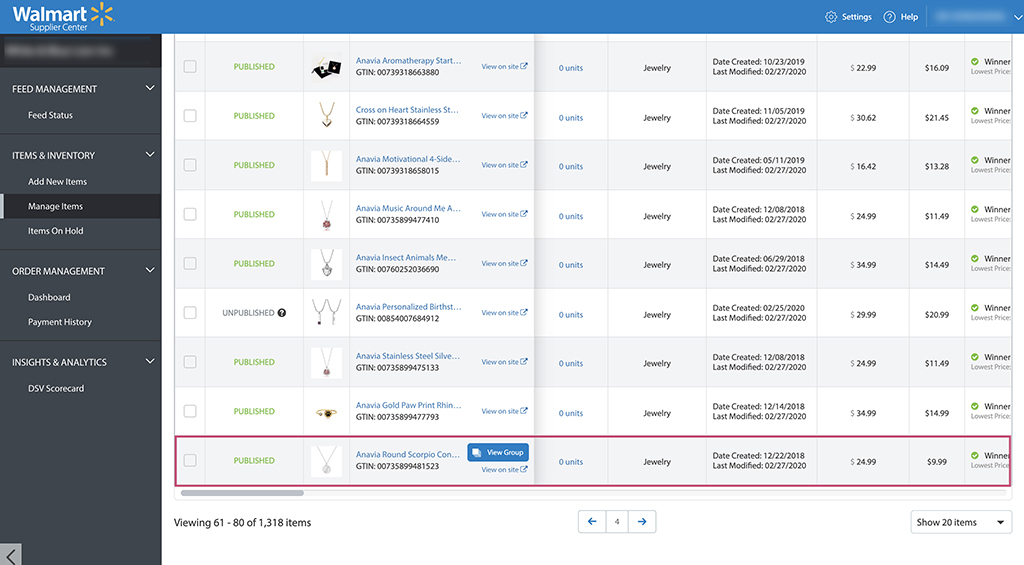
You will find the orders PO Number through your Walmart Supplier Center, in
your Order Management section.
To view your orders PO Number
- Log in to Supplier Center.
- In the left navigation, under Order Management , click Dashboard.

- You will be taken to the Order Management page, which shows all of your outstanding orders that need to be fulfilled. From this page, you can update your active orders.
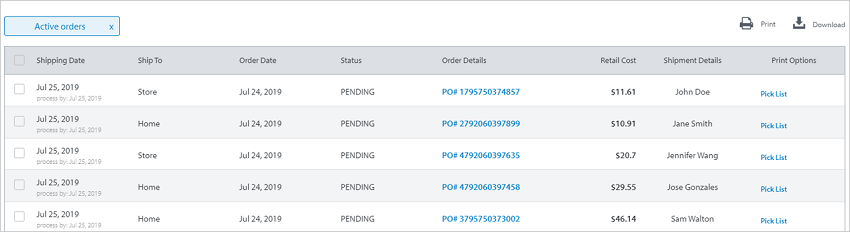
PO numbers are listed under the Order Details column.
▶ Step 2: Connecting previews to your BigCommerce products
Follow these steps to connect a preview template with your BigCommerce products and options.
- Search or browse to the BigCommerce product you’d like to add the
personalization behavior to and select it.
💡 Tip:
You can use the search bar to search for a product by it's name.
- Once inside the product configuration, assign the Template ID of the preview you'd like to load by default on that product.
- Choose if you want to show the preview immediately when the product page
loads. Otherwise, the default behavior is to load the page with your usual
product image and show the preview only when customers interact with the
options.
- Customily will automatically recognize the BigCommerce Option Set for that
product. You will see the list of all the different options available on your
product displayed as shown below. If you haven’t assigned an option set to
your product yet, you will need to do that on your BigCommerce Admin as shown
here.
- Click and expand each option to add a Customily Function to it. This
will connect the option with the dynamic behavior on the preview.
- Select **Add Customily Function
** 
- Select a **Function Type
** 
Functions are the actions that the option will trigger on the preview.
Function types available are:
Text
Executes the action of adding text on the preview.
It is used mostly with text inputs, but it can also be used with dropdowns or
swatches if you want to type predefined text.
Learn more about text function
Color
Executes the change of color in a text.
It is used with dropdowns and swatches.
Learn more about text color function
Font
Executes the change of font in a text.
It is used with dropdowns and swatches.
Learn more about font type function
Dynamic Image
Executes the change of a dynamic image in the preview. This can be many things
depending on the dynamic image, like the color of the product, pattern, icons,
etc.
It is used with dropdowns and swatches.
Learn more about dynamic image function
Dynamic Vector
Executes the change of a dynamic vector in the preview. This can be many
things depending on the dynamic vector, like icons, patches, designs, etc.
It is used with dropdowns and swatches.
Learn more about dynamic vector function
Image
Executes the upload of the customers image into the preview.
It is used exclusively with upload image option.
Learn more about upload image function
Product
Executes a change in the assigned Customily Template ID. This is used to load
a different preview template on the product.
It is used with dropdowns and swatches.
Learn more about change product function
- Enter the Personalizable Element ID to connect the function with a
specific element from the preview. This is the Unique ID of the element that was created on your template (for example text elements, dynamic images, image placeholders, etc.)
- If needed you can add Conditions to the option. Conditions will let
you show or hide the option, depending on if another option is selected.
To add a condition, click the Add Customily Condition button.
- Repeat these steps by expanding all the options, to add the functions to
all the options from the set.
- Once you are done click Save at the top of the screen. When the
button turns green the product set has been saved!
You can click Back and go back to the main menu.
Important:
If the button turns red, it means that the product set was not saved. Please
check your internet connection and try saving it again.
If the problem continues contact support.
▶ Step 1: Creating Option sets
Follow these steps to create an option set for your products
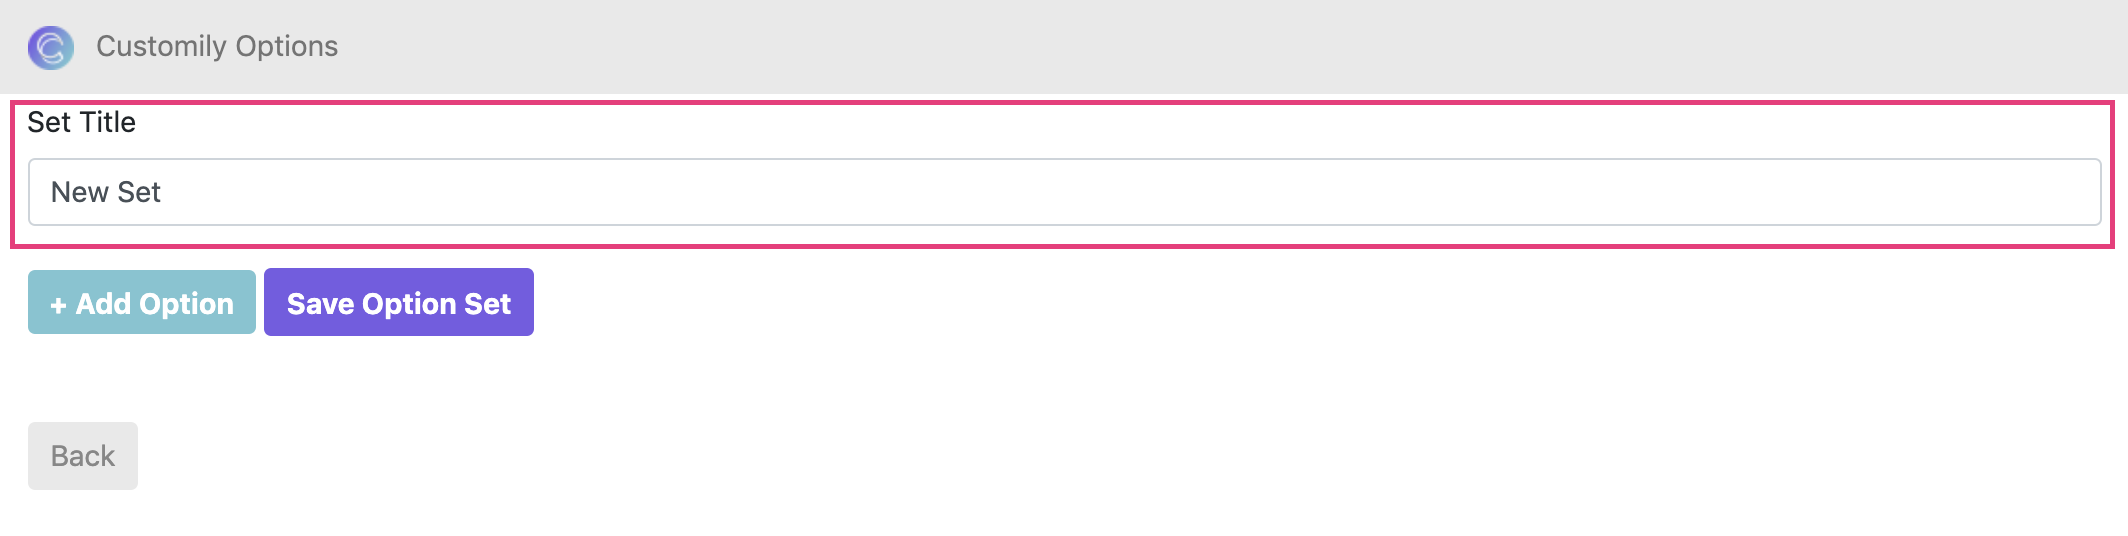
- Select Option Sets to create a new set of options
- Select New Option Set to create a new set from scratch

- Add a Title to your option set. Use an easily identifiable name
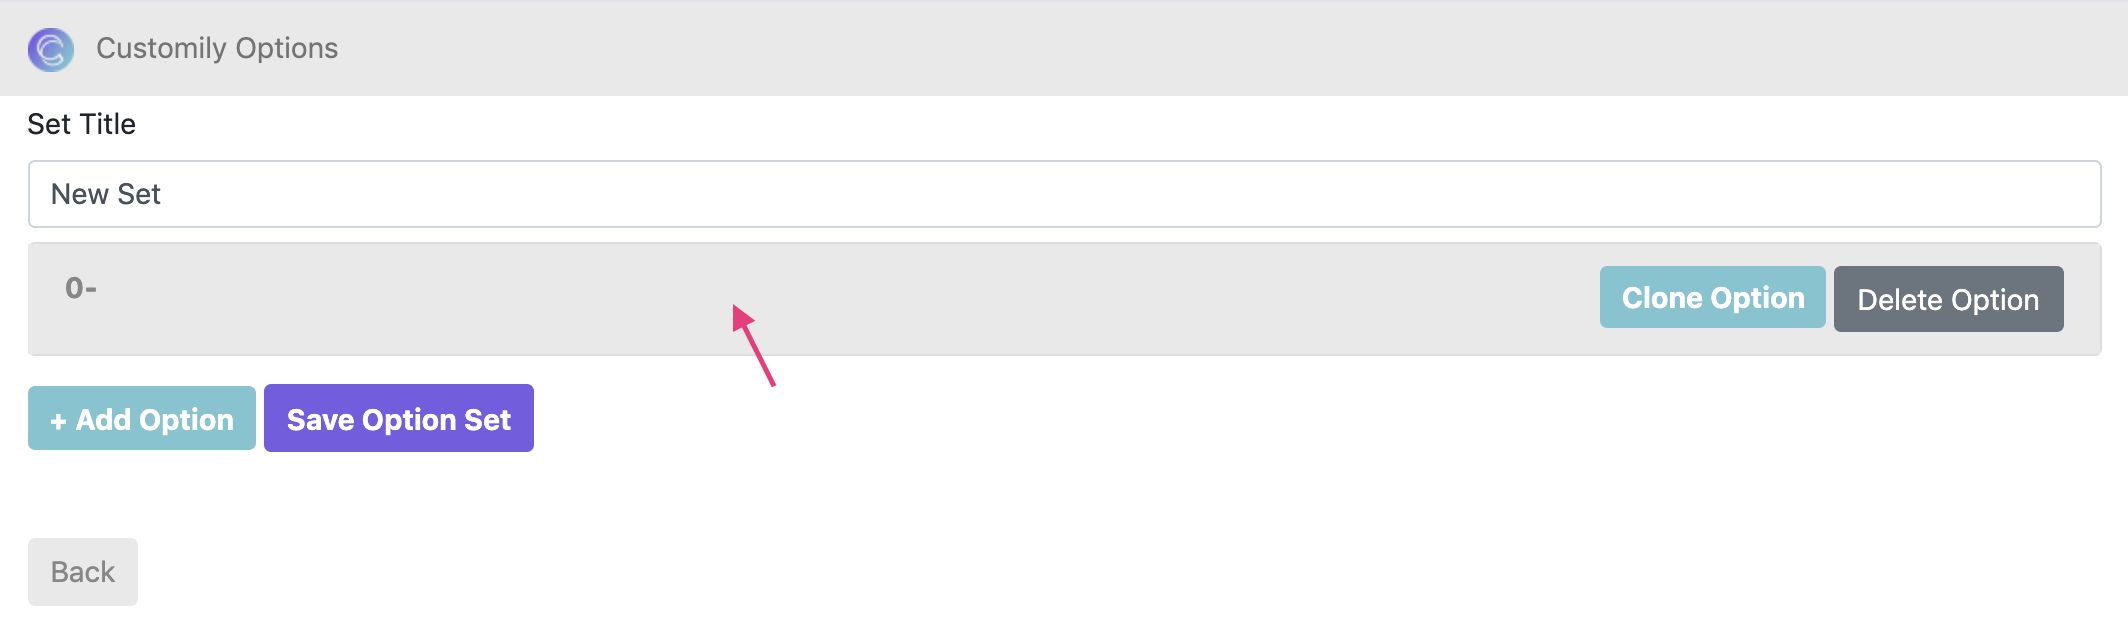
- Select Add Option to start adding options to your set

- Expand the newly added Option by clicking on it
- Select a Type of Option and configure it.
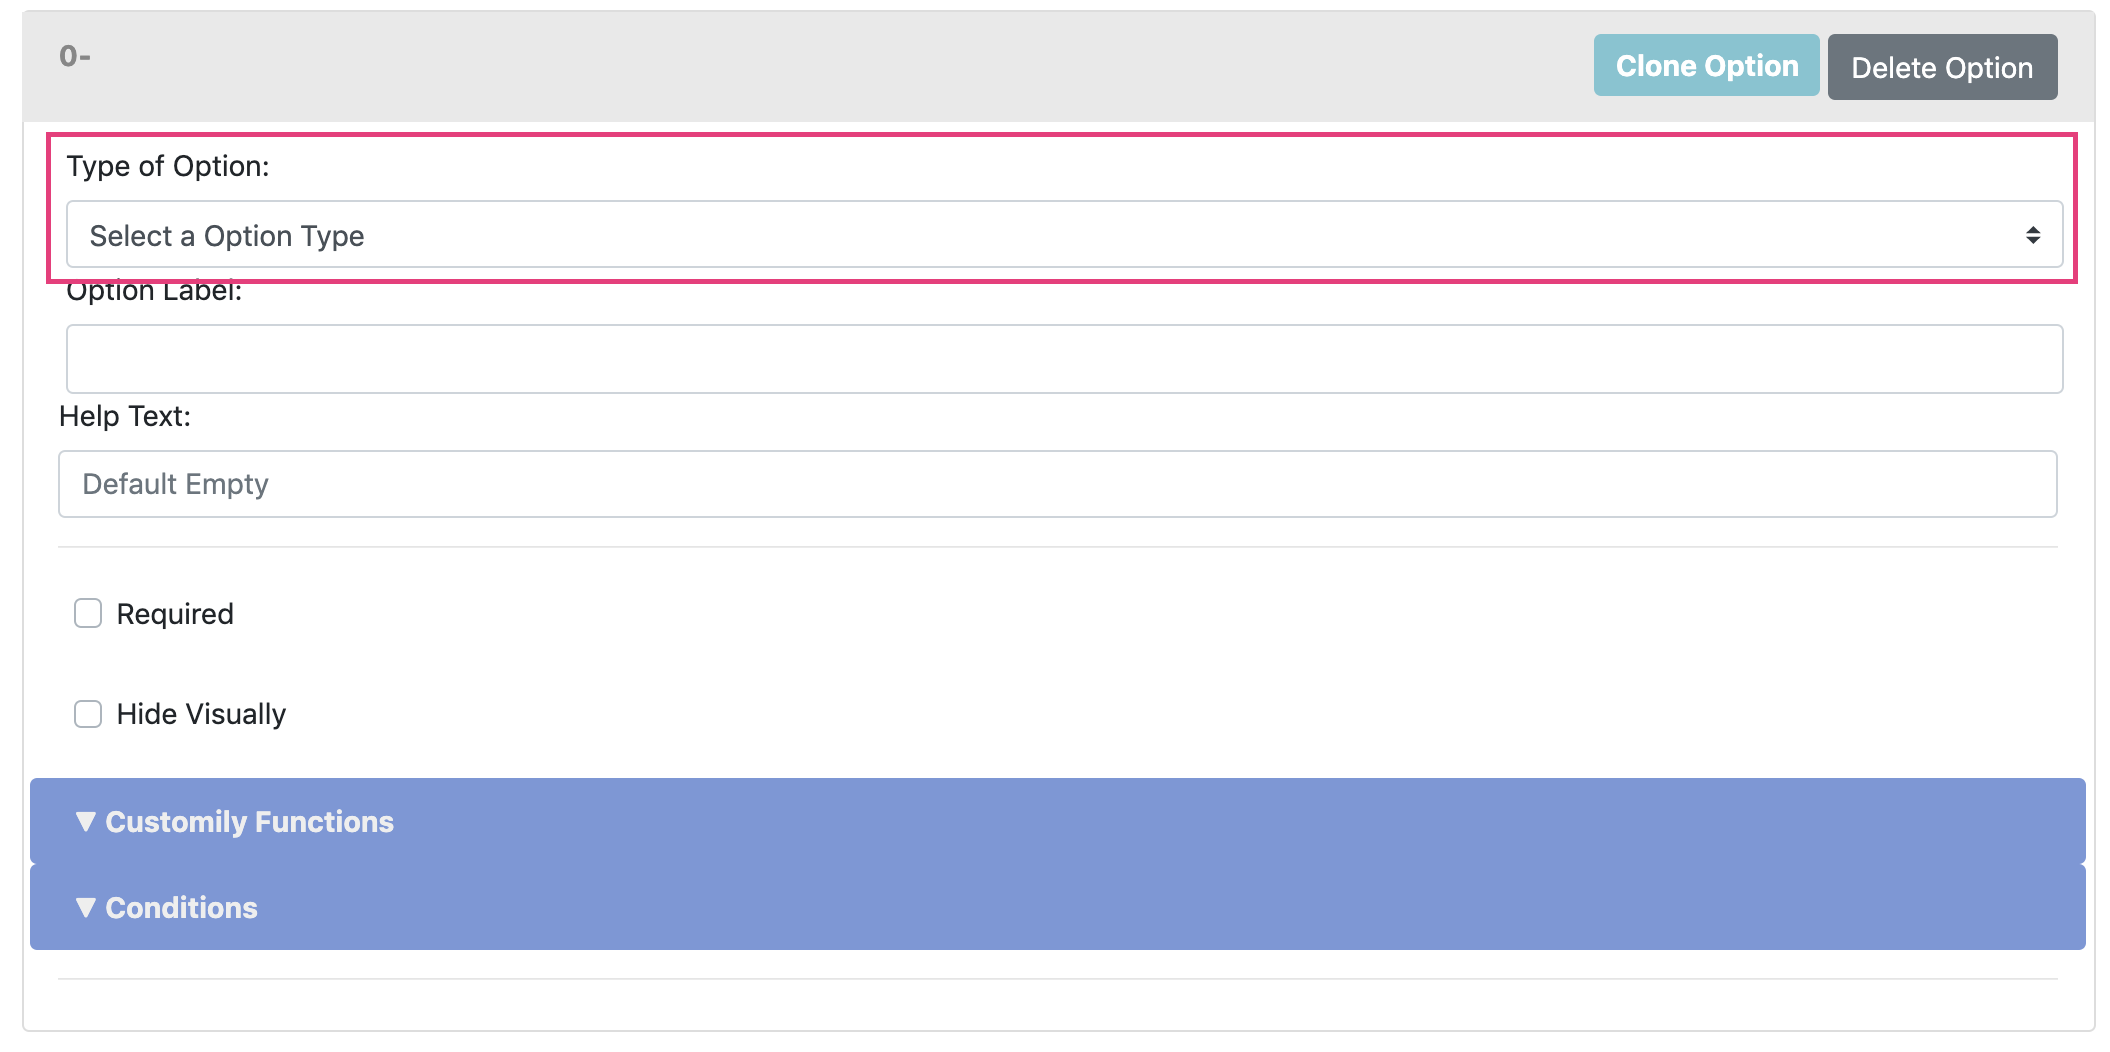Type
of options available, and they're configurations are:
Text Input
An option where customers can type their own text.
The parameters you can define for a Text input are:
- Option label: Title of the option
- Help text
- Placeholder: Example text to appear on the input box
- Initial value: Initial text that will appear on the preview
- Max. length: Maximum amount of characters allowed
- Make it textarea: Add several lines to the input box
- Max. number of lines: Maximum number of lines for the text box (only available for text area)
- Required: Make the option mandatory
- Hide Visually: To hide this element from the option set.
Learn more about Text inputs
Dropdown
An option where customers can choose a value from an expandable list. It can
be used to select fonts, colors, styles, and almost anything!
 The parameters you can define for a Dropdown
are:
- Option label: Title of the option
- Help text
- Placeholder: Displayed text on the dropdown menu
- Required: Make the option mandatory
- Hide visually: To hide this element from the option set.
- Dropdown values: Add the different values inside the dropdown. These are the values customers will be able to choose from.
Learn more about Dropdowns and how to add values to them
Swatches
An option where customers can choose a value from a series of icons. It can be
used to select fonts, colors, styles, and almost anything!
Similar to the dropdown, but with much more visual feedback.
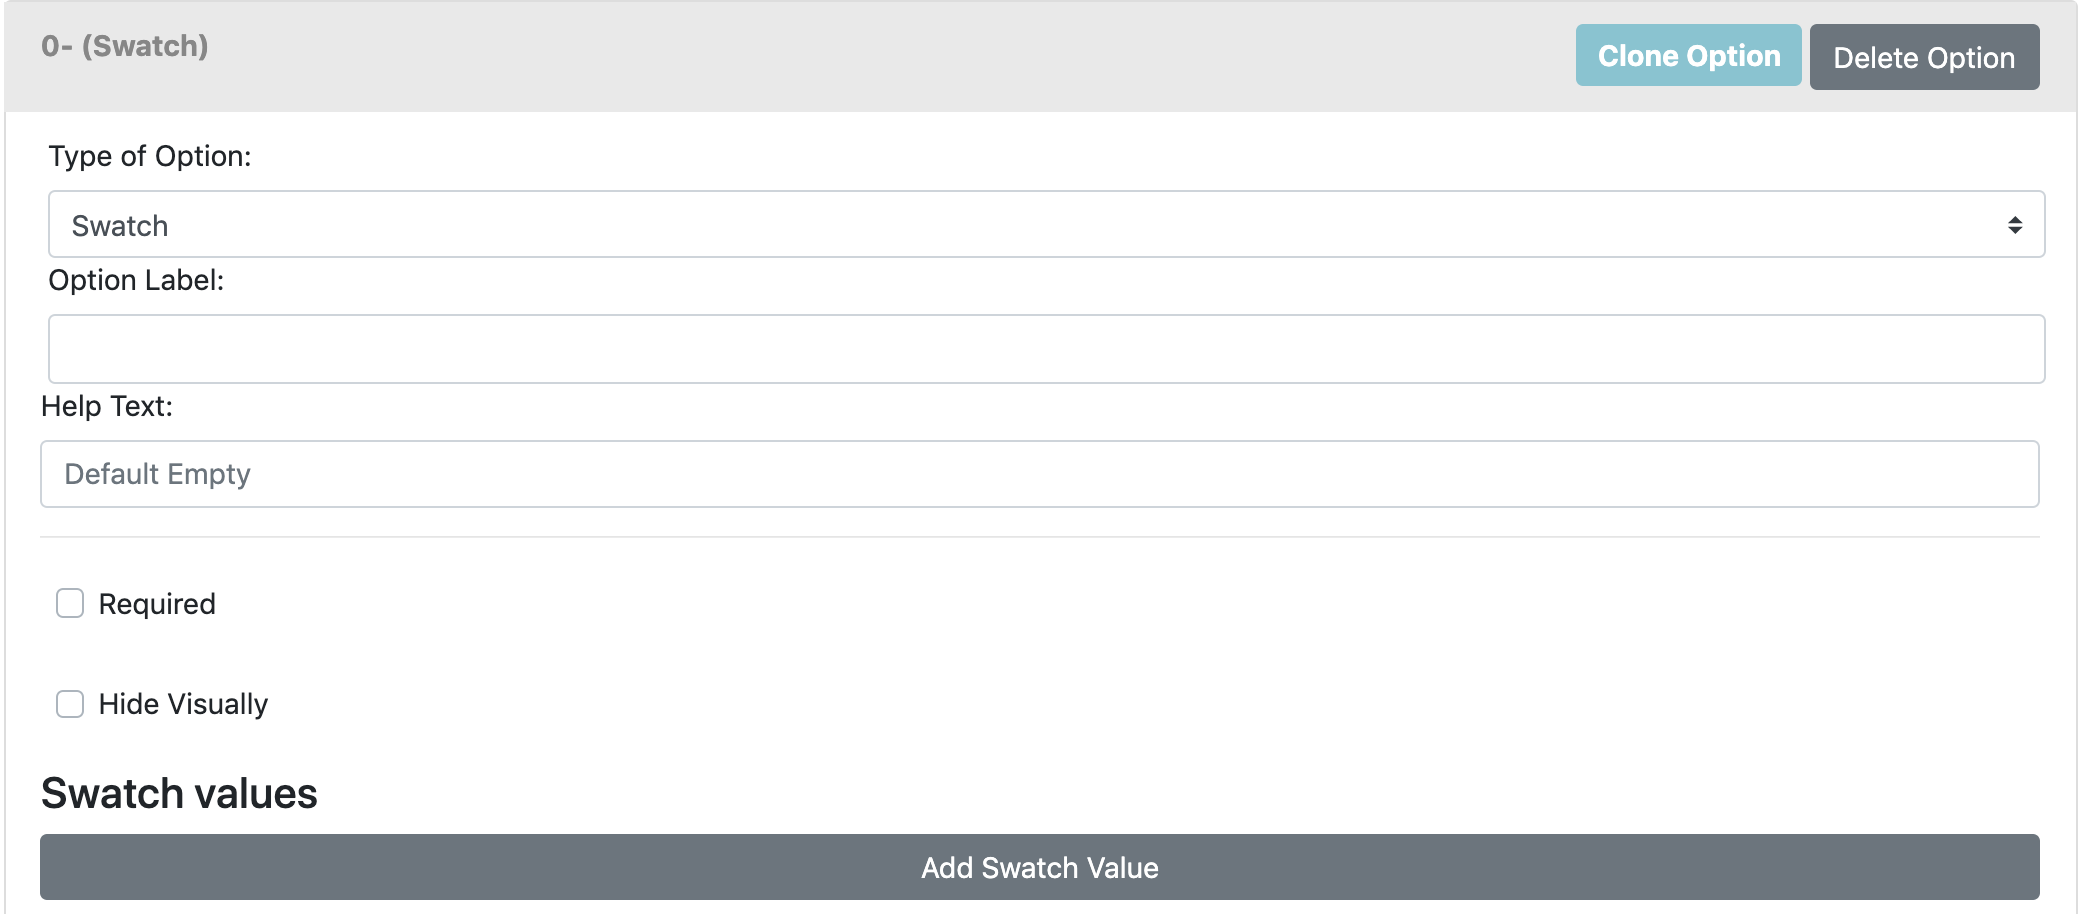The
parameters you can define for Swatches are:
- Option label: Title of the option
- Help text
- Required: Make the option mandatory
- Hide visually: To hide this element from the option set.
- Swatch values: Add the different values inside the swatch list. These are the values customers will be able to choose from.
Learn more about Swatches and how to add values to them
Image Upload
An option where customers can click a button and upload their own image into
the product
The parameters you can define for Image upload are:
- Option label: Title of the option
- Help text
- Button text: Text that will appear in the button
- Button class: To apply special styling to the button
- Required: Make the option mandatory
- Hide visually: To hide this element from the option set.
Learn more about Image upload
Checkbox
An option for customers to check the selection. Very useful if you want
customers to state they have read and verified their
personalization.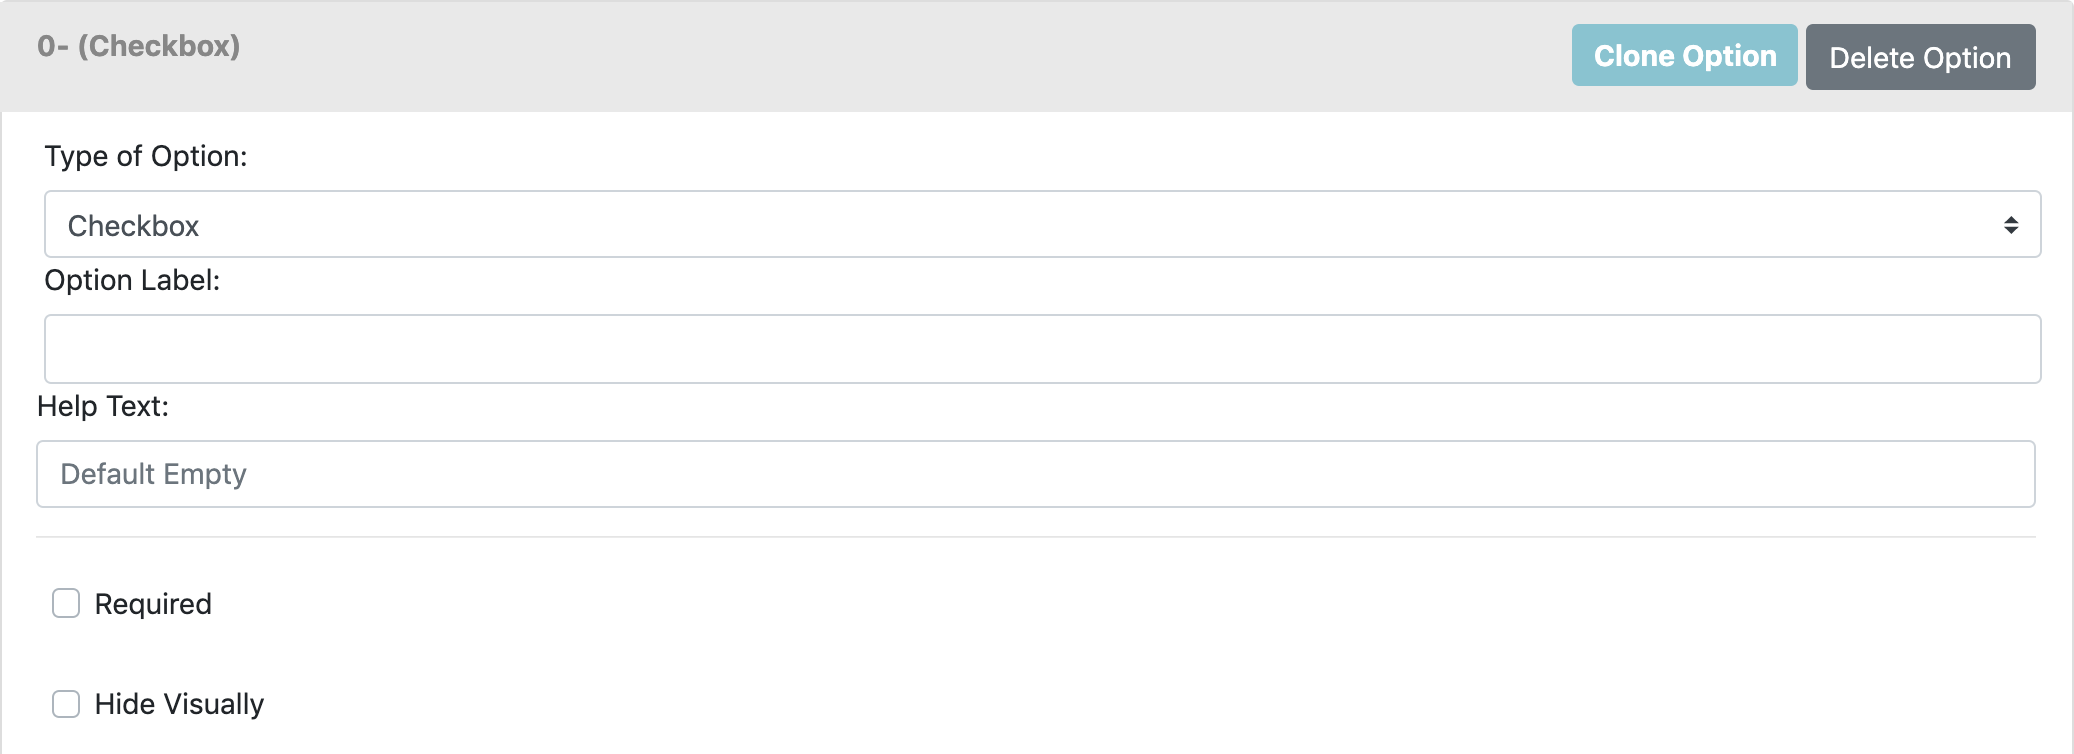
The parameters you can define for Checkbox are:
- Option label: Title of the option
- Help text
- Required: Make the option mandatory
- Hide visually: To hide this element from the option set.
Learn more about Checkboxes
- Once you have selected an option type, you will add a **Customily
Function** to the option to give it the dynamic behaviour on the preview.
First, expand the Customily Function
menu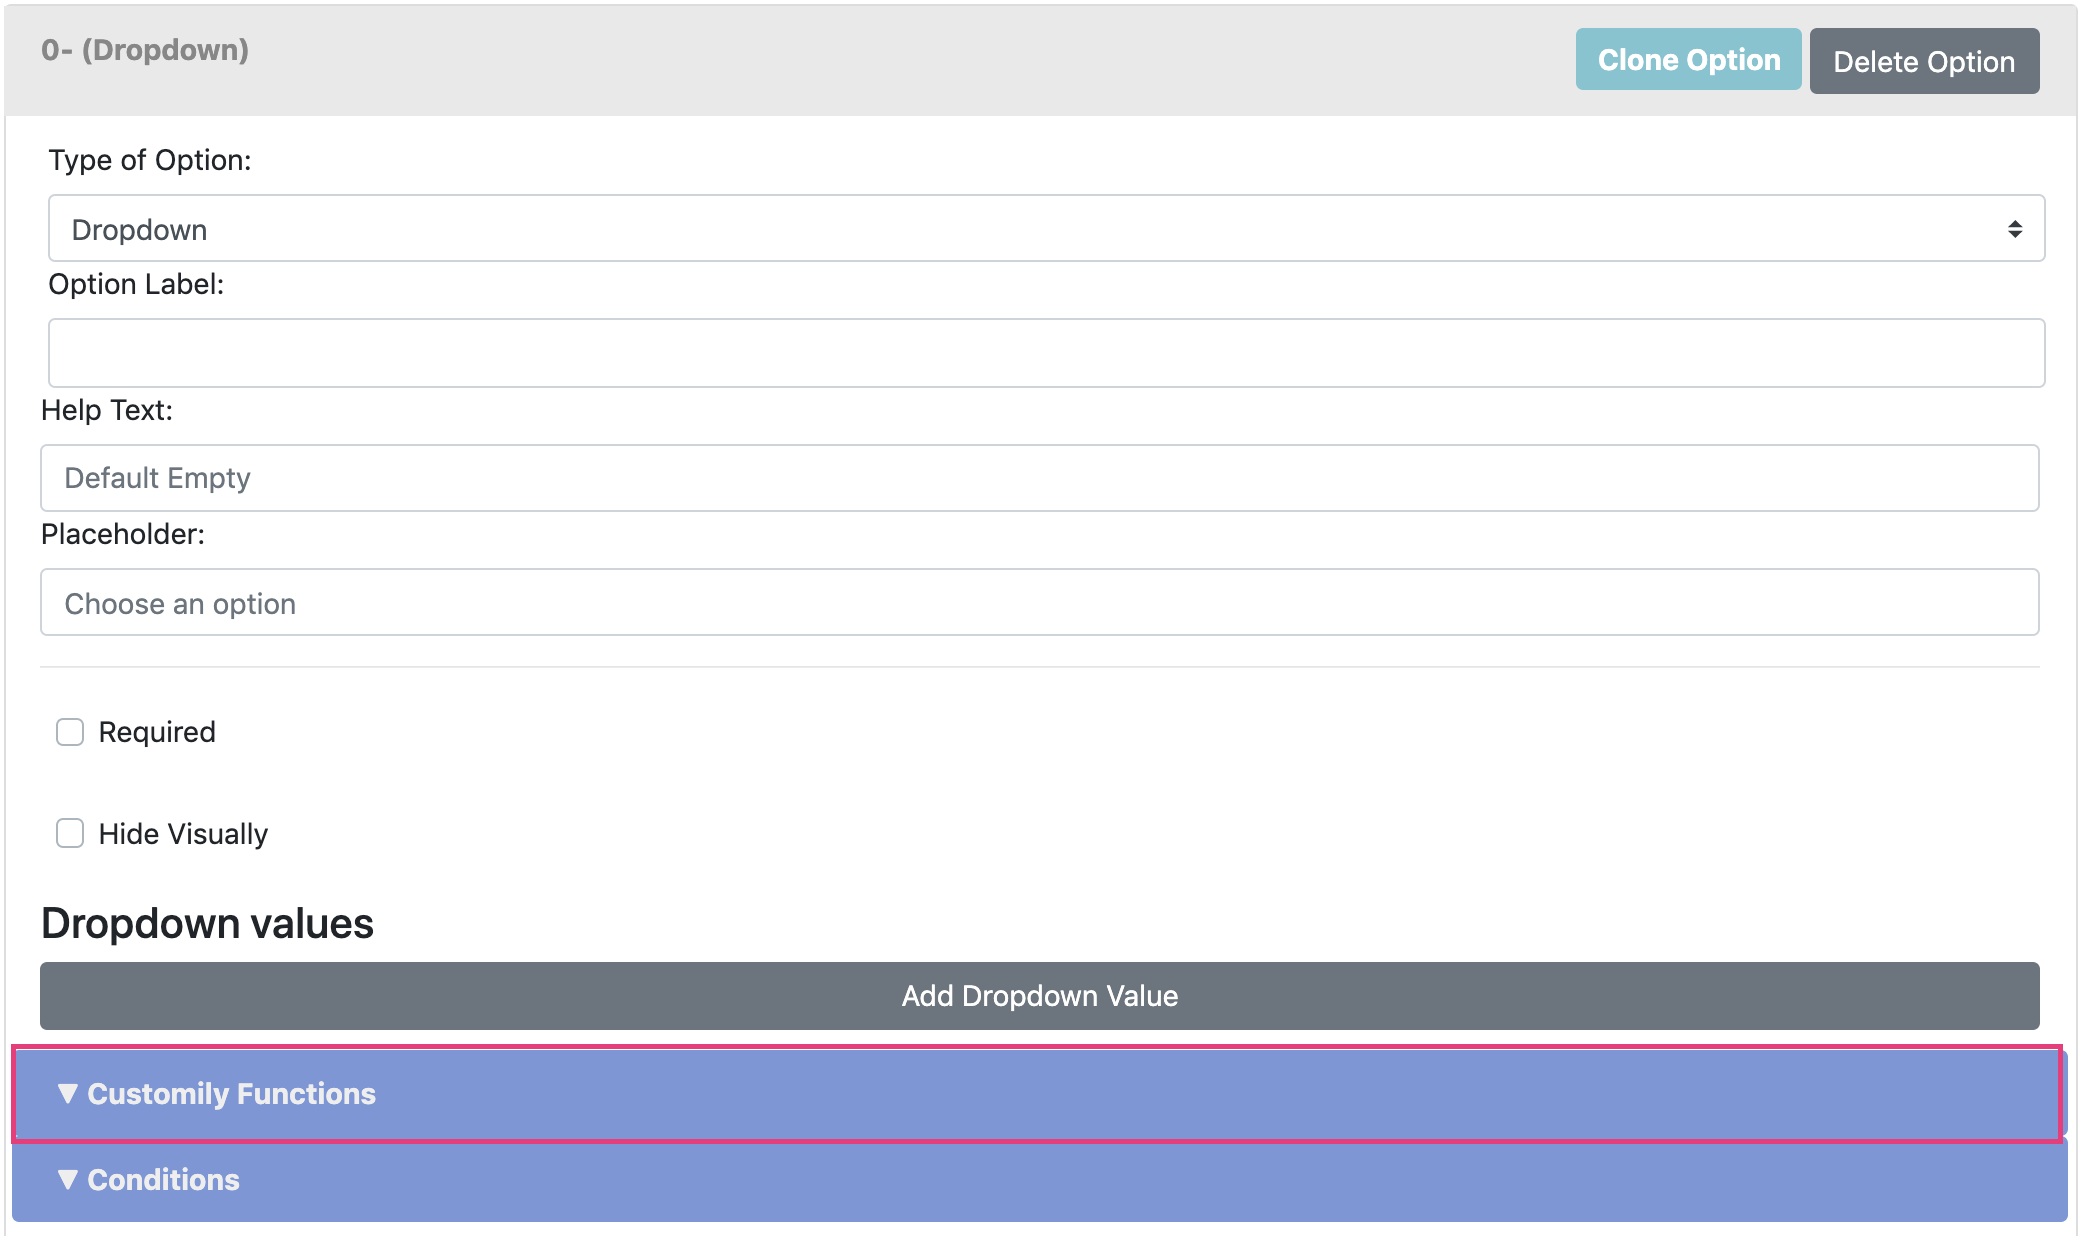
- Select **Add Customily Function
**

- Select a Function Type

Functions are the actions that the option will trigger on the preview.
Function types available are:
Text
Executes the action of adding text on the preview.
It is used mostly with text inputs, but it can also be used with dropdowns or
swatches if you want to type predefined text.
Learn more about text function
Text Color
Executes the change of color in a text.
It is used with dropdowns and swatches.
Learn more about text color function
Font Type
Executes the change of font in a text.
It is used with dropdowns and swatches.
Learn more about font type function
Dynamic Image
Executes the change of a dynamic image in the preview. This can be many things
▶ Dropdown Option
Add a dropdown option to your option sets so customers can choose from a
dropdown menu different parameters of your products.
To add a dropdown option
- Create a new option set or edit an existing one
- Click Add option 
- Expand the newly added Option by clicking on it
- Select Dropdown as option type 
- Configure the options parameters
Option Label
The title of the option that will appear on your product page.
Something like "Choose your ... ", "Select ...", or simply what the option is
like "color" are the most used labels.

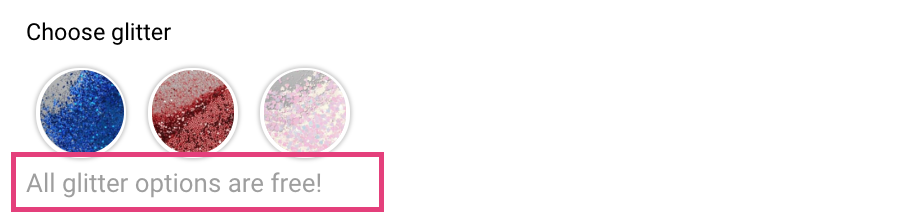
Help Text
A secondary text to give customers some extra information, tips or help.
It's a good place to guide customers on what they can choose from, or let them
know some extra information about their choice.
Placeholder
Text that will appear on the dropdown before a selection is made. It is
usually used to indicate an action, like "select color".
If no placeholder is set, the default one is "choose an option".

Required
The dropdown will be required to add the product to cart. This means the
customer will have to choose an option in it to be able to make a purchase.
If the customer makes no selection, it will let them know so they can choose
something and add to cart properly.
An asterisk (*) next to the option's title indicates that the dropdown is
required.

Hide visually
Check it if you want to hide the option from the product page. It is useful if
you want to have some predefined option on the preview you don't want
customers to change.
However, it is hardly used.
- * *
To assign a Customily Function to a dropdown option
Once you have defined your option, you need to add a Customily Function to it.
Customily Functions are the way we assign actions to the options. It tells the
option how to affect the preview. For example, in the case of dropdown
options, it could tell it what element it will change on the preview and how,
like a color, a font style, etc.
To assign a Customily Function:
- Expand the Customily Functions section by clicking on it.
- Click Add a Customily Function 
- Select the Customily Function you want to use 
Functions available for the dropdown options are:
Text
This is used when you want to load pre-defined texts into a text element on the
preview.
Text Color
One of the most used functions for dropdowns. This is used when you want to
change the color of a text element on the
preview.
Font Type
One of the most used functions for dropdowns. This is used when you want to
change the font of a text element on the
preview.
Dynamic Image
Also, one of the most used functions for dropdowns. This is used when you want
to change between positions of a dynamic image on the
preview.
This function is ideal if you want to change the color of the overall product,
patterns, materials, etc.
Dynamic Vector
Similar to the dynamic image, this is used when you want to change between
positions of a dynamic vector on the preview.
This function is ideal if you want to change between pre-defined icons or
clipart.
Change Product
This function is used when you want to change the preview to a different
template. For example, if you want to switch between designs on the preview,
you can use this function to link each design to a different personalization
template from your admin.
- Assign the Unique ID of the element that will work with that function

If you are not sure what the Unique ID for the element is, learn how to know the Unique ID of an element here.
📝 Note:
If your function is to change product you won't need to assign and ID to
the function, since the function will communicate directly with an entire
template.
- * *
To assign Conditions to a dropdown option
Conditions create rules that will show or hide an option based on the
customer's previous selections. With conditions you can, for example, show an
option only if another specific option is selected.
To assign Conditions:
- Expand the Conditions section by clicking it 
- Click Add Condition 
- Complete the condition's rules
- Select action Show / Hide
- When select option(the option that will generate the condition)
- is -> select a value from that option

- * *
To add values to your dropdown
One of the most important elements of the dropdown are all the different
values customers will be able to choose from.
▶ Swatch Option
Add a swatch option to your option sets so customers can choose from visible
icons different parameters of your products.
To add a swatch option
- Create a new option set or edit an existing one
- Click Add option 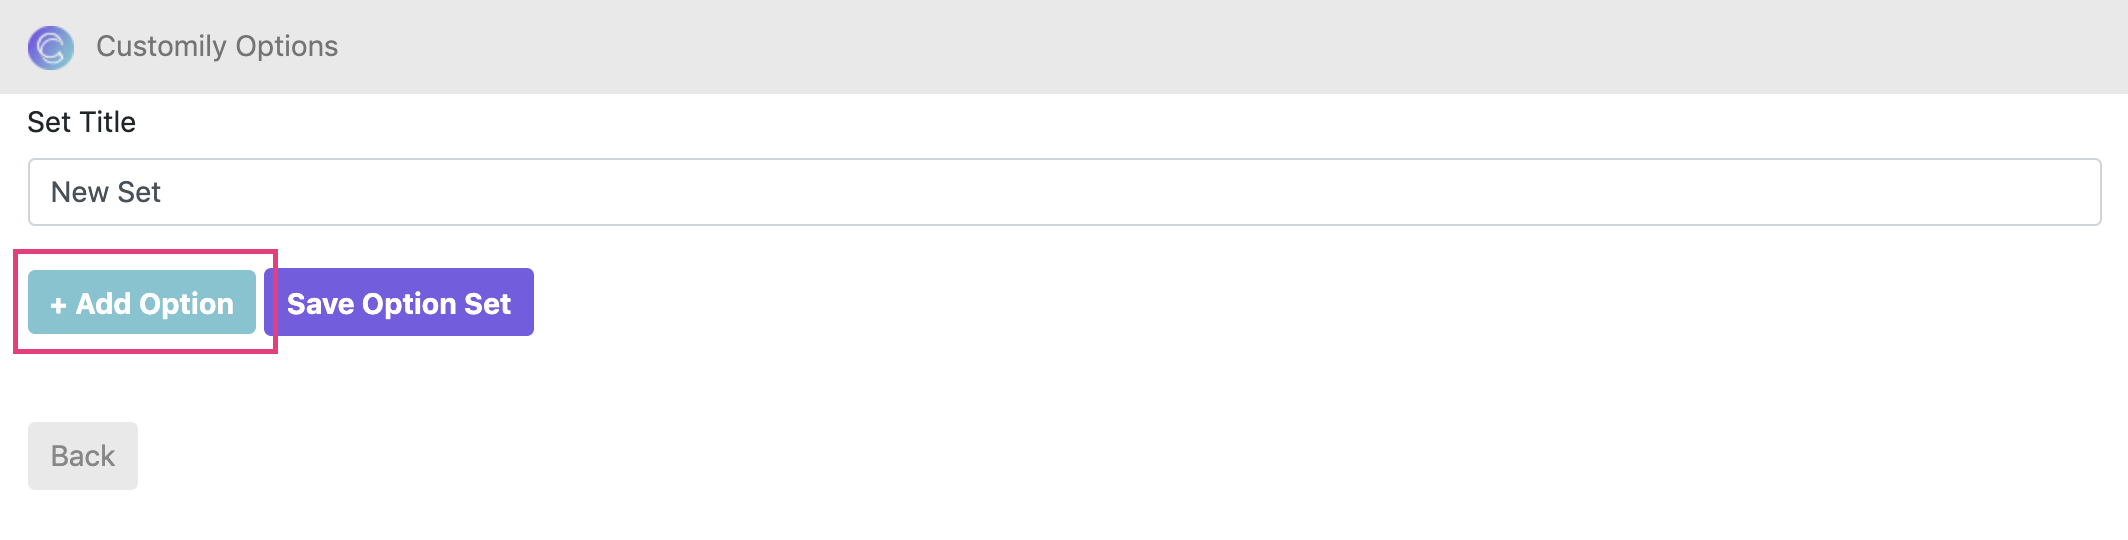
- Expand the newly added Option by clicking on it
- Select Swatch as option type 
- Configure the options parameters
Option Label
The title of the option that will appear on your product page.
Something like "Choose your ... ", "Select ...", or simply what the option is
like "color" are the most used labels.

Help Text
A secondary text to give customers some extra information, tips or help.
It's a good place to guide customers on what they can choose from, or let them
know some extra information about their choice.
Required
The swatch selection will be required to add the product to cart. This means
the customer will have to choose an option in it to be able to make a
purchase.
If the customer makes no selection, it will let them know so they can choose
something and add to cart properly.
An asterisk (*) next to the option's title indicates that the swatch is
required.

Hide visually
Check it if you want to hide the option from the product page. It is useful if
you want to have some predefined option on the preview you don't want
customers to change.
However, it is hardly used.
- * *
To assign a Customily Function to a swatch option
Once you have defined your option, you need to add a Customily Function to it.
Customily Functions are the way we assign actions to the options. It tells the
option how to affect the preview. For example, in the case of swatch options,
it could tell it what element it will change on the preview and how, like a
color, a font style, etc.
To assign a Customily Function:
- Expand the Customily Functions section by clicking on it.
- Click Add a Customily Function 
- Select the Customily Function you want to use 
Functions available for the swatch options are:
Text
This is used when you want to load pre-defined texts into a text element on the
preview.
Text Color
One of the most used functions for swatches. This is used when you want to
change the color of a text element on the
preview.
Font Type
One of the most used functions for swatches. This is used when you want to
change the font of a text element on the
preview.
Dynamic Image
Also, one of the most used functions for swatches. This is used when you want
to change between positions of a dynamic image on the
preview.
This function is ideal if you want to change the color of the overall product,
patterns, materials, etc.
Dynamic Vector
Similar to the dynamic image, this is used when you want to change between
positions of a dynamic vector on the preview.
This function is ideal if you want to change between pre-defined icons or
clipart.
Change Product
This function is used when you want to change the preview to a different
template. For example, if you want to switch between designs on the preview,
you can use this function to link each design to a different personalization
template from your admin.
- Assign the Unique ID of the element that will work with that function

If you are not sure what the Unique ID for the element is, learn how to know the Unique ID of an element here.
📝 Note:
If your function is to change product you won't need to assign and ID to
the function, since the function will communicate directly with an entire
template.
- * *
To assign Conditions to a swatch option
Conditions create rules that will show or hide an option based on the
customer's previous selections. With conditions you can, for example, show an
option only if another specific option is selected.
To assign Conditions:
- Expand the Conditions section by clicking it 
- Click Add Condition 
- Complete the condition's rules
- Select action Show / Hide
- When select option(the option that will generate the condition)
- is -> select a value from that option

- * *
To add values to your swatch
One of the most important elements of the swatch are all the different values
customers will be able to choose from.
To add a swatch value:
- Click Add swatch value 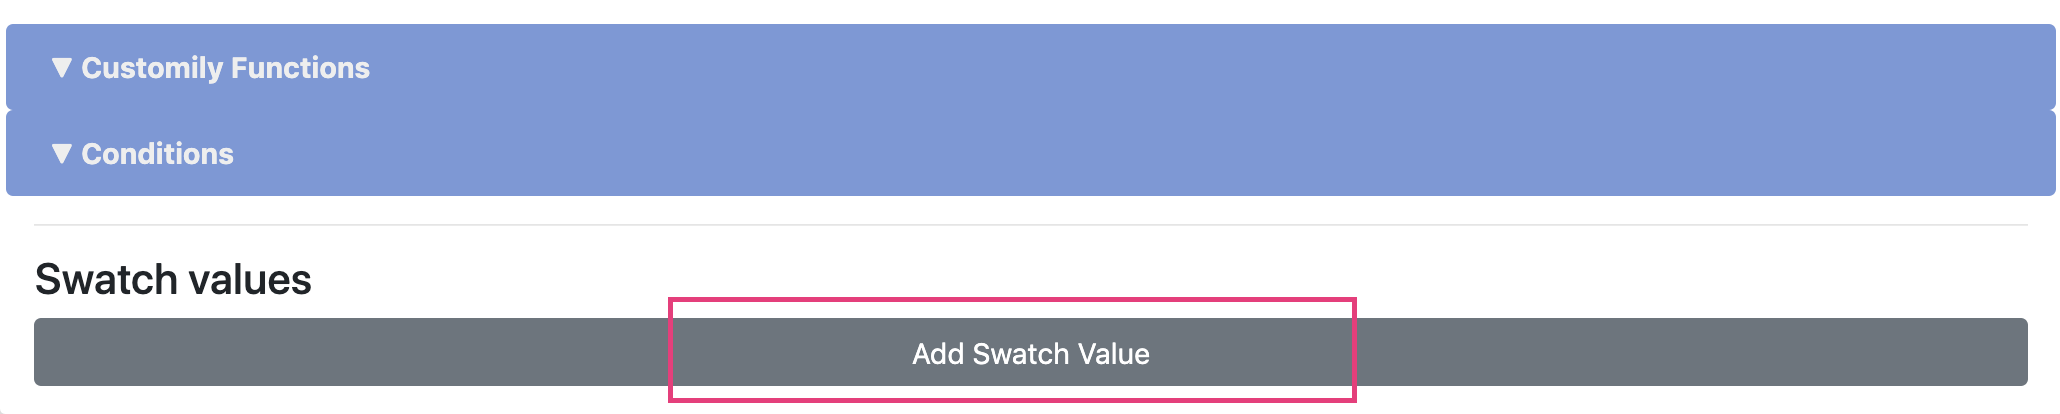
- Expand the newly added value by clicking on it 
- Give it a Value Name. This is how the value will be displayed on the option details, the value name will not be visible for customers. 
▶ How to use Customily with configurable products
Configurable products are a native functionality from Magento.
To learn how to create configurable products you can follow this great
tutorial by Magento:
Attributes that are compatible with Customily, and that will work with the
preview are:
Dropdown
An option where customers can choose a value from an expandable list. It can
be used to select fonts, colors, styles, and almost anything!
Swatches
An option where customers can choose a value from a series of icons. It can be
used to select fonts, colors, styles, and almost anything!
Similar to the dropdown, but with much more visual feedback.
Adding Customily functions to the Configurable Product's attributes
- Create a configurable product, with all its attributes and
child products (simple products associated with the configurable one).
- Under the general information of the product, scroll to the end to find
the Product Customization Id and assign the Template ID of the preview
you'd like to load by default on that product. Turn Enable Customization
to Yes
- Save the changes by clicking Save on the top right corner
- Once the product is saved, scroll back to the end of the General
Information section, to find the “Attributes Options” field. Click Edit to
assign Customily Functions to the attributes.
- A dialog will appear with all the attributes from the configurable
product. Click and expand each attribute to add a Customily Function to
it. This will connect the attribute with the dynamic behavior on the preview.
- Click Add Function
- Select a Customily Function from the menu
Functions are the actions that the option will trigger on the preview.
Function types available are:
Change Font Type
Executes the change of font in a text.
Learn more about font type function
Change Text Color
Executes the change of color in a text.
Learn more about text color function
Change Dynamic Image
Executes the change of a dynamic image in the preview. This can be many things
depending on the dynamic image, like the color of the product, pattern, icons,
etc.
Learn more about dynamic image function
Change Dynamic Vector
Executes the change of a dynamic vector in the preview. This can be many
things depending on the dynamic vector, like icons, patches, designs, etc.
Learn more about dynamic vector function
Change Vector Color
Executes the change of color in a vector element.
Learn more about vector color function
Change Image Color
Executes the change of color in an image uploaded by a customer.
Learn more about image color function
Change Product
Executes a change in the assigned Customily Template ID. This is used to load
a different preview template on the product.
Learn more about change product function
- Enter the Personalizable Element ID to connect the function with a
specific element from the preview. This is the Unique ID of the
element that was created on your template (for example text elements, dynamic images, image placeholders, etc.)
- If necessary, add the option's position, or Template ID for each attribute
value.
💡 Tip:
You can add as many functions as you like to an attribute. This is useful if
you want the attribute to change several things at a time, for example the
colors or fonts of various elements on the preview.
- Repeat these steps by expanding all the attributes, to add the functions
to them. Once you are done click Save on the top right corner to close the
dialog.
- When you are back on the product configuration page, click Save on
the top right corner, to save the entire product.
Adding Customizable Options to a configurable product
Configurable products can also have Customizable Options. These need to be
added directly to the configurable product (the parent product).
To learn how to add options to your product you can follow this great tutorial
by Magento:
Once you have the options added, you can link them with Customily.
Watch out:
A warning sign from Magento will appear when you try to add a customizable
option on a configurable product. It reads:
**"Custom options with price type "percent" is not available for configurable
product."**
Don't mind this message! You can add the customizable options without any
trouble, so just ignore it 🙂
▶ Step 2: Connecting previews to your Magento 2 products
Follow these steps to connect a preview template with your Magento products.
Link a preview to your Magento product
- Open the Magento product you'd like to add a preview to.
- Under the general information of the product, scroll to the end to find
the Product Customization Id
- Assign the Template ID of the preview you'd like to load by default on that product, and
turn Enable Customization to Yes
##
Give the product's customizable options the dynamic behavior
- Scroll to the customizable options section of your product. If you
haven’t assigned customizable options to your product yet, you can learn how
to do that here.
- Click and expand each option to add a Customily Function to it. This
will connect the option with the dynamic behavior on the preview.
- Select a Customily Function from the menu
Functions are the actions that the option will trigger on the preview.
Function types available are:
Change Text
Executes the action of adding text on the preview.
It is used mostly with text inputs, but it can also be used with dropdowns or
swatches if you want to type predefined text.
Learn more about text function
Change Font
Executes the change of font in a text.
It is used with dropdowns and swatches.
Learn more about font type function
Change Font Color
Executes the change of color in a text.
It is used with dropdowns and swatches.
Learn more about text color function
Change Dynamic Image
Executes the change of a dynamic image in the preview. This can be many things
depending on the dynamic image, like the color of the product, pattern, icons,
etc.
It is used with dropdowns and swatches.
Learn more about dynamic image function
Change Dynamic Vector
Executes the change of a dynamic vector in the preview. This can be many
things depending on the dynamic vector, like icons, patches, designs, etc.
It is used with dropdowns and swatches.
Learn more about dynamic vector function
Change Vector Color
Executes the change of color in a vector element.
It is used with dropdowns and swatches.
Learn more about vector color function
Image
Executes the upload of the customer's image into the preview.
It is used exclusively with the file upload option.
Learn more about upload image function
Change Image Color
Executes the change of color in an image uploaded by a customer.
It is used with dropdowns and swatches.
Learn more about image color function
Change Product
Executes a change in the assigned Customily Template ID. This is used to load
a different preview template on the product.
It is used with dropdowns and swatches.
Learn more about change product function
- Enter the Personalizable Element ID to connect the function with a
specific element from the preview. This is the Unique ID of the
element that was created on your template (for example text elements, dynamic images, image placeholders, etc.)
Keep in mind
If your option requires changing more than one element make sure all the
necessary function types are added to it
- Repeat these steps by expanding all the options, to add the functions to
all the options from the set.
- Once you are done click Save at the top of the screen.
▶ How to install the Magento 2 Customily extension
In order to install our extension, you should have received the zip file that
contains it
(The extension is installed like any other M2 extension distributed on a zip file).
If you haven't received the extension (after you subscribed) please contact
our support team
Customily extension is compatible with every Magento 2. X version.
▶ Access Customily Options for Walmart
Follow these steps to login to your Customily Options App:
- From your Customily Admin Panel, select Manage Options from the sidebar menu
💡 Tip:
To go back to managing your preview templates, click the back button on the
top left corner.
▶ Add zoom on hover to the previews
You can enable or disable zoom on hover for all your products on BigCommerce
by adding a simple script to your storefront configuration.
To enable zoom on hover on your preview
- Go to your Storefront menu on BigCommerce 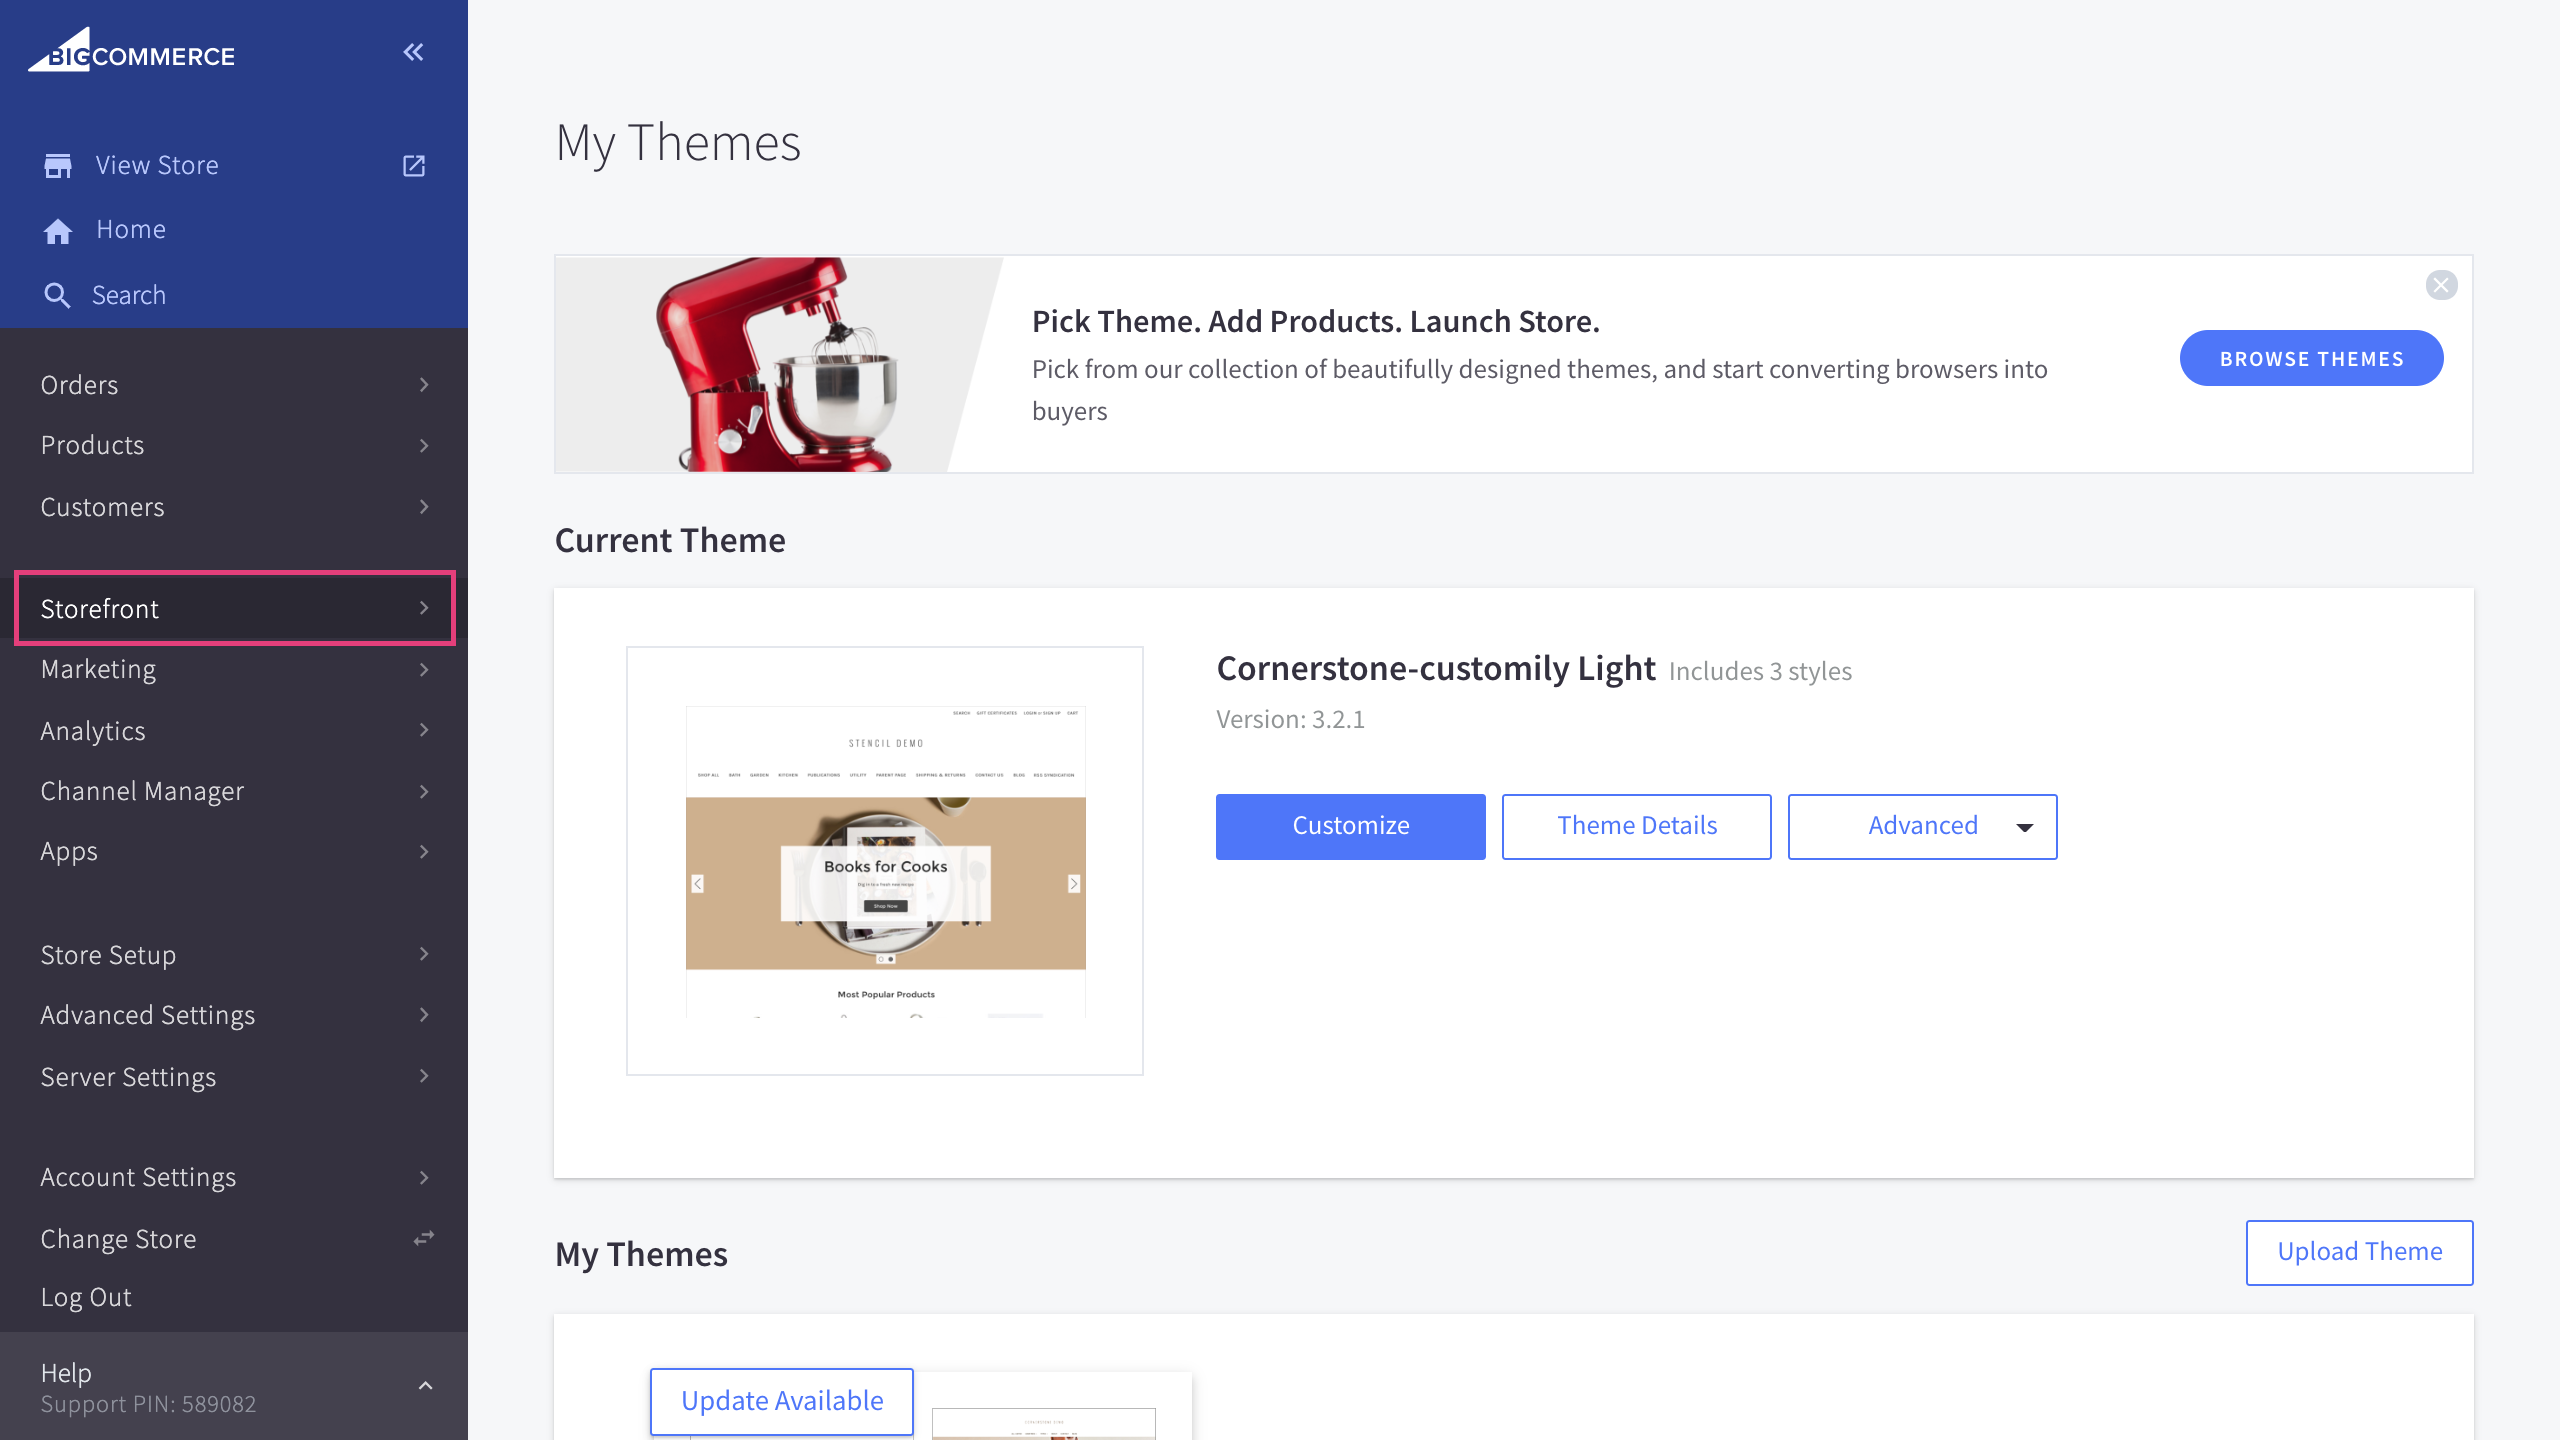
- Go to the Script Manager section 
- Click create a script 
- Name your script customily storefront options and copy the following configuration 
- Paste the following code in the script contents and save the script
Important:
This script enables and disables several features, such as zoom on hover,
uploaded images cover and sticky preview. To enable Zoom on hover, make sure
hoverZoom is set to true , like this:
**window.customily.hoverZoom = true;
To disable zoom on hover, instead set hoverZoom to false**.
▶ Connecting your Magento products with Customily
Connecting your Magento products with your Customily preview requires you to
follow 2 easy steps.
1. Adding Customizable Options to the product
Add Customizable Options to your products. This is done entirely on the
Magento side, so it's most likely you already know how to do this, and that
your products already have them!
But if they don't here's a summary of the different option types you can
create are:
- Text field
- Text area
- File upload
- Dropdowns
- Swatches - This is exclusive with Customily Options Extension!
2. Assigning previews to your Magento products
Connect your Magento product listing with the personalization template created on Customily's Admin Panel.
- * *
▶ What is Customily Options Extension for Magento 2
Customily Options is a Magento 2 Extension that provides you with the ability
to offer more dynamic versions of your products with different option
selections, connecting them with the templates created on Customily.
Here you can connect your Magento Customizable Options, with the preview so
any selection a customer makes will be reflected on the dynamic preview.
With Customily Options you can:
▶ Text input Option
Add a text input option to your option sets so customers can type their own
text on your products.
To add a text input option
- Create a new option set or edit an existing one
- Click Add option 
- Expand the newly added Option by clicking on it
- Select Text Input as option type 
- Configure the options parameters
Option Label
The title of the option that will appear on your product page.
Something like "Type your text", "Name", or "Add your personalization" are the
most used labels.
Help Text
A secondary text to give customers some extra information, tips or help.
It's a good place to guide customers on what they can type with an example, or
to let them know the maximum amount of characters they can type.
Placeholder
Example text that will appear on the text input as a reference.
It will not be written on the preview.
Whenever a customer starts typing, the placeholder will be deleted.
Max. Legth
The maximum amount of characters allowed in the text input. It will be
displayed as a counter next to the option's title.
Make it Textarea
Check this box if you want the input to have multiple lines. It will transform
a simple text input into a text area. The default number of lines for a text
area is 2, however, you can determine if it will have more on the parameter
below.
Textarea Max. number of lines
Maximum number of lines allowed on the text area. If empty, the default
maximum number of lines will be 2.
Required
The text input will be required to add the product to cart. This means the
customer will have to type something in it to be able to make a purchase.
If the customer leaves the text input empty, it will let them know so they can
fill it and add to cart properly.
An asterisk (*) next to the option's title indicates that the field is
required.
Hide visually
Check it if you want to hide the option from the product page. It is useful if
you want to have some predefined text on the preview you don't want customers
to change.
However, it is hardly used.
- * *
To assign a Customily Function to a text input option
Once you have defined your option, you need to add a Customily Function to it.
Customily Functions are the way we assign actions to the options. It tells the
option how to affect the preview. For example, in the case of text options, it
tells it what text will change on the preview when we type.
To assign a Customily Function:
- Expand the Customily Functions section by clicking on it.
- Click Add a Customily Function 
- Select the Customily Function you want to use 
Functions available for the text options are:
Text
This is the most commonly used function for text options. It tells the text
option that it should type something on a text element from the
preview.
Dynamic Image
This is used when you want the typed text to change some pre-set pictures on
the preview. It tells the text option that it should change positions on one
or more dynamic images from the preview.
A great example of the use of this function is when the text on the product
needs to displayed as pictures, as opposed to a regular text element with
font, color, etc. For example, if you are creating a charm necklace.
- Assign the Unique ID of the element that will work with that function
If you are not sure what the Unique ID for the element is, learn how to know the Unique ID of an element here.
- * *
To assign Conditions to a text input option
Conditions create rules that will show or hide an option based on the
customer's previous selections. With conditions you can, for example, show an
option only if another specific option is selected.
To assign Conditions:
- Expand the Conditions section by clicking it 
- Click Add Condition 
- Complete the condition's rules
- Select action Show / Hide
- When select option(the option that will generate the condition)
- is -> select a value from that option
- * *
Once you have finished configuring your text input, you can move on to adding
more options to the option set. If you are done with all the options just hit
save and go back to the main menu.
▶ Step 1: Adding Customizable Options in Magento 2
Option sets are a native functionality from Magento.
To learn how to add options to your product you can follow this great tutorial
by Magento:
Options that are compatible with Customily, and that will work with the
preview are:
Text field
An option where customers can type their own text.
Text area
An option where customers can type their own text in multiple lines
Dropdown
An option where customers can choose a value from an expandable list. It can
be used to select fonts, colors, styles, and almost anything!
Swatches - Exclusive with Customily Extension!
An option where customers can choose a value from a series of icons. It can be
used to select fonts, colors, styles, and almost anything!
Similar to the dropdown, but with much more visual feedback.
To add a Swatch you need to use Magento's Radio Button option
File upload field
An option where customers can click a button and upload their own image into
the product.
Checkbox
An option for customers to check the selection. Very useful if you want
customers to state they have read and verified their personalization.
▶ Add conditions to an option
Conditions create rules that will show or hide an option based on the
customer's previous selections. With conditions you can, for example, show an
option only if another specific option is selected.
Since BigCommerce doesn't have native conditions, it is not possible to add
them while creating the options set. However, you can add them later through
the Customily Options App, as we show here.
To assign a condition to an option
- Browse to the product, and to the option you want to add a condition to, click that option to expand it
- Scroll to the Conditions section and click Add Customily Condition 
- Complete the condition's rules
- Select action Show / Hide
- When select option(the option that will generate the condition)
- is -> select a value from that option

▶ Checkbox Option
Add a checkbox option to your option sets so customers can confirm their
personalization before adding to cart.

To add a checkbox option
- Create a new option set or edit an existing one
- Click Add option 
- Expand the newly added Option by clicking on it
- Select Checkbox as option type 
- Configure the options parameters
Option Label
The title of the option that will appear on your product page.
Something like "I confirm that....", is the most used label.

Help Text
A secondary text to give customers some extra information, tips or help.
It's a good place to make customers take a final look at their personalization
before confirming.
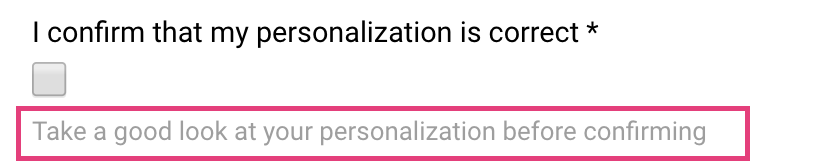
Required
The checkbox will be required to add the product to cart. This means the
customer will have to check it to be able to make a purchase.
If the customer leaves the checkbox unchecked, it will let them know so they
can fill it and add to cart properly.
An asterisk (*) next to the option's title indicates that the field is
required.

- * *
To assign a Customily Function to a text input option
Once you have defined your option, you need to add a Customily Function to it.
Customily Functions are the way we assign actions to the options. It tells the
option how to affect the preview.
However, since checkboxes are mostly used to confirm personalizations on the
preview, they don't usually have a function assigned to it.
To assign a Customily Function:
- Expand the Customily Functions section by clicking on it.
- Click Add a Customily Function 
- Select the Customily Function you want to use 
Functions available for the checkbox options are:
Text
This is the only function available for checkboxes. It is useful if you want
some pre-defined text to be applied to a text element on the
preview when customers check the box.
- Assign the Unique ID of the element that will work with that function

If you are not sure what the Unique ID for the element is, learn how to know the Unique ID of an element here.
- * *
To assign Conditions to a checkbox option
Conditions create rules that will show or hide an option based on the
customer's previous selections. With conditions you can, for example, show an
option only if another specific option is selected.
To assign Conditions:
- Expand the Conditions section by clicking it 
- Click Add Condition 
- Complete the condition's rules
- Select action Show / Hide
- When select option(the option that will generate the condition)
- is -> select a value from that option

- * *
Once you have finished configuring your checkbox, you can move on to adding
more options to the option set. If you are done with all the options just hit
save and go back to the main menu.
▶ What is Customily Options?
Customily Options is an App for Walmart that provides you with the ability to
offer more dynamic versions of your products with different option selections,
connecting them with the templates created on Customily.
You can display color swatches, offer multiple option selections and allow
customers to type their own text, all while showing a dynamic preview.
With Customily Options you can:
- Create option sets for your Walmart products
- Connect your Walmart products with preview templates
▶ Integrating Customily into any website.
This guide will show you how to embed Customily’s personalization tool into
your product pages using an iframe. This method is ideal if you’re using a
custom-built e-commerce platform or a platform without a native Customily
integration.
_If you are on a popular platform like Shopify, BigCommerce, Magento 2,
WooCommerce, or Walmart, please check the platform-specific documentation
instead.
_
There are 4 main steps to set up Customily via iframe:
- Generate a personalization URL in the Customily app.
- Embed an iframe on your product page with that URL.
- Capture the shopper’s personalization details.
- Generate the print file.
1) **Generate a Personalization URL
**
Personalization URLs are generated inside the Customily app:
- Go to app.customily.com → Store → Link
- Generate a URL for the product you want to personalize (as explained here).
A sample personalization URL looks like this:
_
2) Embed the iFrame on Your Product Page
To display Customily’s personalization module, embed the iframe where you want
it to appear:
<html>
<iframe src="https://preview-2.customily.com/productViewer?template=0313370a-e3d1-4b88-8640-f1027a78235d&set=53b7ddcc-880d-4303-a495-0338e1388ca2&shop=standalone.customily.com" width="100%" height="100%" >
</html>
Then replace the
src with the personalization URL you generated in Step 1.After embedding, shoppers will see the preview and option set on your
product page and will be able to customize and add the product to their cart.
2.a) **Optional: Allow Non-Technical Team Members to Manage
personalization URLs**
You can hardcode the personalization URLs into product pages, but we recommend
adding functionality that allows your team to manage them directly in your
admin panel.
For example:
- Add a new field in your Products table called
personalizationURL.
- Update your admin panel so team members can paste the generated URL for each product.
On the product page, load that field dynamically into the iframe:
<html>
<script>
window.onload = function(){
const iframe = document.getElementById('iframeHTML');
iframe.src = {{customilySrc}}
}
</script>
<iframe width="100%" height="100%" id="iframeHTML">
</html>
Here
customilySrc is a variable containing the personalization URL stored inyour database or injected on the product page.
3) Capture the shopper's entered personalization details.
When shoppers click Add to Cart inside the iframe:
- Shoppers should be redirected to your checkout to complete payment and shipping.
- Customily creates a record in your Order Dashboard.
You'll be able to obtain the personalization details by going to your Order
Dashboard (Store->Orders):
You'll see a list of all the records that were created after the shopper
clicked on "Add to Cart"
Clicking "Go to details" will show all the personalization details your
customer entered
👉 **Important:
** As you start receiveing more and more orders, you'd want to have a way to
connect each ecommerce order with it's personalization details. In order to do
so you'd have to capture the personalization details from the iFrame and store
that information in your database.
When the Add to Cart button is clicked, Customily sends the
personalizationGUID using parent.postMessage. Add this code to your pageto capture it:
window.addEventListener("message", function (event) { if (event.data.action === 'add-to-cart') { // Example: Save the personalization GUID along with your order number // saveOrderData(yourOrderNumber, event.data.personalizationGUID); } }, false);
Store
this
personalizationGUID as an attribute of your e-commerce order.Later, you can use it to retrieve the personalization details via the
Customily API as shown here.
4) Generate the print file
Once your shopper completed their checkout process you'd want Customily to
generate a print file for that order. In order to do so, you should call:
curl --location 'https://app.customily.com/api/standalone/item/generate'
--header 'Content-Type: application/json'
--header 'Authorization: ••••••' \
--data '{ "personalizationGUID": "3023CAAA-4AC7-42BA-98DB-25BE2CDF6ED1"}'
Once you call this endpoint you can navigate to the print file URL and
download it.
In this video, you'll see a summary of the items covered above
###
What's next?
Once everything is up and running, you may want to separate the preview from
the option set so you can position them independently within your product
page. This guide walks you through that more advanced configuration.
▶ Customily preview API
You can interact with Customily and add your own functionality on top of our
javascript preview API.
This API will let you use Customily's most popular functionalities such as
setting a personalization template on the
preview canvas, updating the preview, and generating production files based on the
preview.
Before getting started
If you plan to integrate our software into a custom e-commerce platform, we
recommend using the iframe method. This
documentation is intended for users that want to build their own
personalization logic from scratch or use some of Customily's features
programmatically.
If you are not familiar with Customily's admin panel, this video will be a
great introduction that will help you understand the building blocks that
you'll be using with our API.
API Introduction:
This video shows a basic example of how our API works on a simple HTML
website.
It's a good starting point if you are already familiar with Customily's admin
panel.
The HTML file used in this example can be obtained
Set up
To use Customily Javascript API just include our script and create an HTML canvas within a
div:
<script src="<https://app.customily.com/customily.js>"></script>
<div id="container">
<canvas id="preview-canvas">
</div>
This will create and give you access to the 'engraver' object.
API Reference
init(canvasId)
Initializes the engraver. This function must be always called first (before calling any other functions)
• parameter {String} canvasId: Canvas tag id to use
• return {Number} Returns 0 if initialization completed correctly, -1
otherwise
setProduct(templateGuid)
Loads the specified template from
Customily and displays it on the canvas
• parameter {String} templateGuid : Customily product guid
• return {Promise} Returns a promise when the product was successfully loaded
setText(textId,text)
Sets the string 'text' on the Customily's text placeholder textId
• parameter {Number} textId : Customily id for the text to be set
• parameter {String} text : String to set
• return {Number} Returns 0 if the text was successfully set, -1 if there was
some error
setFont(textId,fontOption)
Sets the font stored on fontOption on Customily's text placeholder textId
• parameter {Number} textId : Customily id for the font to be set
• parameter {Number} fontOption: Customily option number where the font was
stored
• return {Number} Returns 0 if the text was successfully set, -1 if there was
some error
setFontColor(textId,fontColorOption)
Sets the font color stored on fontColorOption on Customily's text placeholder
textId
• parameter {Number} textId : Customily id for the font to be set
• parameter {Number} fontColorOption: Customily option number where the font
• return {Number} Returns 0 if the text was successfully set, -1 if there was
some error
setImage(imageId,image)
Sets an image in the image placeholder imageId
• parameter {Number} imageId : Customily id of the image to set
• parameter {String} image: The image's base64 string or URL
• return {Promise} Returns a promise when the image was loaded on the preview
setPresetImage(imageId,imageOption)
Sets a Customily-stored image in the dynamic image placeholder imageId
• parameter {Number} imageId : Customily id of the dynamic image placeholder
• parameter {Number} imageOption: Customily option number where the image was
stored
• return {Promise} Returns a promise when the image was loaded on the preview
setVector(vectorId,vector)
Sets a vector in the vector placeholder vectorId
• parameter {Number} vectorId: Customily id of the vector placeholder
• parameter {String} vector: SVG string, URL to SVG file to download or
javascript File object for EPS, PDF or SVG file
• return {Promise} Returns a promise when the vector was loaded on the preview
exportFile(fileURL)
Generates the Production file for the current preview.
• return {Promise} Returns a promise with the URL to download the Production
file, -1 if you don't have your production file features enabled
getAvailableImageIds()
Gets the product metadata for image placeholders
• return {Array} Returns an array containing the id's for the image
placeholders (both regular image placeholders and dynamic images).
getAvailableTextIds();
Gets the product metadata for text placeholders
• return {Array} Returns an array containing the id's for the text
placeholders
▶ How does Customily work with Etsy?
The best way to use Customily with Etsy is to have your customer personalize
your product after they completed their checkout. The following video
shows how this process works:
▶ Connecting your templates with an option set (generating the personalization URL)
This tutorial explains how to create an option set for your product, and link
it with a personalization template to use in your store.
Before creating an option set and connecting it to a template, make sure you
created the template on app.customily.com. If you
are not sure how to create a template, you can check our tutorials for
template creation here.
To create an option set with Customily Options
- Go to the Manage Options section, by clicking it on the sidebar.
- Click on Option Sets button to view and manage your option sets
- Create or edit your option sets. In this case, we have created an option
set called “Phone Case Options” that has all the options the user can enter
for our Taupe Phone Case product.
💡 Tip:
To learn how to create an option set from scratch click
here.
To connect the option set with a preview template (get the iFrame link)
To generate the link for the iFrame to display on your product page, you'll
have connect the template created on
app.customily.com with the options set created
above. This connection will provide a link for you to use on the product page,
so customers can see the product options and the preview while browsing on
your store.
- Go to the Manage Options section, by clicking it on the sidebar.
- Go to the Link option
- Select the template you want to connect to a product in your store. This
list has all the product’s template you previously created on
app.customily.com
- Select the options set you want to use with this template.
- A dialog will appear with the link for the iFrame you'll need to load on
your store
- Copy this link since you'll need it to show the preview and options set
combination in your store.
▶ Access Customily for WooCommerce
Follow the steps to login to your Customily account through WooCommerce
- On WordPress go to WooCommerce > Customily
- Click to launch Customily **
**
▶ Creating option sets automatically with Manage Options
To create an option set automatically
- Open manage options
- Go to Option Sets
- Select create new option set from template
- Paste the template ID of the template you want to use to create the
options and give the options set a title. The title won't be visible for
customers, is just an internal title so you can easily locate that option set.
Example Text Font
This is the text that will be used to generate the font choice swatches. If
the example text is Abc, then the swatches will look like this:
- Once you have all the information in place click Save, and the options set
will be automatically created.
- When the options set is ready, you will see something like this.
Here you can edit the options set manually, if you want to change the titles,
or add extra information to the options such as help text, required, etc.
- Once you are done click Save Option Set to save it.
▶ Find personalization details for your order
To get the personalization details for your store orders, you will need to
search for the order in the Customily Options App with the personalization
GUID.
If you haven't implemented the personalization GUID and you don't see it on
your orders, you can learn how to capture it
here.
To find an order's personalization information
- Go to the Manage Options section, by clicking it on the sidebar.
- Select Orders to search an order
- Search for an order by using the personalization GUID.
- The personalization details will appear together with the order information.
**The personalization details include:
**
- Customily's Template ID
- Preview Image: The preview the customer was seeing when he made the purchase
- Production File: Only available when subscribed to Preview + Production Plans
- User Options: All the personalization options selected by the customer (this includes, text inputs, dropdowns, swatches, etc.)
📝 Note:
If the order has more than one element, all elements will appear in the
details cataloged as Line Items.
💡 Tip:
If you want to retrieve the personalization details via API, you should check
▶ Retrieving the personalization details via API
If you receive a lot of orders and you want to automate the personalization
details retrieval process, our API will come very handy. This example will use
postman so you can then port it to any language.
First of all, you'll need to obtain an access token by calling at the
following endpoint https://app.customily.com/api/token as shown below
(make sure you use the POST method)
You'll receive an access token (as the one shown below). You will use this
token to make authenticated requests to the
https://preview.customily.com/api/item endpoint.
Call the https://preview.customily.com/api/item endpoint, remember to
include the access token in the header request and the PONumber
(personalizationGUID) as a query
string parameter. Make sure to attach the string "Bearer" followed by the
accesstoken_ as shown in the screenshot below
It will return a JSON that has the following structure:
[ { "id": "05D74647-AE23-44FB-84CE-347307E523A8", "lineNumber": null, "productName": null, "sku": null, "quantity": 1, "productId": "0de16998-e3b4-4cc2-a939-833a590f5f1e", "previewUrl": "http://preview.customily.com/assets/previews/76d15c12-631d-4965-8f84-061d8dd9dd27.jpeg", "productionUrl": "https://cdn.customily.com/ExportFile/jbloom/a65f4484-f22c-4199-a755-fea837b5153a.ai", "optionsJson": "[{\"name\":\"Select Necklace color\",\"value\":\"Gold Stainless\",\"type\":\"Swatch\"},{\"name\":\"Enter text \",\"value\":\"Customily\",\"type\":\"Text Input\"}]", "createdDate": "2020-07-02T00:00:00.000Z" } ]
This is the interface where the client entered his personalization details.
The API response will contain all thepersonalization information (ignoring the fields lineNumber, productName, sku) the client entered plus the Customily
generated preview and production files
**
**id: Internal Customily Id unique to every line item,
lineNumber: null value,
productName: null value,
sku: null value,
quantity: The quantity ordered for the product.
product id: The Customily template id for the ordered product.
previewUrl: link to the preview picture containing the client's
personalization.
productionUrl: link to the production file containing the client's
personalization.
optionsJson: the options the client selected (form the product's option set).
createdDate: the date when the product was added to the cart.
You can download this postman example
▶ How to have your customers personalizing your orders via email
If you don't have an eCommerce platform or if you sell on a marketplace that
is not supported by Customily yet, you can always have your customers
personalizing your products by sending them an email after they've submitted
their orders.
After your client submitted an order and you want them to personalize the
product that they bought, you'll have to send them a personalization link via
email.
Before starting, you should know how to generate a personalization link in
Customily. This article shows how to generate personalization links for your
products.
In order to generate personalization links for orders that users have
already submitted to your store, you'll need to build a link that
combinesCustomily's personalization link and theorder number. The reason why
we include the order number in the link is so we can later **retrieve the
personalization details** your client entered based on that order number.
The structure of the link you are going to build will be the following:
Customily personalization link \+ "&order=" + Order number
For example, if you have:
Original personalization link:
And the order number is 12002220
Your combined link will be:
What if I have multiple items in the same order? (optional)
In that case, you can create a different link for each line item adding the
line item number at the end of the link.
The structure of the link you are going to build will be the following:
Customily personalization link + "&order=" + Order number + "" + Line item
number_
For example, if your combined link is:
The link you'll send for the first line item will be:
For the second:
And so on.
Pro Tip! (optional)
You can use a link shortener such as <https://bit.ly/> to transform a long
link like
into something short like <https://bit.ly/3cg65oV>
You'll send this "combined" link to your buyer and once they open the link,
they'll be able to personalize their product while seeing a live preview.
After they are done with the personalization, they need to click "Submit
personalization" to finish personalizing.
Once the personalization is submitted, you’ll be able to retrieve the
personalization details using the order number in Customily.
For more information on how to properly get the personalization details,
please read this article. Keep
in mind that in that articles' context the order number will be referred
to as **personalizationGUID**personalizationGUID_.
Important notice!
Take into account that as soon as the user personalizes the product and clicks
Submit, the link won't work anymore. In other words, it won't be possible for
someone else to use that link again. In case your client want's to change his
personalization, you can generate a link with a new personalization line item
number so and send it to them
▶ Change options styles
The way Customily Options are displayed depends on the type of option if it's
a text field, a swatch, a dropdown, etc.
To change Customily Options styles
- From your Customily Admin Panel, select Manage Options from the sidebar menu
- Click on settings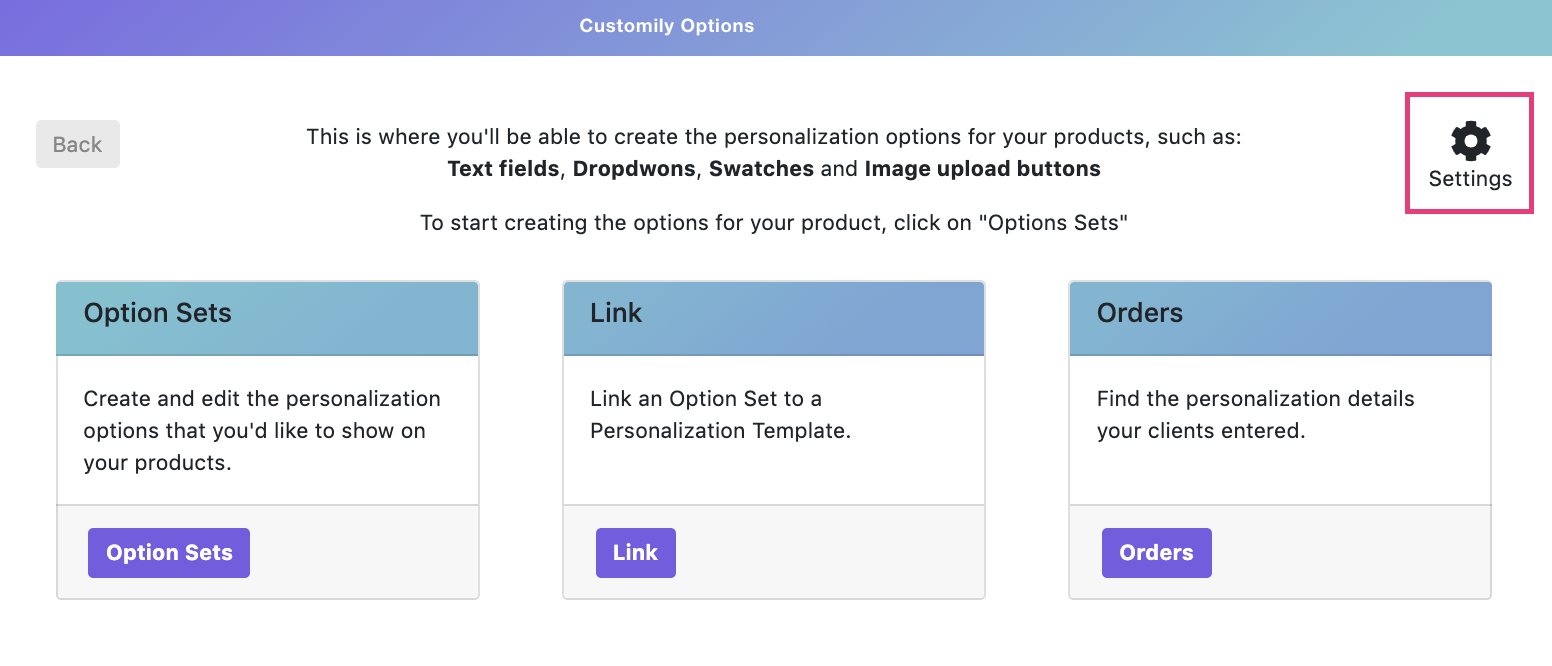
- Click on the styles tab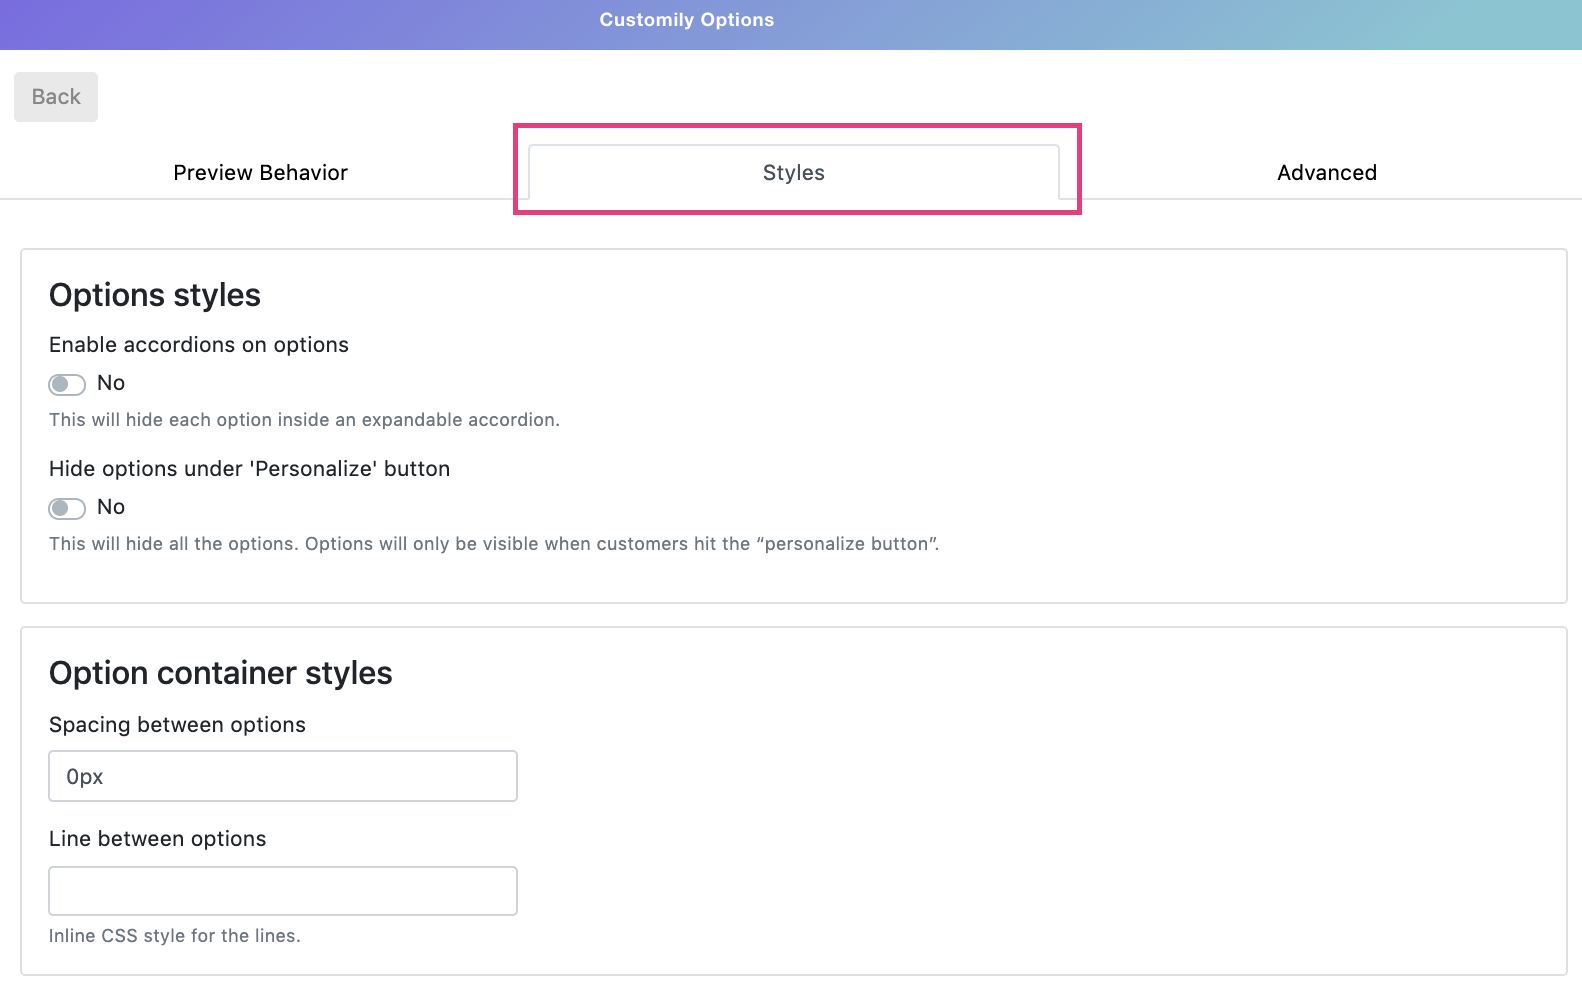
- There you'll find all the different styles you can edit for the different Customily Options. The styles you can edit are:
Style | What does it change?
---|---
Enable accordions on options | This will hide each option inside an expandable accordion.
Hide options under 'Personalize' button | This will hide all the options. Options will only be visible when customers hit the “personalize button”.
Spacing between options | Determine how many space there is between options
Line between options | Add a line between each option
Change swatch shape | Choose from square, round or rounded square swatches
Change swatch size | Choose from small, medium and big swatches
Required message styles | Change the wording from the required text, and the text color
▶ Access Customily for Shopify
Follow these steps to login to your Customily Account through Shopify:
- From your Shopify Admin, select Apps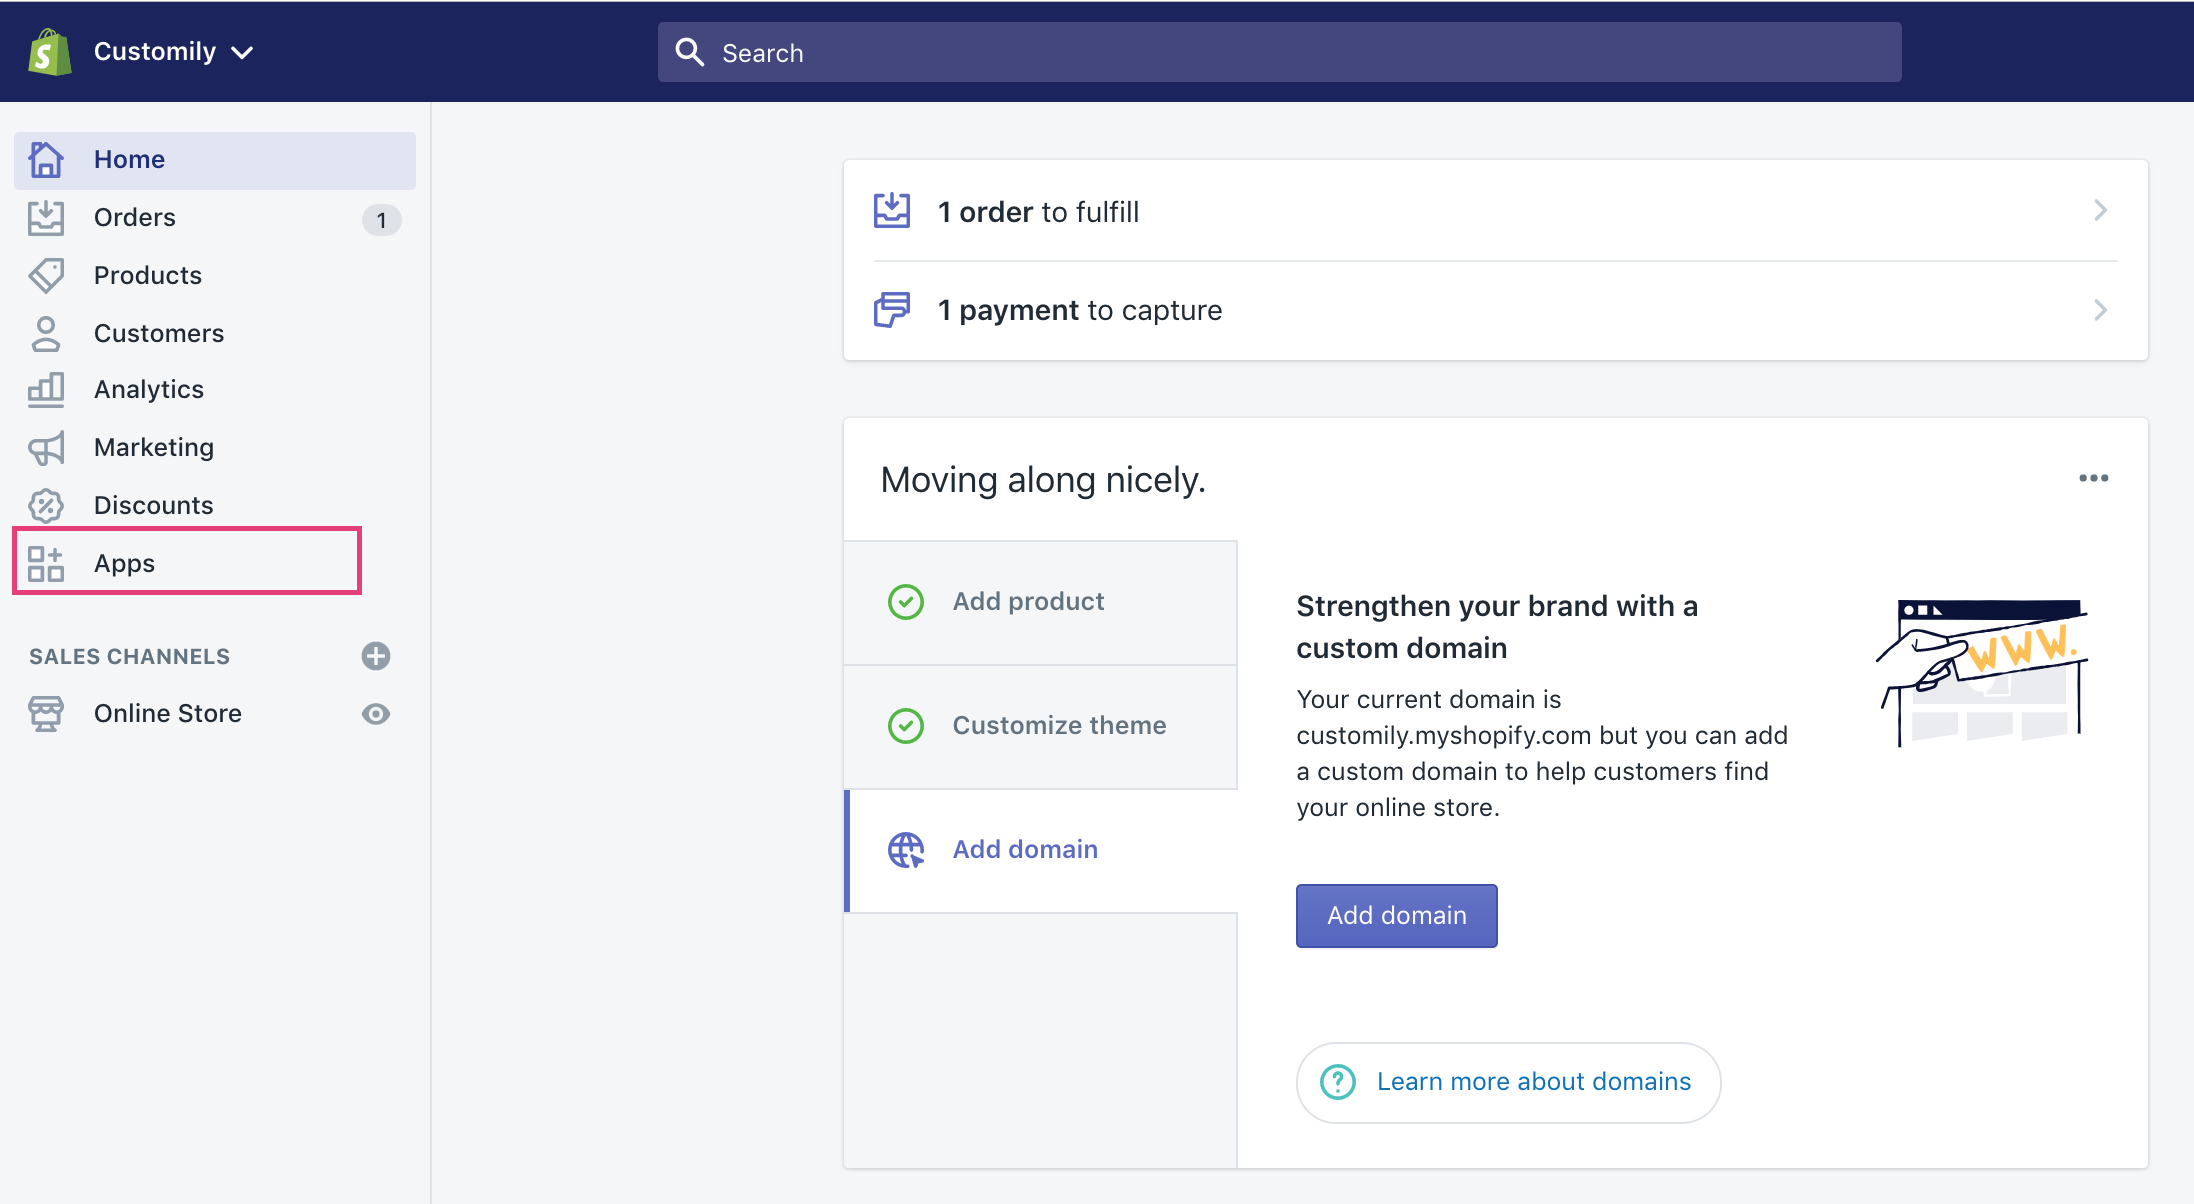
- From your App list select Customily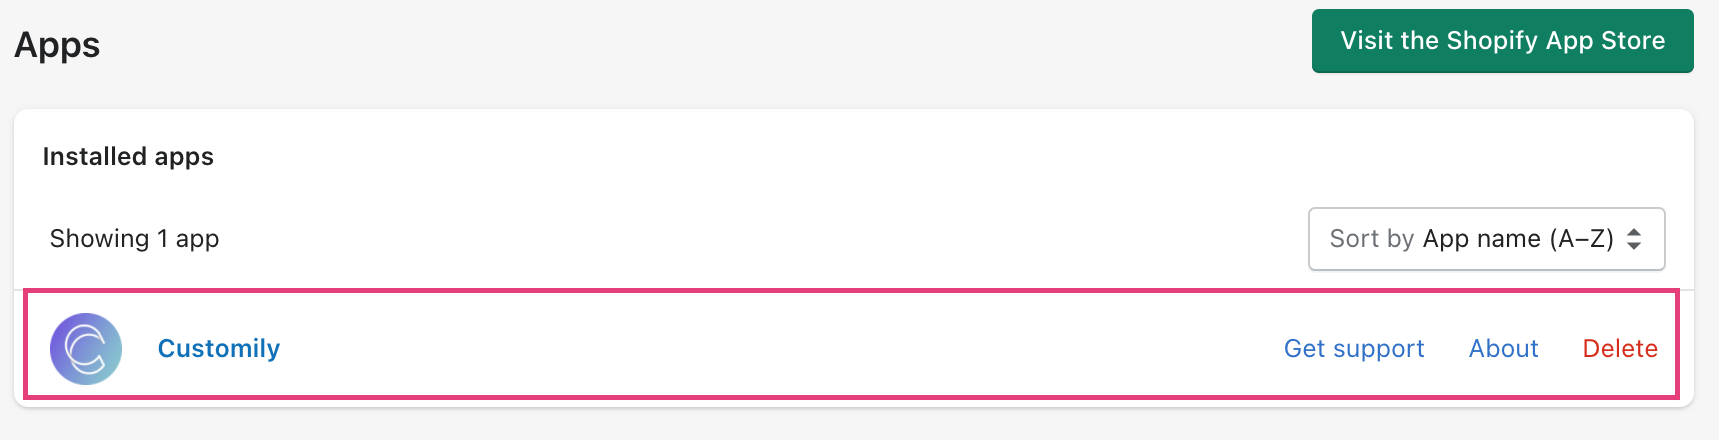
▶ Add your own Javascript code to the product personalization page
If you want to add or change the existing behavior of the product
personalization page you can do it by entering your own javascript code as
follows:
- From your Customily Admin Panel, select Manage Options from the
sidebar menu
- Click on settings
- Open the advanced tab and enter your javascript code in the**"Custom
javascript"** field
Be careful
If you are not familiar with Javascript, we recommend you find someone to help
you. Adding JS code without knowing how can result in breaking the basic
functionality of the product personalization page
▶ Installing Customily Options
To install Customily Options 2.0 get in touch with our team, and they will
provide you the link for the installation.
Once you have the link, follow these instructions:
- Open the link provided by our team.
- Click **Add App
**
- If you are not logged in already, then log in to your Shopify account and add the URL of the store where you'd like to add the app.
📝 Note:
Customily Options will work with any theme you use on your store. So don't
worry if you install the app and then want to switch themes, it won't affect
your installation at all!
▶ Change options styles with CSS
If you want to add advanced styles to change the way options are displayed,
you can do that by adding custom CSS.
To change Customily Options styles through CSS
- From your Customily Admin Panel, select Manage Options from the sidebar menu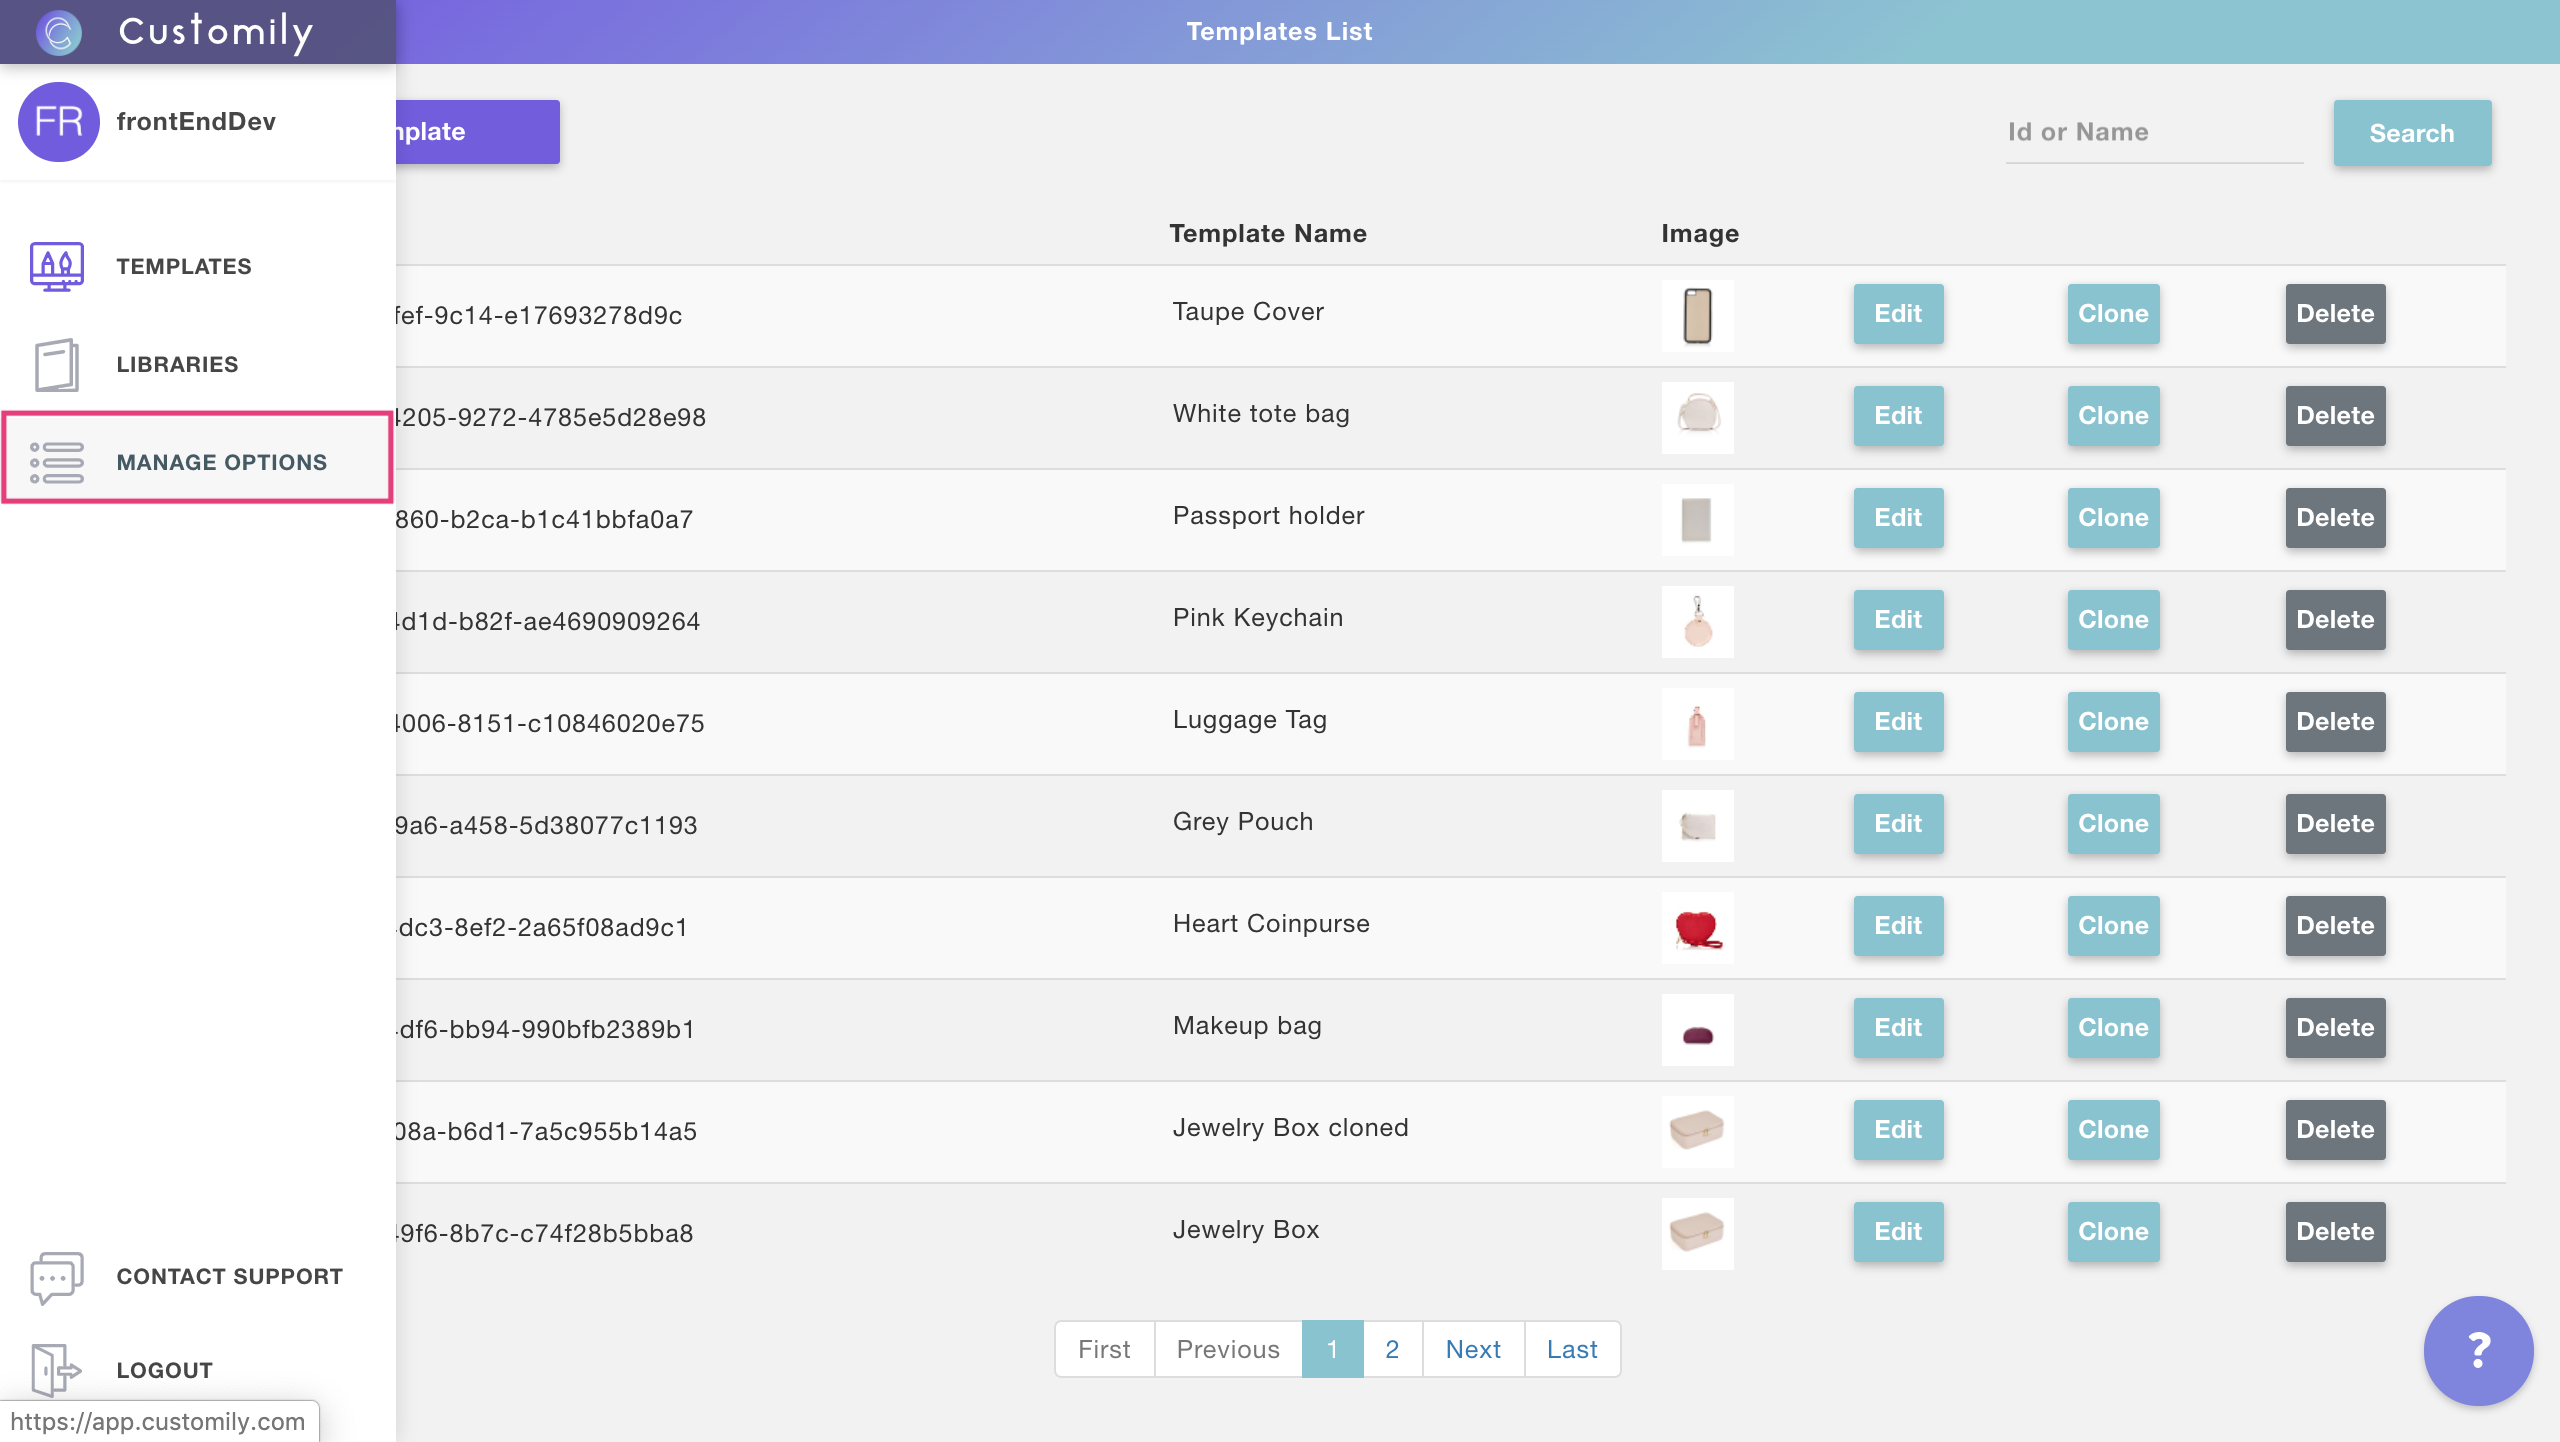
- Click on settings
- Open the advanced tab 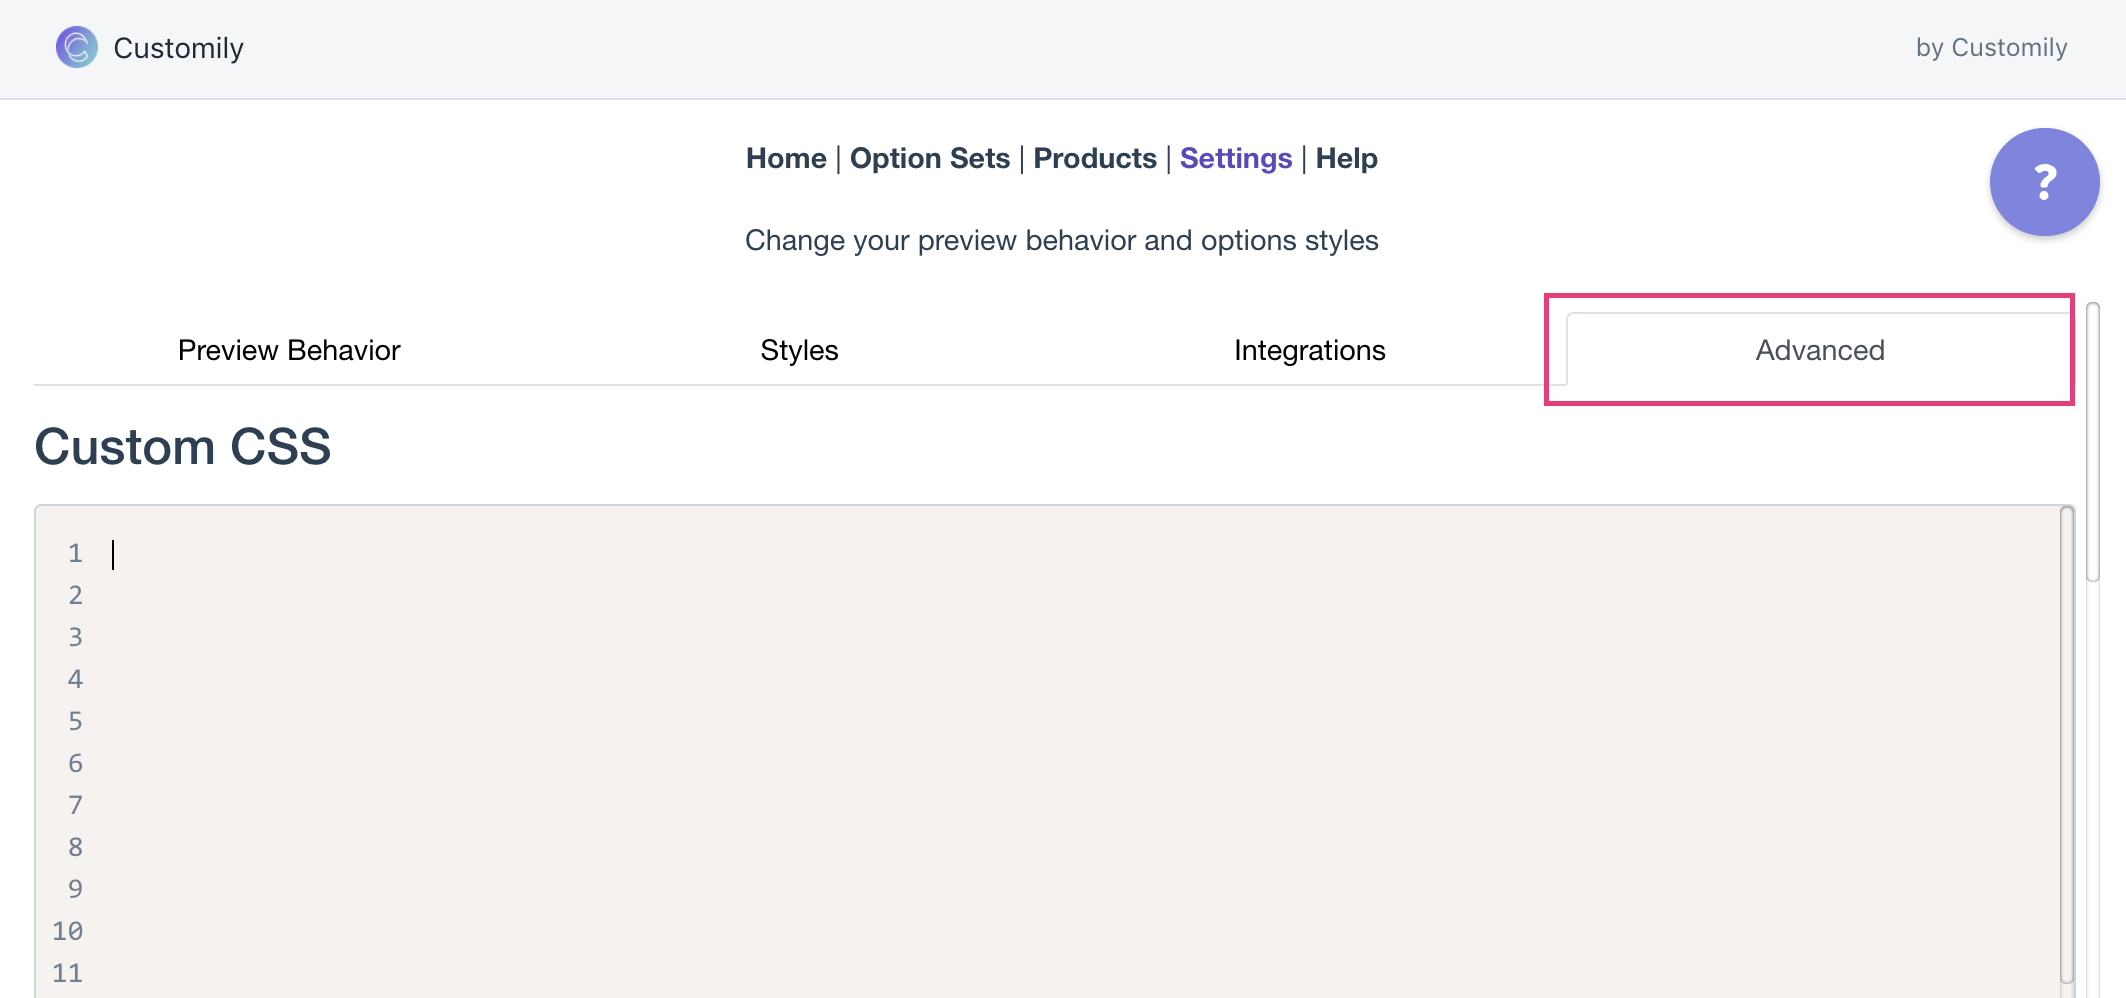
- Type in any custom CSS you would like to add.
Be careful
If you are not familiar with CSS, we recommend you find someone to help you
adjust the styles of your options. Changing styles without knowing how can
result in breaking the layout of your product page.
CSS Classes of Customily Options
Use these class selectors to identify the different type of options and their
elements
Element | Class selectors
---|---
Text Input | #cloptionsapp .customilyoption input
Drodpown | #cloptionsapp .customilyoption select
Swatch | #cloptionsapp .swatch-container .swatch #cloptionsapp .swatch-container label #cl_optionsapp .swatch-container label img
Image upload button | #cl_optionsapp .customily-download-button
Remove uploaded photo button | .cl_remove-image
Option Labels | #cloptionsapp .customilyoption label
Help Text | #cl_optionsapp .help-text
Photo size limit text | .cl_image-invalid-size
Required message | #customily-required-after-label
▶ How to know your Etsy Shop name
To integrate Customily with your Etsy shop, we need to know your Etsy Shop
name. Your Shop Name is part of your Etsy Shop URL, so you can share either of
them with our team.
If you are not sure how to get it, here are easy instructions:
- Log into your Etsy account
- Go to Shop Manager
- On the left menu, find Sales Channels and click on your store
- Once you are on your store's home page, you'll see your shop name and
store's URL.
##
▶ Connect your Etsy store with Customily
How to link your Etsy store to Customily
- Open your Customily Account
- On the left menu, go to Store orStart(the rocket ship!)**
**
TIP \- If you have more than one store in your account, make sure you
select your Etsy store in the dropdown that's in the top left corner.
- Click on Connect Customily on the Etsy store

- This will open a new tab with your Etsy account. If you are not logged in,
you will be asked to log in to your Etsy account.
- Once you are signed in, it will let you know that **an application would
like to connect to your account**. Scroll to the bottom of the notice and
allow access.
- You'll be redirected to Customily, and the connection is complete! Now
it's time to connect your Etsy products with your Customily templates and
designs.
If you want to check if everything is connected correctly, you can go to your
Etsy store Settings > Advanced, and you'll see your store's name highlighted
in green.
▶ Where to find your user credentials on Walmart
##
Log in to your Walmart Supplier Center to find the information you need to
link Customily with your store. Follow the next steps to find the different
information needed: Consumer ID, Private Key, Distributor ID
Consumer ID
- Go to the settings menu and select API Credentials
- Copy your consumer ID from the box
Private Key
You should be in possession of your Private Key since this is a configuration
that is not visible or accessible through the supplier center. If you can't
find it ask around to your colleagues, probably someone stored it safely for
future use.
However, if you can't find your Private Key, or if you don't have one, you can
generate a new one
Warning
Don't generate a new Private Key if you have one already in use!
Generating a new Private Key will make the old one obsolete, and all
connections you had made using that Private Key will be lost.
To generate a new private key:
- Go to the settings menu and select API Credentials
- Copy your Private Key from the box and store it in a safe place. Once
you leave that page you won't be able to see your Private Key anymore, so make
sure you store it somewhere!
Distributor ID
- Go to the settings menu and select **Distribution Facility
** 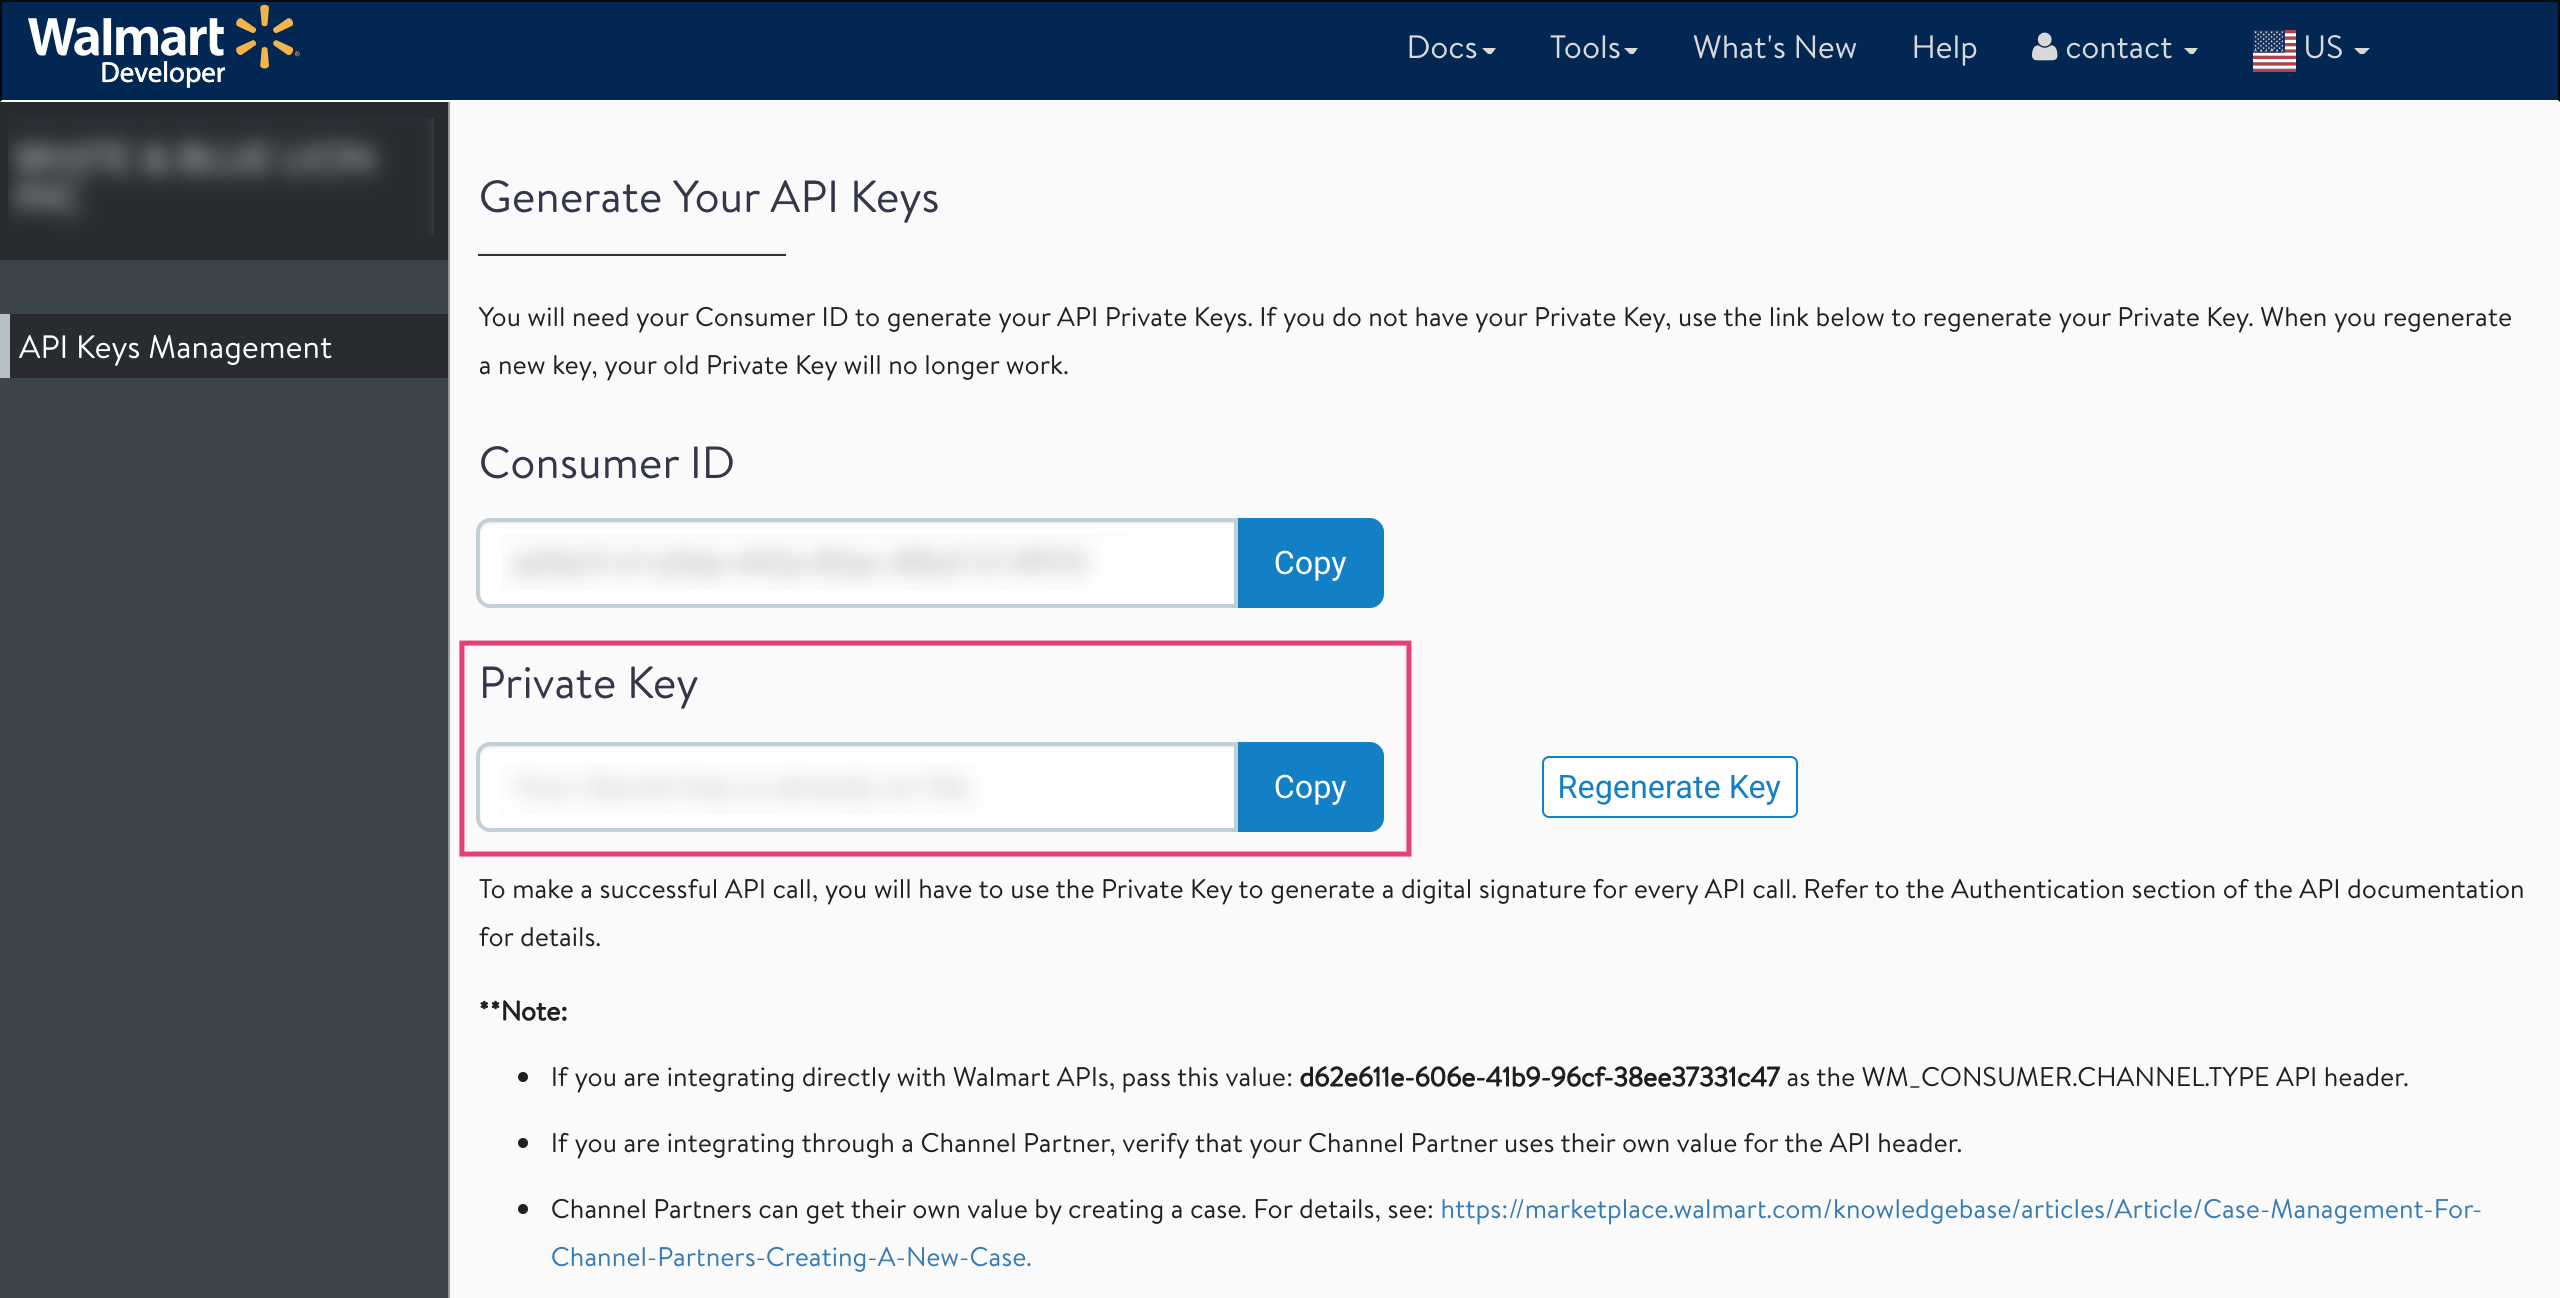
- Choose the distribution center you want to work with, and copy the
**Distributor ID
** 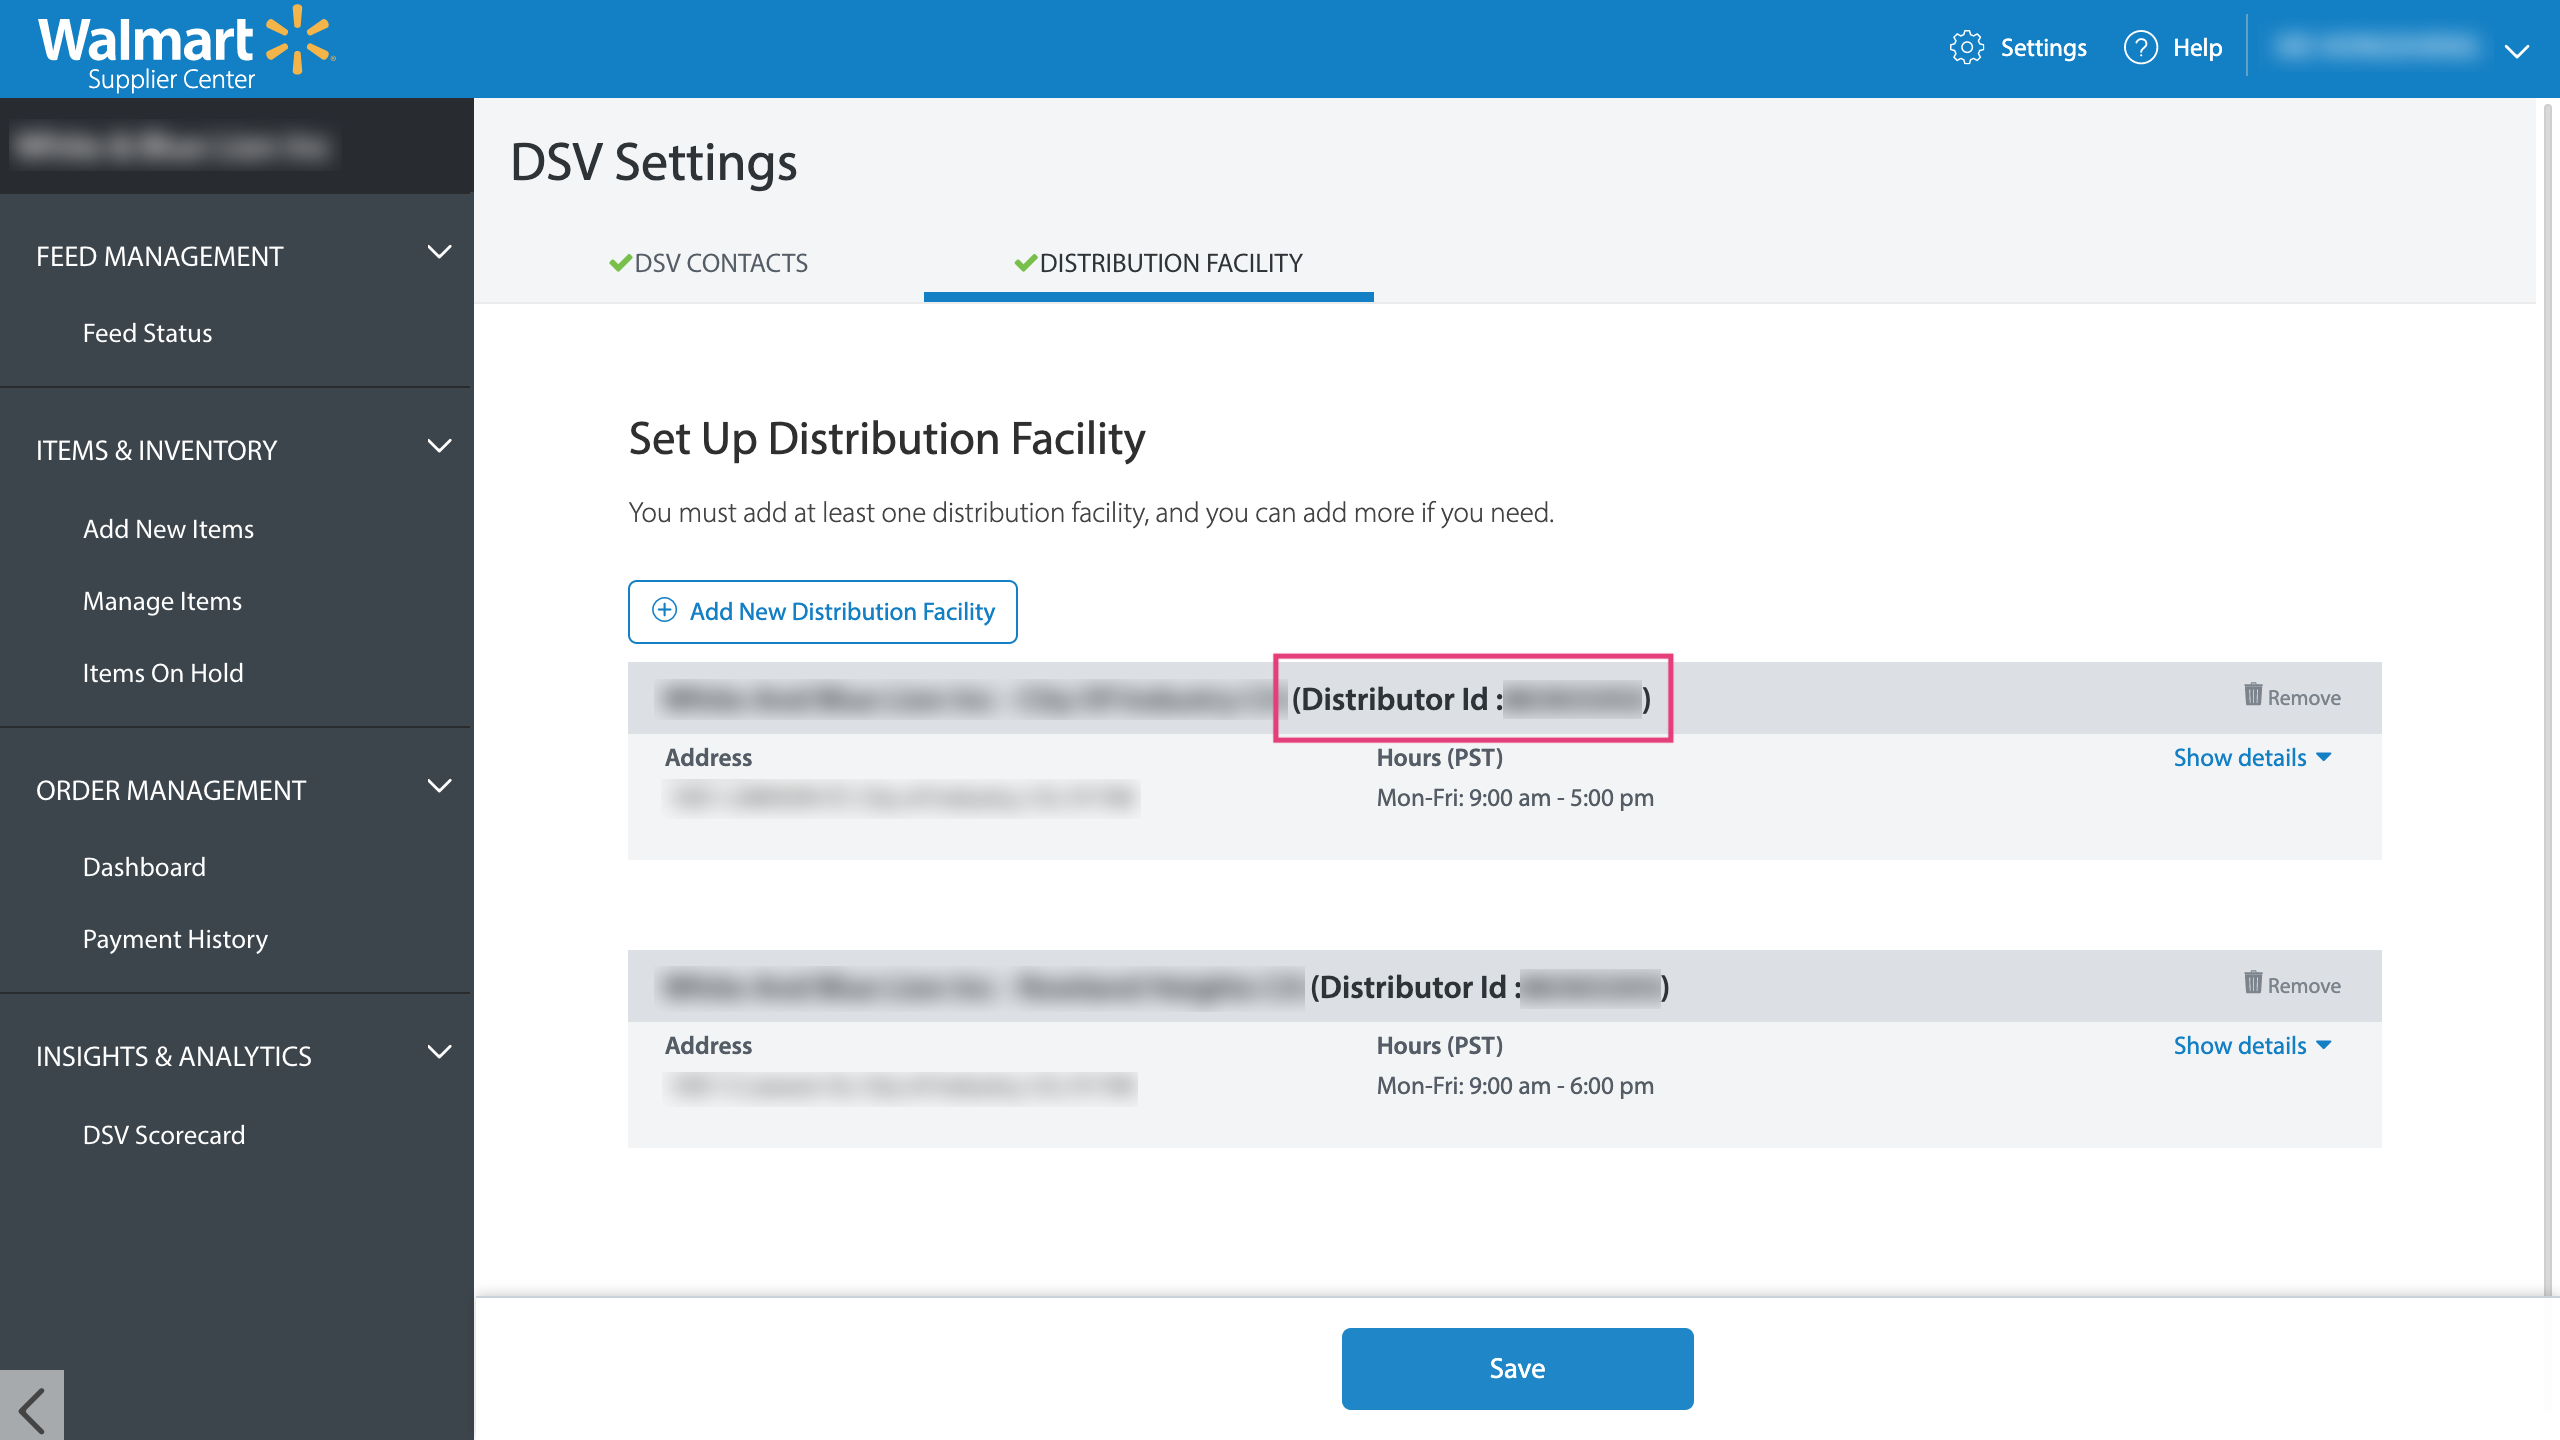
▶ How to re-connect your Etsy store
When making changes to your Etsy account (like changing your password, or username) Etsy resets all your access keys, so connection with Customily can
be lost.
When this happens, we will ask you to reconnect your Etsy store with
Customily. Follow this easy steps to avoid any service interruptions due to
lost connections.
- Open your Customily Account
- On the left menu go to Store
- Open Settings on the top menu
Tip
If you have more than one store in your account, make sure you select your
Etsy store in the dropdown that's in the top left corner.
- Open the Advanced Tab
- Click reconnect to Etsy !Screenshot 2023-08-22 at 12.09.30 PM.png
- This will open a new tab with your Etsy account. If you are not logged in, you will be asked to log in to your Etsy account.
- Once you are signed in, it will let you know that an application would like to connect to your account. Scroll to the bottom of the notice and allow access. !Screenshot
- You'll be redirected to Customily, and the connection is complete!
▶ Connect your Amazon store with Customily
How to link your Amazon store to Customily
- Open your Customily Account
- On the left menu, go to Store orStart(the rocket ship!)**
**
TIP \- If you have more than one store in your account, make sure you
select your Amazon store in the dropdown that's in the top left corner.
- Click on 'Install Customily on Amazon ' according to your store's
region
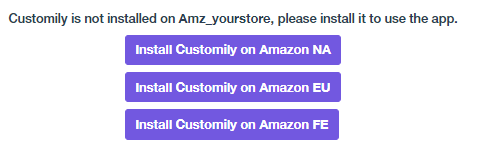
- This will open a new tab with your Amazon account. If you are not logged
in, you will be asked to log in to your Amazon account.
- You'll be redirected to Customily, and the connection will be complete!
Now it's time to Sync Products from Customily with your Amazon listings.
Note \- This action will generate an 'Inventory Report' in Amazon, and
once it is ready, Customily will read the report. It can take several minutes,
depending on the number of listings in the report.
▶ Retrieving the personalization details via API - V2
If you receive a large number of orders and want to **automate the process of
retrieving personalization details** , our API will be very useful.
In this example, we’ll use **Postman**, but you can
easily adapt the same steps to any programming language.
First, you’ll need to obtain an access token by sending a POST request
to the following endpoint:
https://app.customily.com/api/token:You'll receive an access token (as the one shown below). You will use this
token to make authenticated requests to the
https://sh.customily.com/api/standalone/item/ endpoint:
Call the following endpoint:
https://sh.customily.com/api/standalone/item/Remember to include:
- The access token in the request header (with the prefix
"Bearer").
- The PONumber (
personalizationGUID)and the shop (shop url) as query string parameters.
Example request:
https://sh.customily.com/api/standalone/item/8a975ffd-451f-499f-89fb-74c6e1736fb3&shop=yourstore.com
Postman example:
It will return a JSON that has the following structure:
{
"id": "05D74647-AE23-44FB-84CE-347307E523A8",
"clientId": "41201",
"quantity": "1",
"productId": "0de16998-e3b4-4cc2-a939-833a590f5f1e",
"previewUrl": "http://preview.customily.com/assets/previews/76d15c12-631d-4965-8f84-061d8dd9dd27.jpeg",
"productionUrl": "https://cdn.customily.com/ExportFile/jbloom/a65f4484-f22c-4199-a755-fea837b5153a.ai",
"optionsJson": "[{\"name\":\"Select Necklace color\",\"value\":\"Gold Stainless\",\"type\":\"Swatch\"},{\"name\":\"Enter text\",\"value\":\"Customily\",\"type\":\"Text Input\"}]",
"orderElement": "1234",
"orderId": null,
"orderItemId": "0",
"exportedFiles": [ { "url": "https://cdn.customily.com/ExportFile/user/a65f4484-f22c-4199-a755-fea837b5153a.ai", "epsId": 1, "podPlaceholder": null, "personalizationId": "05D74647-AE23-44FB-84CE-347307E523A8" } ],
"createdDate": "2020-07-02T00:00:00.000Z"
}
This is the interface where the client entered his personalization details.
The API response includes all the personalization details entered by the
client, along with the Customily-generated preview and production files.
Field descriptions:
- id: Internal Customily ID, unique for each line item.
- clientId: Identifier for the client or store.
- quantity: The quantity ordered for the product.
- productId: The Customily template ID for the ordered product.
- previewUrl: Link to the preview image showing the client’s personalization.
- productionUrl: Link to the production file containing the client’s personalization.
- optionsJson: The options the client selected (from the product’s option set).
- orderElement: Identifier for the order line within the client’s system.
- orderId: The ID of the order associated with the item (may be null).
- orderItemId: The internal identifier for the ordered item.
- exportedFiles: A list of generated production files, including file URLs and related metadata.
- createdDate: The date when the personalized product was created.
You can download this postman example
If the order was submitted with an order number , you can also retrieve
all items belonging to that order by calling:
https://sh.customily.com/api/standalone/item?shop=yourstore.com&orderId=1234
It will return a JSON that has the following structure:
[ { "id": "8a975ffd-451f-499f-89fb-74c6e1736fb3", "clientId": "98544", "quantity": "1", "productId": "f2d36b61-c442-47f5-9b9a-6cf38bc60a36", "previewUrl": "https://cdn.customily.com/shopify/assetFiles/previews/customstore.com/b312bb15-e801-48de-a318-fc725a02d241.jpeg", "productionUrl": "https://cdn.customily.com/ExportFile/user/594a4eab-0eba-4225-b4bc-0d44365f61c3.png", "optionsJson": "[{\"sort_id\":1,\"name\":\"Upload your photo\",\"value\":\"https://cdn.customily.com/js-lib-temp-images/4c9b9cf3-5d6e-4b31-8cb0-b5c56d04b18a/1-d89702b2-b47f-406b-b79b-1e06defda291-1756312363032.jpeg\",\"type\":\"Image Upload\"}]", "orderElement": "1234", "orderId": null, "orderItemId": "0", "exportedFiles": [ { "url": "https://cdn.customily.com/ExportFile/user/594a4eab-0eba-4225-b4bc-0d44365f61c3.png", "epsId": 1, "podPlaceholder": null, "personalizationId": "92d6e164-28c3-47cc-bb63-4851e9aa933b" } ], "createdDate": "2025-08-27T16:33:49.951Z" } ]
- Author:EcomGrace
- URL:http://ecomgrace.com/article/2d935142-581f-81ea-b9f9-d4cfd5aaca73
- Copyright:All articles in this blog, except for special statements, adopt BY-NC-SA agreement. Please indicate the source!